
The i3WHITEBOARD Tool menu
On this page:
Tool menu

On the i3WHITEBOARD you’ll find several tools to work with, divided into three sections.
These sections are:
the Main tool menu, which can be activated by finger touch
the VR tool menu is available if activated in the Settings menu.
the (physical) Pen tool menu, for displays that come with physical pens
If i3WHITEBOARD Pen preferences are set in Basic Mode, both finger and pen can access the Main tool menu.
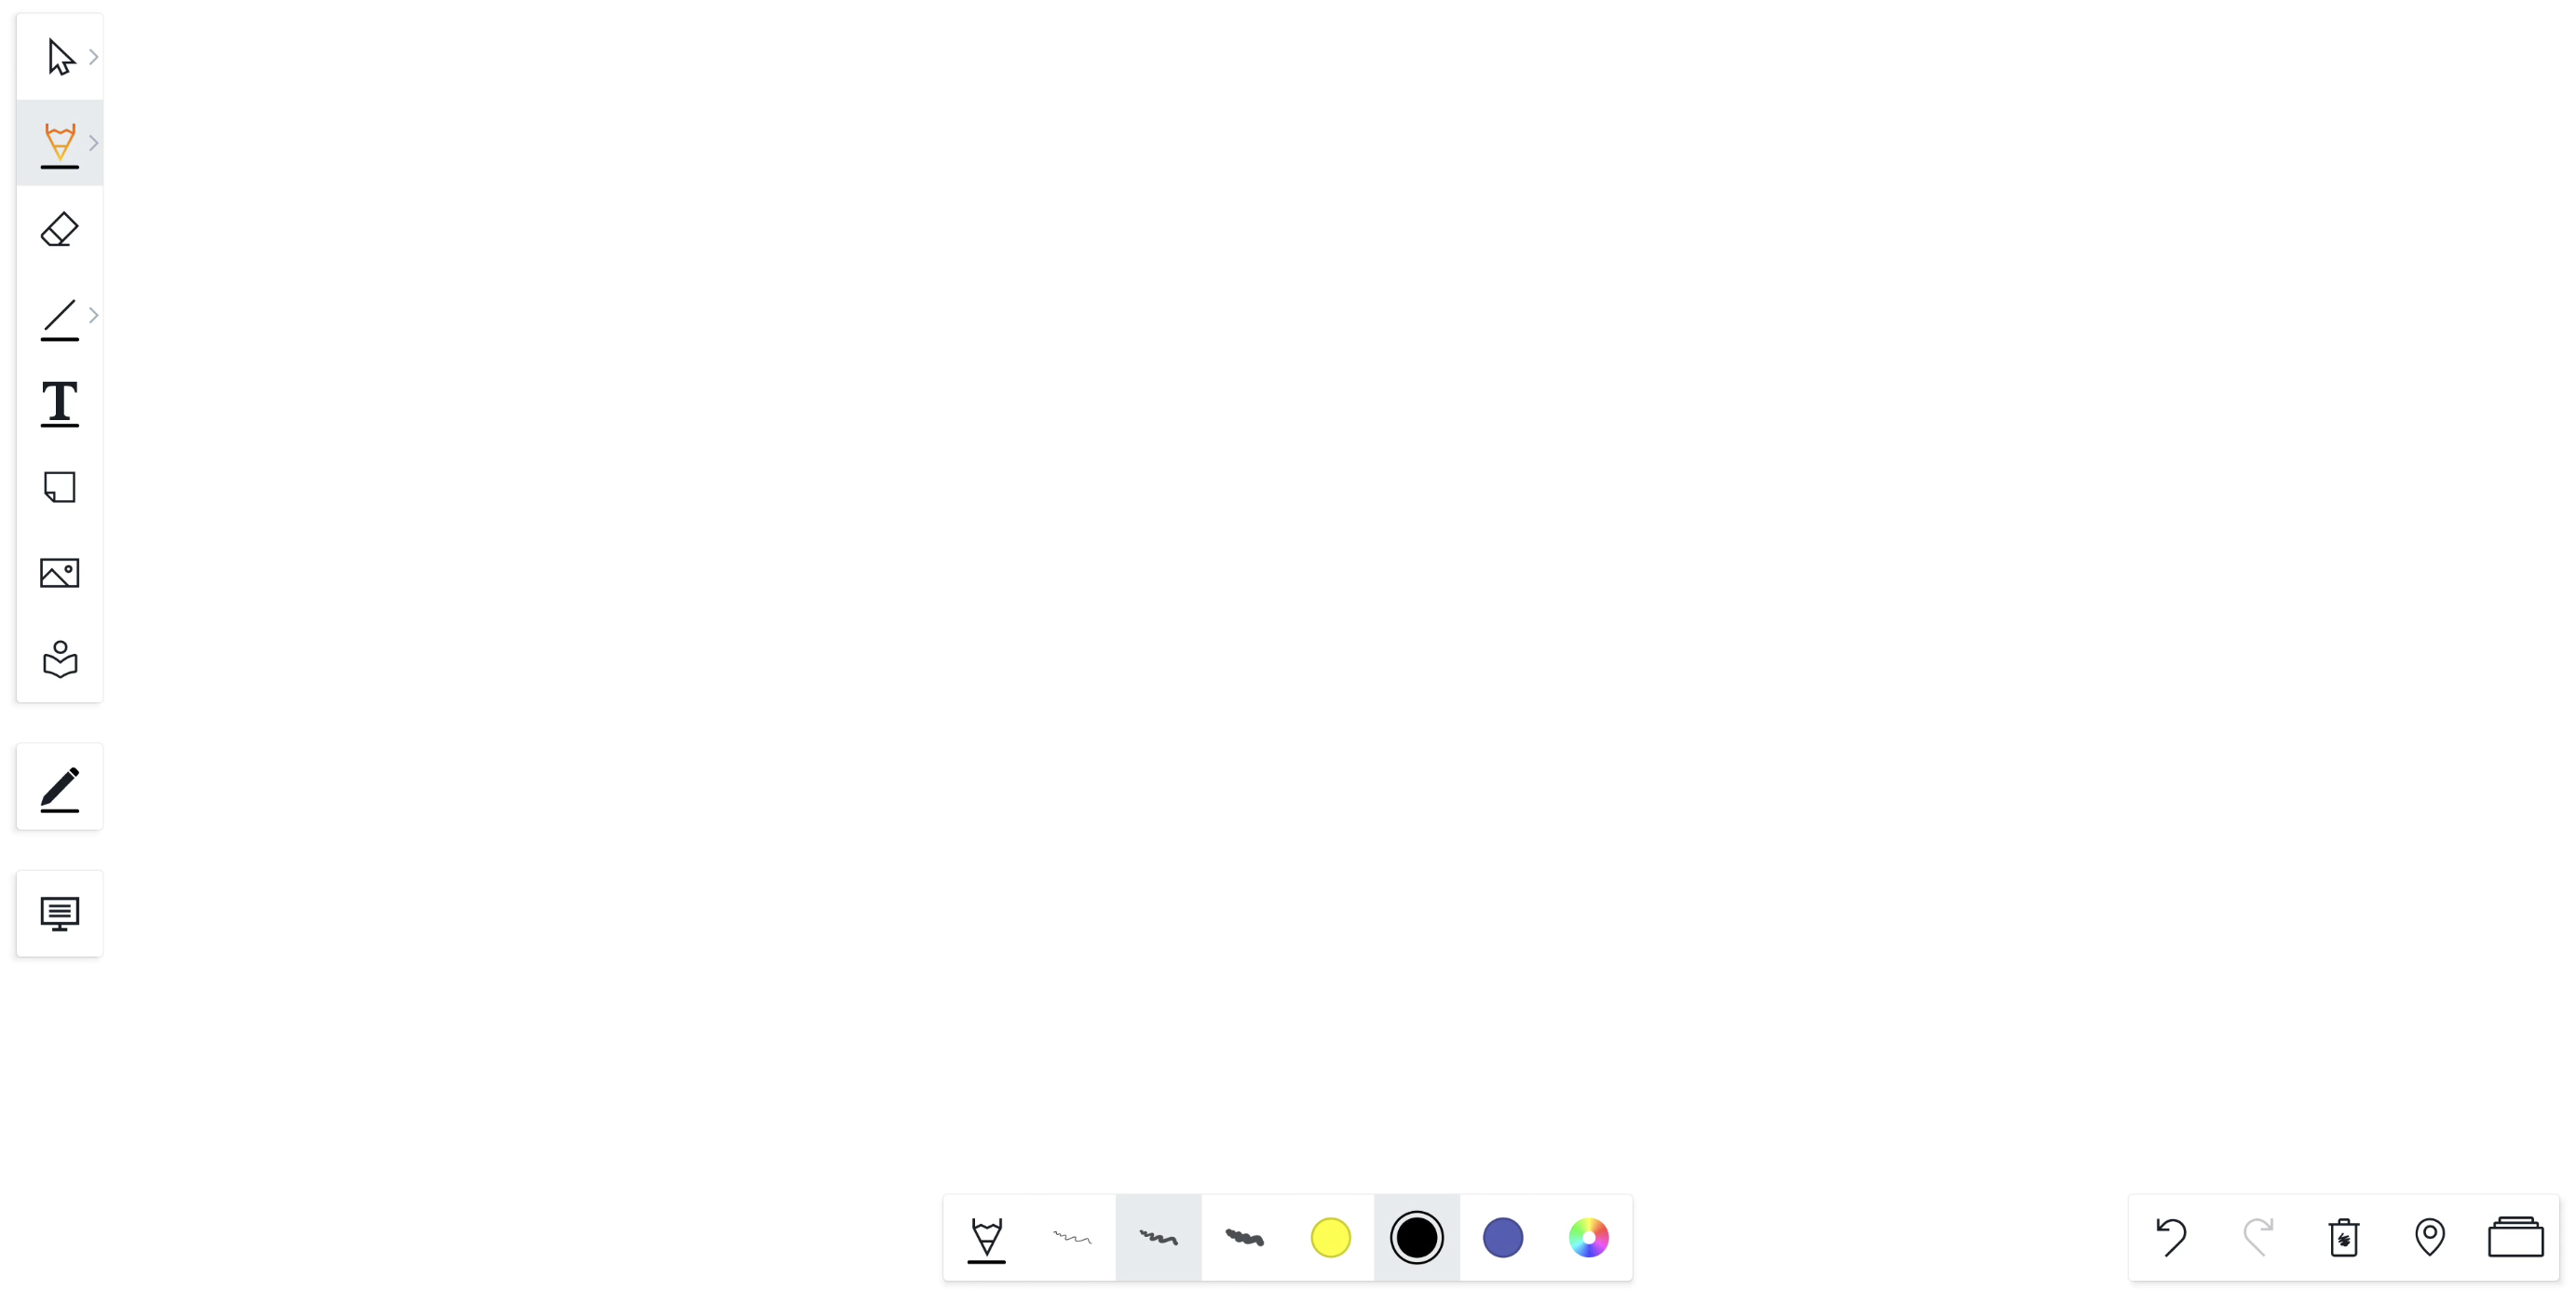
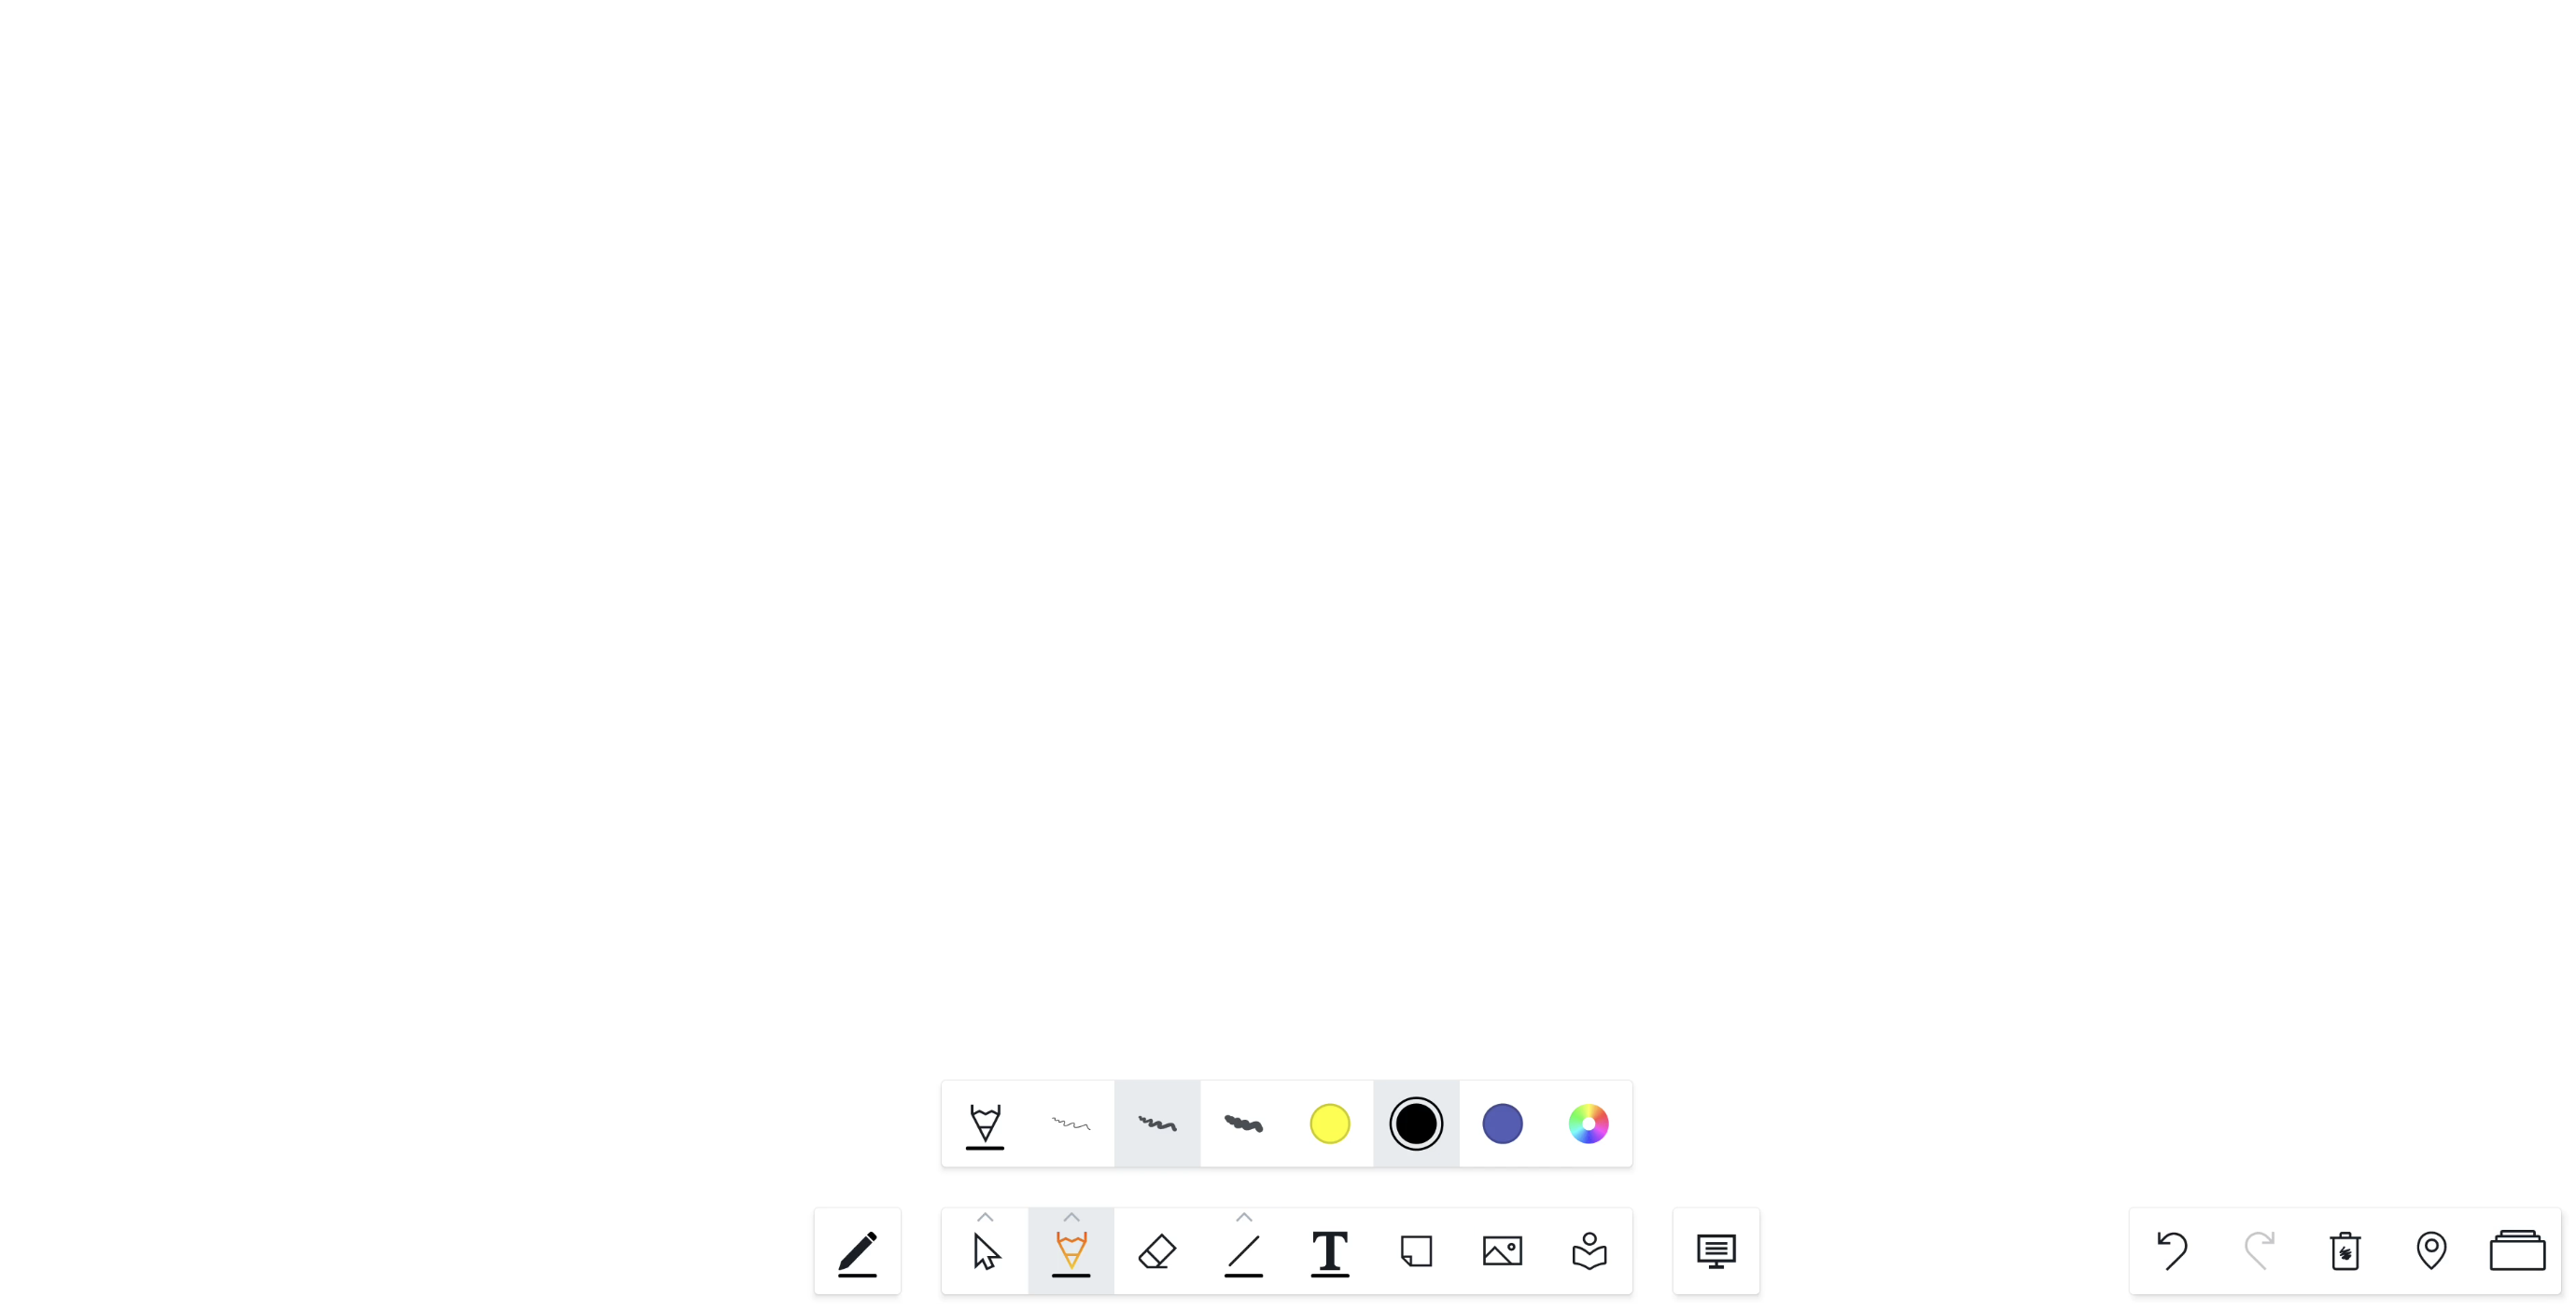
Main tool menu
The Main tool menu consists of several tools you can use:
Selection tool (has a pointer and a box select tool)
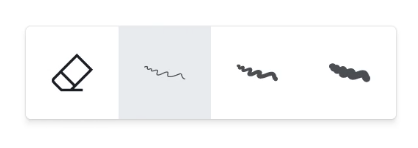
Drawing tool (has a pencil and a marker tool)
Eraser tool
Text tool
Shape tool (has a selection of shapes you can draw with)
Sticky notes
Images
Icon library
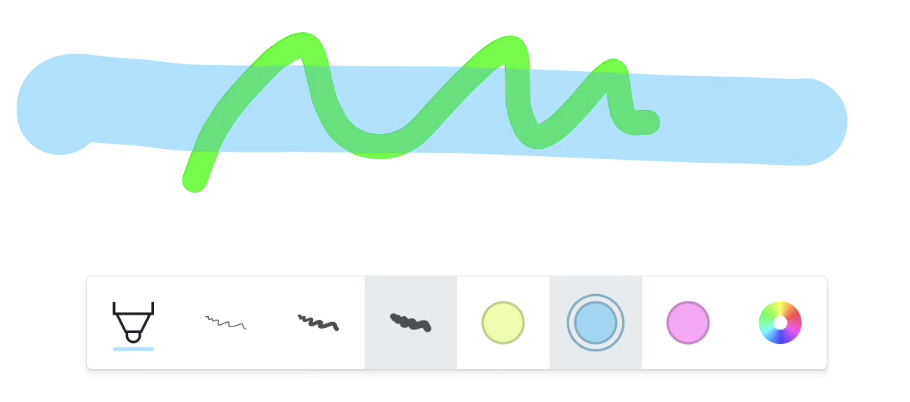
These tools respond to finger touch activity. This means that you use them using your fingers. Some i3TOUCH displays also come with physical pens. To learn how to use them, see below in the Pen tool menu. The tool menu will show you the tools available with which you can draw objects. The features of that object, such as color and line thickness, will be available in the Features menu.
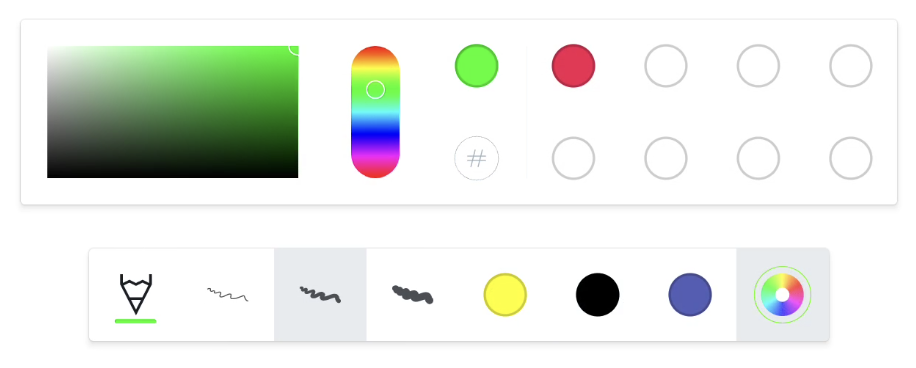
The Features menu explained
This Features menu is a subset of the tool menu and the UI will depend on the tool selected.

This menu consists of:
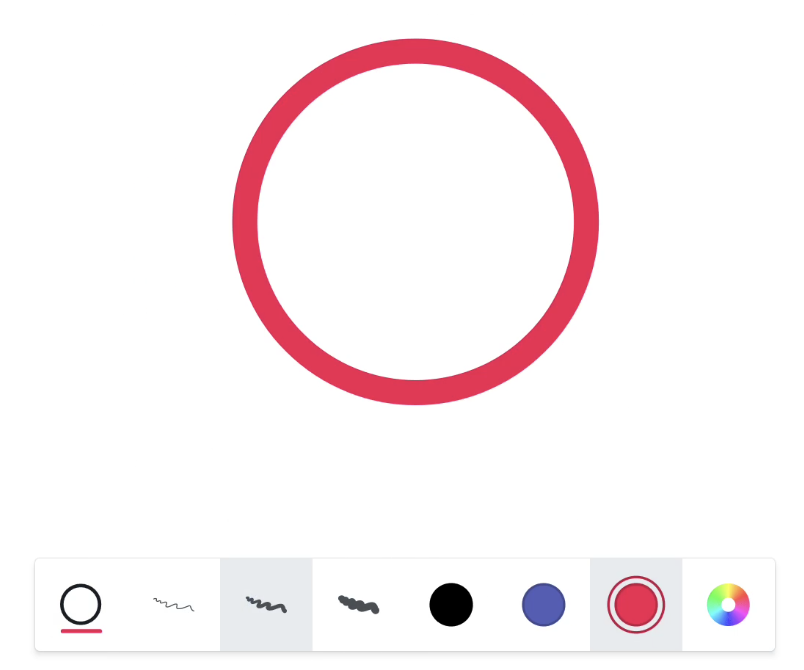
A visual representation of the active tool
Line thickness selector (3 options for you to choose from)
Recent colors (the 3 most recent colors of the selected tool)
Color picker and color archive (a sub-menu with a color picker and up to 8 recently used colors
Collapsed Features menu
The Features will “collapse” once you start drawing, in order to get out of your way. This means that it will only show you the active tool, and the active color.
Press the collapsed Features menu, if you’d like to change color or thickness.
Features menu in Vertical vs Bottom menu mode
If i3WHITEBOARD is configured in vertical menu mode, the Features menu will appear at the bottom of the canvas while the tool menu is fixed to the left side.
If i3WHITEBOARD was configured in Bottom menu mode, the Tool and Features menu will both appear at the bottom of the screen.
Fine-tuning the line thickness values
The line thickness comes with 3 values:
Thin (for drawing fine lines)
Regular (for most use cases)
Thick (for drawing canvas-filling objects)
These values were given a default value which would cover most use cases. However, you still have the option to fine-tune these values to your liking, while still maintaining the ease of use of having three options to choose from.
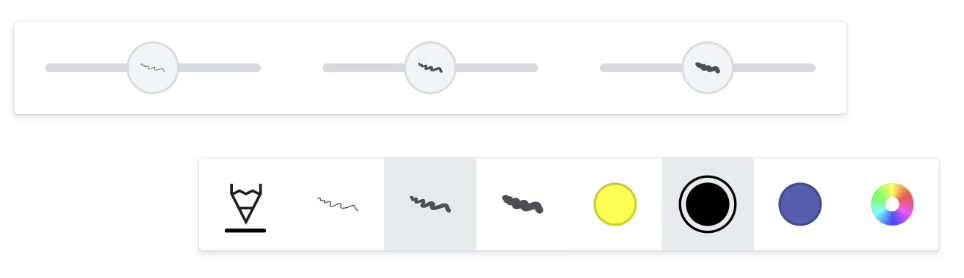
Simply long-press (press and hold for about a second) any of the line thickness buttons in the Features menu for a second, a sub-menu will appear with a slider for each line thickness value, thin, regular and thick.
By default, the sliders will be centered. Dragging the slider cursor to the left will make the value thinner while moving it to the right will make it thicker. While dragging, the new value will be displayed above the cursor.
Once changed, you can use these new values straight away. if you start drawing, the slider will disappear. To make it reappear again, for instance, to return to the default values, simply long press any of the line thickness buttons again.
This feature is available for all tools except eraser, text tool, and sticky notes.
Selection tool
There are two selection tools available:
Pointer Select tool
Box Select tool
You can use the Pointer Select tool to select single objects.
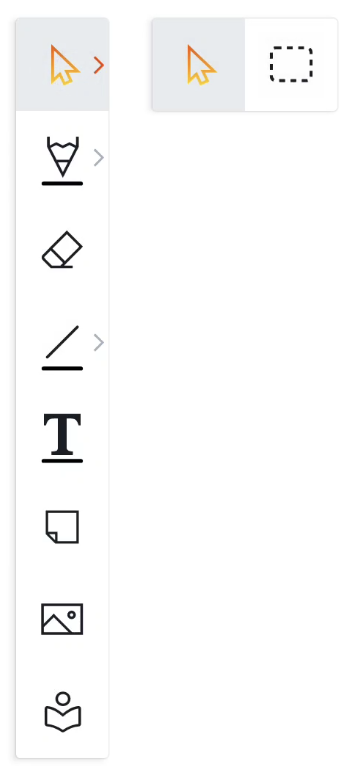
You can also use the pointer to move the canvas around or zoom in and out with pinch gestures. Use the Box Select tool to select multiple objects by dragging a rectangle around the objects.
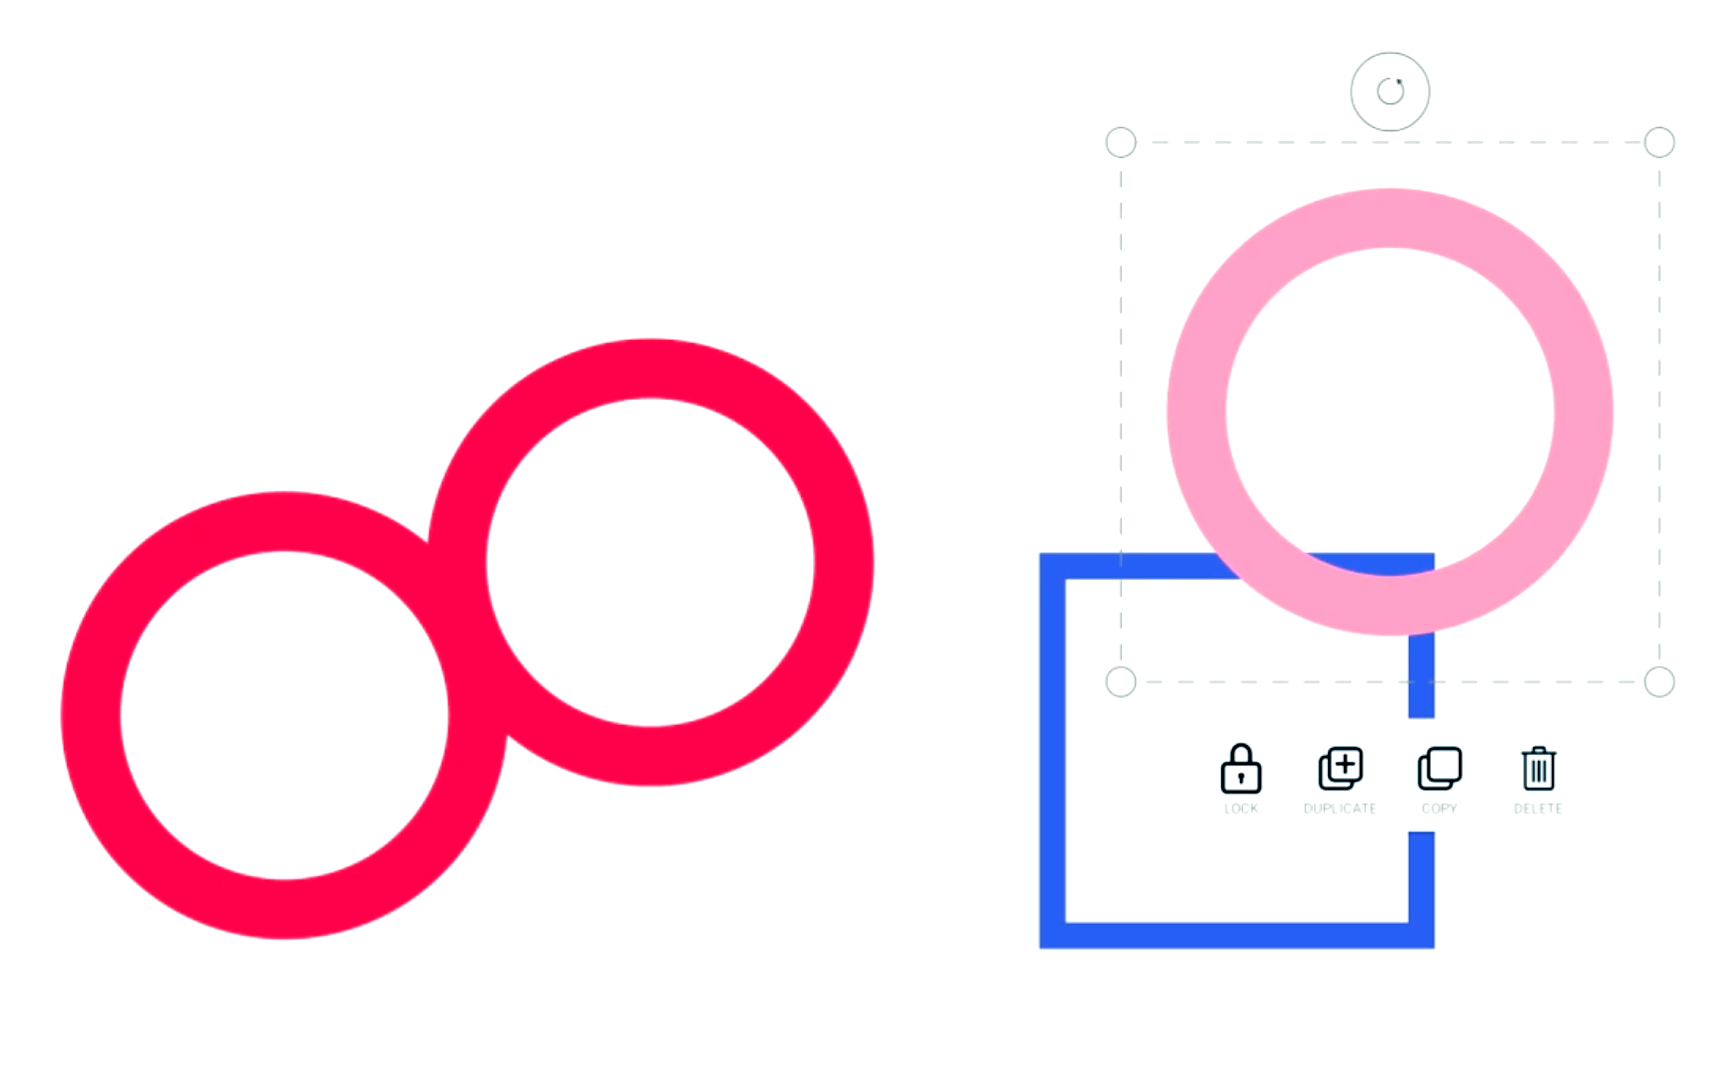
When you select an object, a bounding box (1) with transformation handles will be visible, along with the Actions menu (2) and Features menu (3).
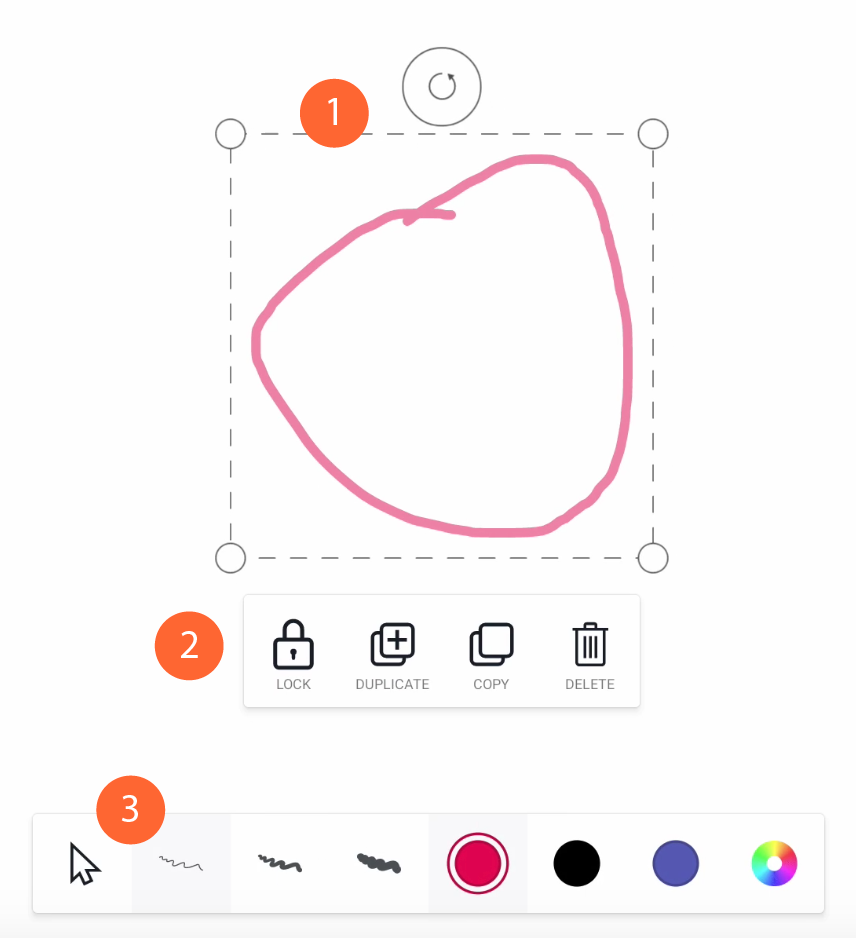
The bounding box
The bounding box allows you to scale or transform the selected object(s). You can scale from any of the four corners. Rotating can be done by holding down and moving the rotation handle in the desired direction.
Actions menu
The Actions menu is visible once you select one or multiple objects on the canvas. The Actions menu helps you to lock, detect, edit, duplicate, copy-paste, and delete the selected object(s).
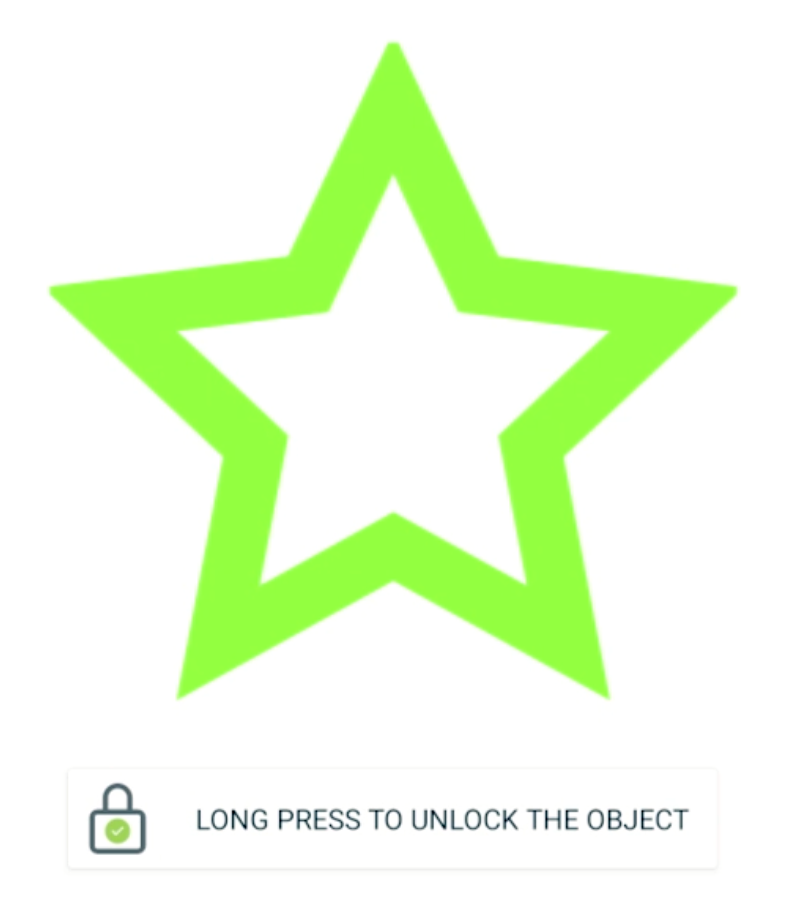
Lock
Locked objects can not be selected or deleted, nor can their features be changed until they are unlocked again. The action is easy to perform. Select one or more objects, hit the Lock icon in the Actions menu, and the object is locked. It’ll show you visually by adding a small Lock icon at the corner of the object when you try to select it:
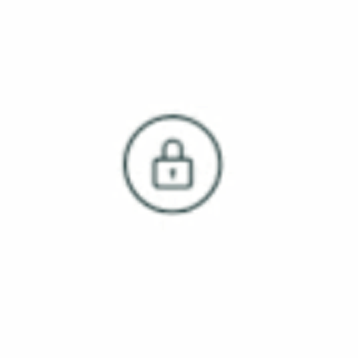
When locking the object, you may also have noticed that the Actions menu informs you how to unlock it:
Long press the locked object, and you will see the action to unlock it:
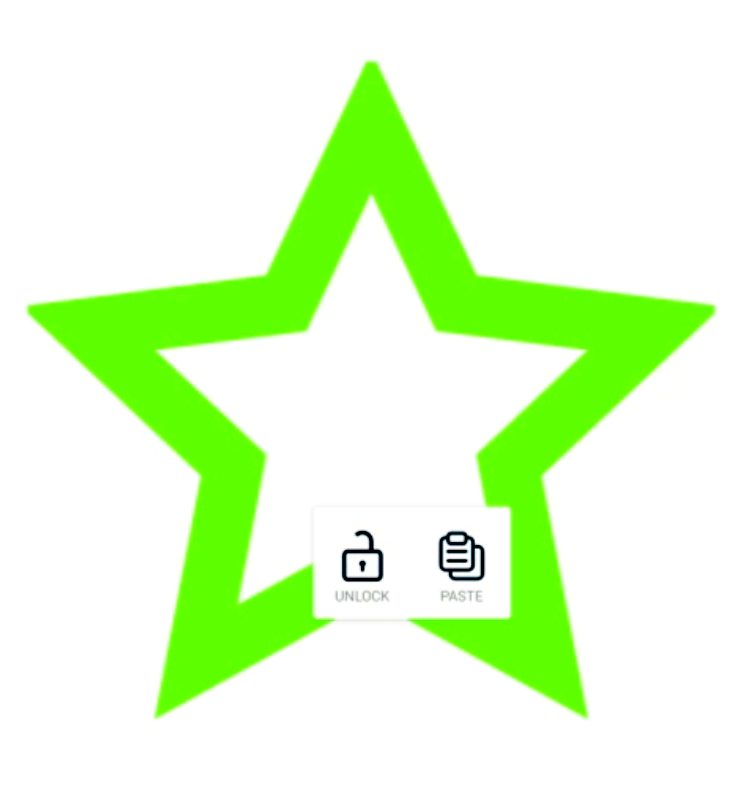
You might also see a Paste icon next to it if you previously copied an object.
Detect
This feature is visible when a drawing is selected that can be converted to a text object which can still be edited. Simply write something on the canvas, using the pen or your finger. Draw a box selection field around the word or sentence that you wish to convert.
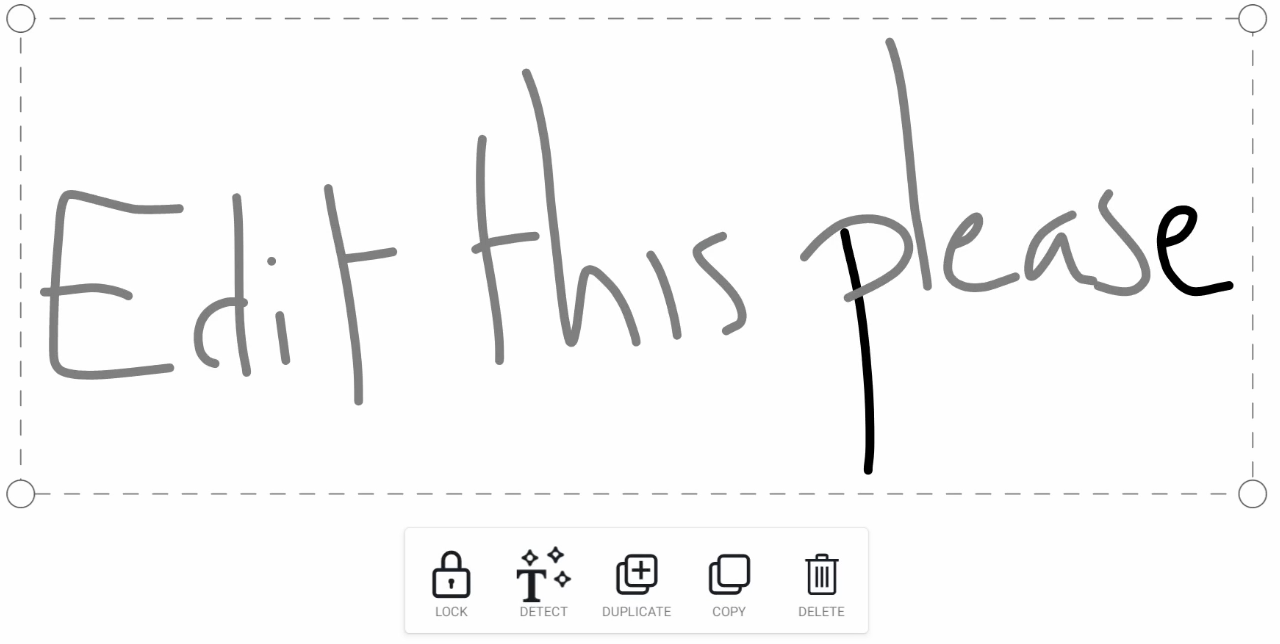
In the Actions menu, select “Detect”. The Suggestions menu will appear to the right of the selection in which you will see one main suggestion and three alternative suggestions.

The main suggestion can be accepted or, if necessary, edited from within the suggestions menu.

If you choose any of the alternative suggestions, it will replace the main suggestion, allowing you to still edit that suggestion before accepting it.
Note that text recognition works best on words that were written in the same sequence. If you erase a word in a sentence to write another word in its place, it might not give the desired result.
Edit
This feature is only visible when a text object is selected.
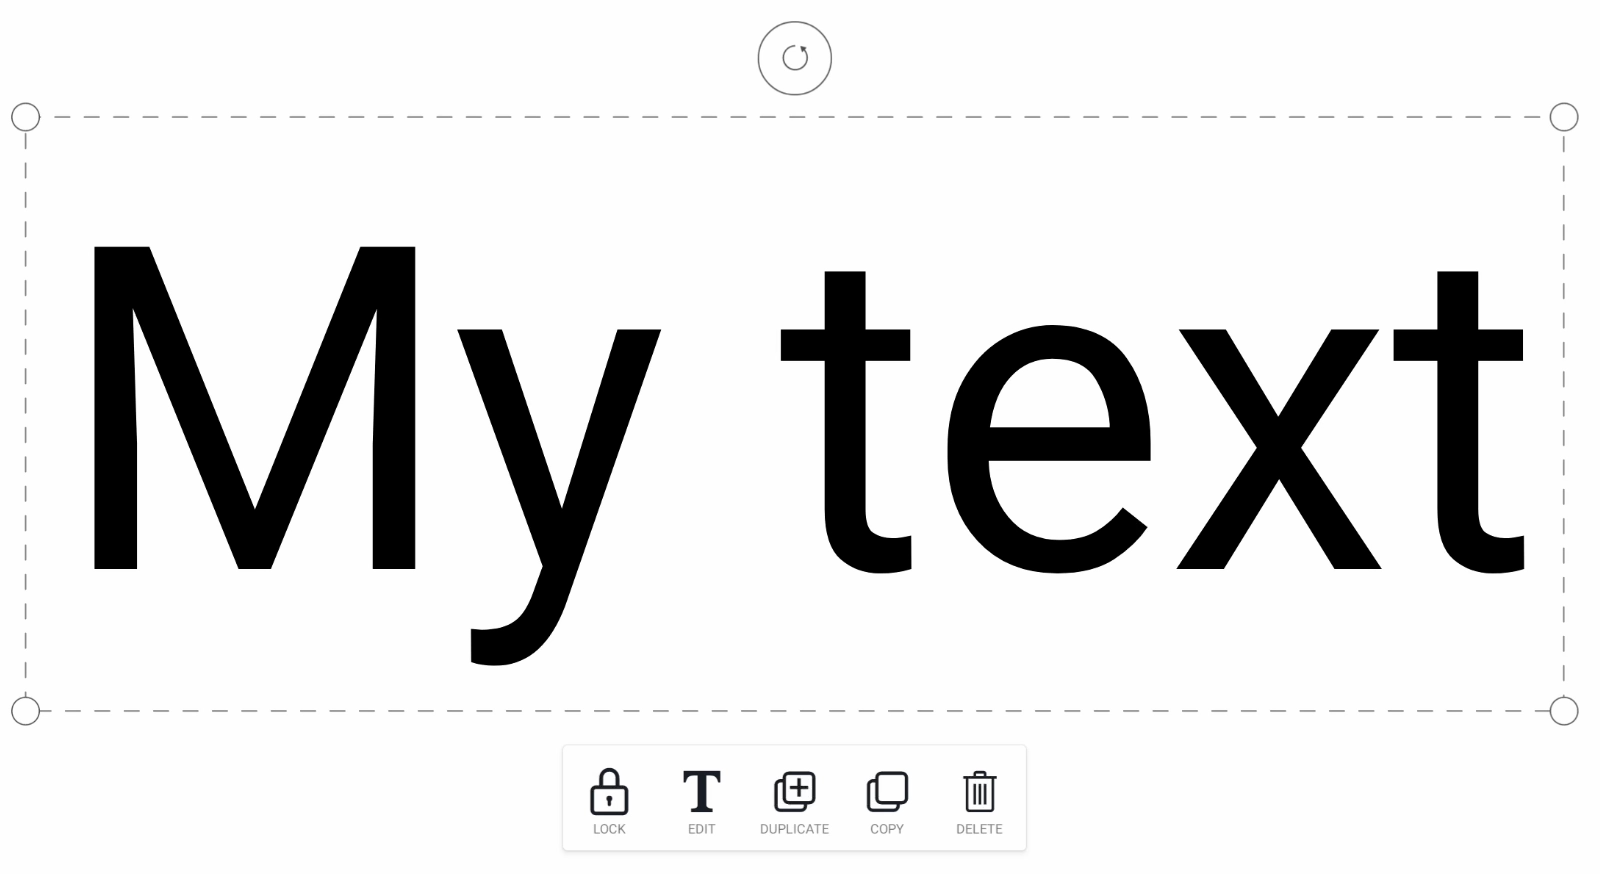
Select “Edit” and a modal will appear with a rich text editor. See Text tool below for more information on the rich text editor.
Duplicate
Duplicate instantly creates a new instance of the selected object(s) in front of them.
Copy-paste
You can copy the selected object(s) and paste them later on the same or on a new page. Just like the Locking action, the Actions menu will briefly show you how to paste an object once you copy it.
Long press anywhere on the canvas and a Paste icon will appear:
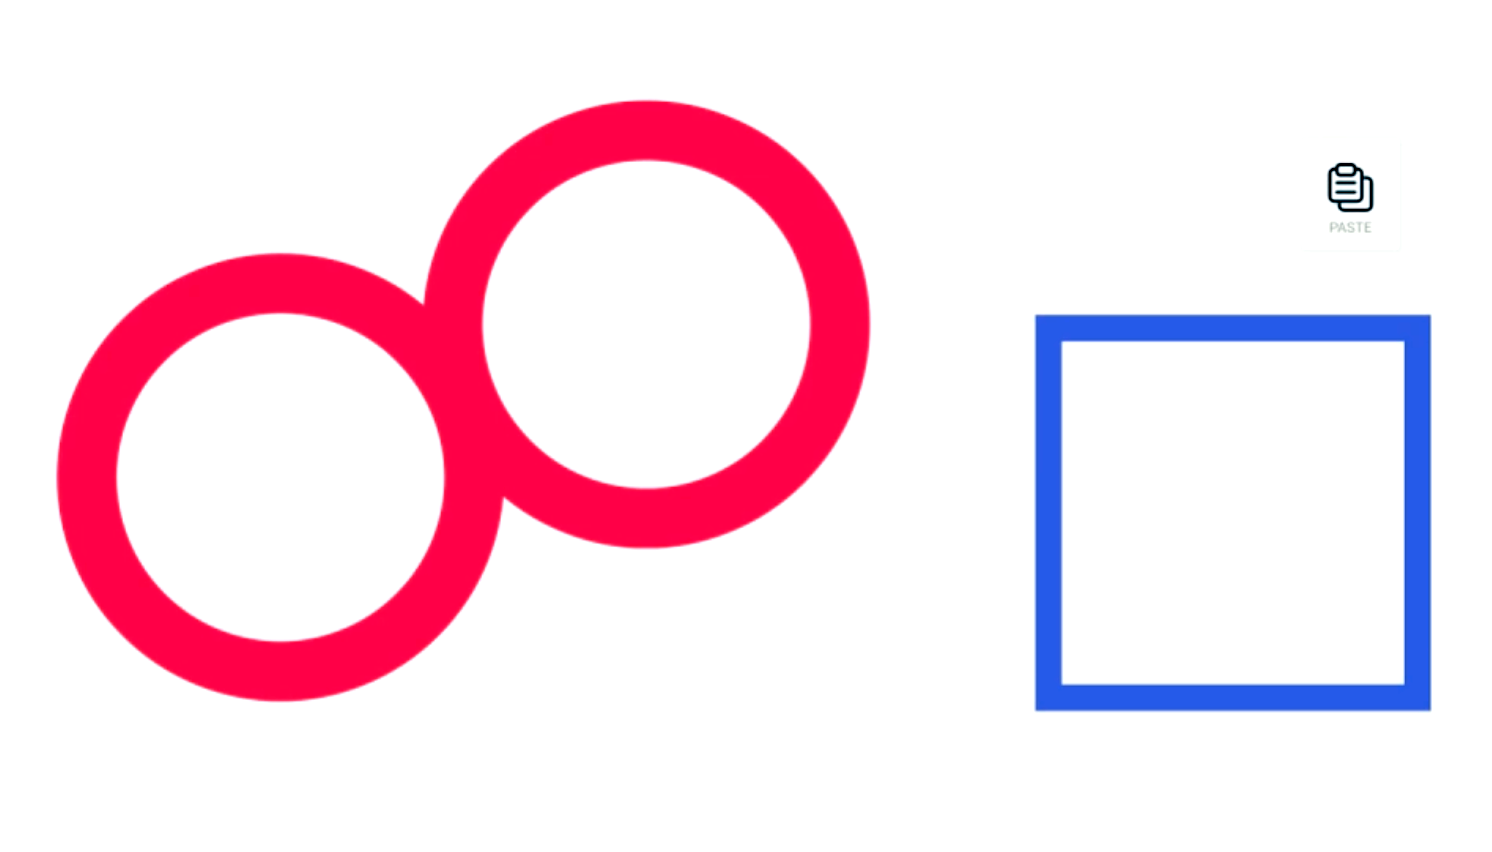
Select Paste and a copy of the object will be pasted on that position.
Delete
This action deletes the selected object(s) from the canvas.
Features menu
This menu appears at the bottom of the canvas. It may indicate the color and line thickness features of the selected object(s), and also allow you to change them.

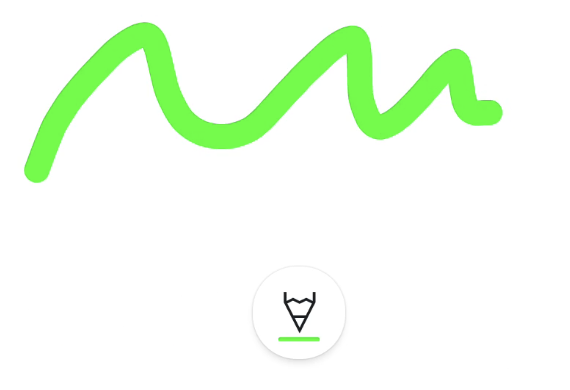
Drawing tool
There are 2 tools available:
Pencil
Marker
Pencil
The Pencil tool is fully opaque.
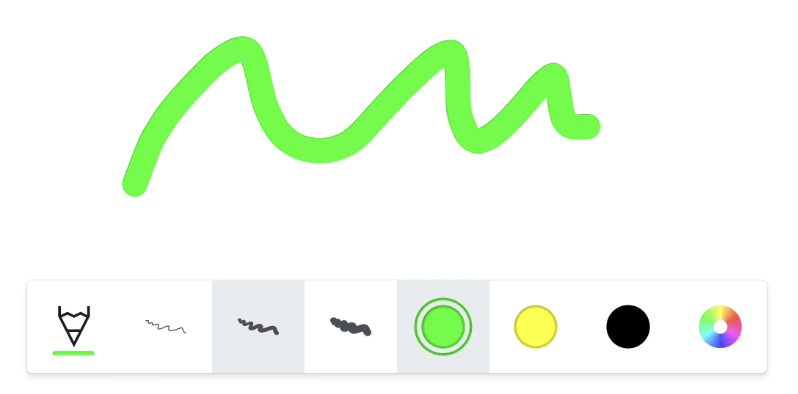
Marker
The Marker tool is slightly transparent and has a brighter color palette. Once you select any of the tools, you can use them to write on the canvas with your finger, or a similarly sized pen.
Eraser tool
The Eraser allows you to erase specific sections from the canvas.
Select the size you want to erase within the Features menu.
You can also erase using certain gestures:
Four-finger erase → use 4 fingers
Palm erase → use the palm of your hand
Palm erase is supported only on the following displays:
i3TOUCH EX
i3TOUCH PX (only on updated models with palm rejection settings disabled)
i3TOUCH X-ONE
i3TOUCH E-ONE
i3TOUCH X2
i3TOUCH ULTRA
Text tool
Use the Text tool to type text to the canvas using the on-screen keyboard. When you add, or edit a text field on the canvas, it will display a dialog with a rich text field editor.
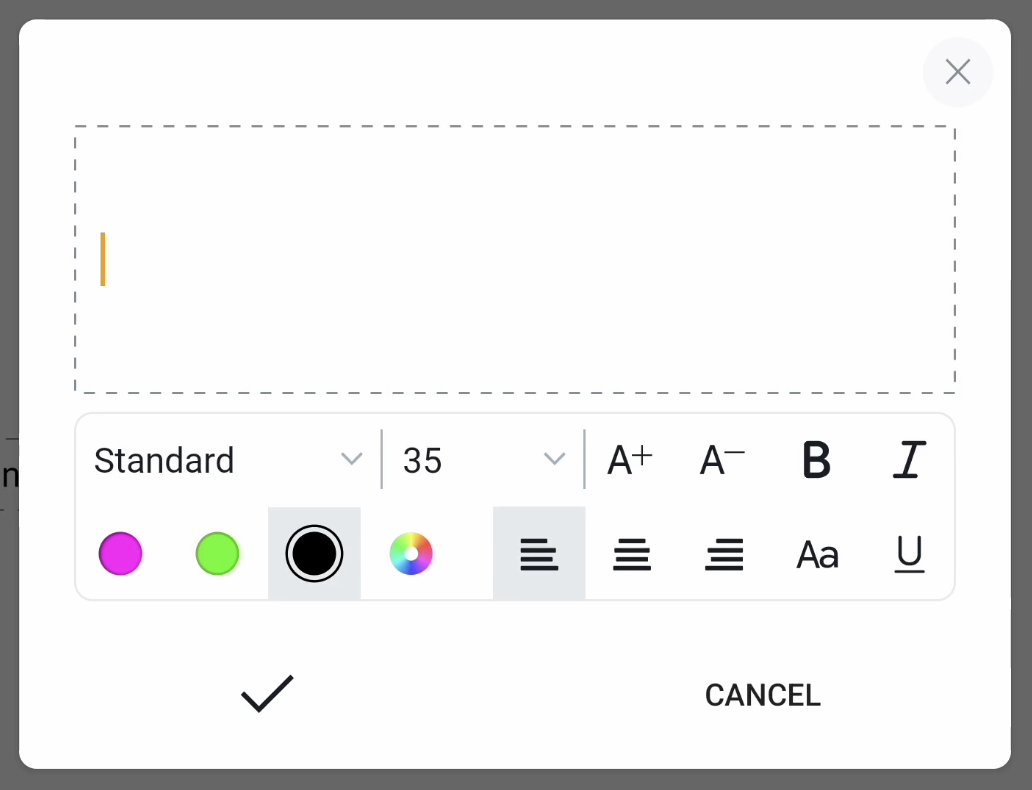
This rich text field editor allows you to:
Enter and/or edit text. You can do that by setting the cursor on a word to edit it or in between words to add/ delete words
Set the formatting of the text using one or several of these parameters:
Font style: choose any of the given font styles in the drop down field
Font size: Set a given size or use the increment ( + )/ decrement icons ( - ). Alternatively, you can also resize the text field on the canvas.
Bold
Italic
Change the color using any of the document colors or the color picker
Alignment icons (left, center and right)
Toggle between upper/ lower case or the original writing
Underline
Shape tool
Use our Shape tool to draw various shapes on the canvas.
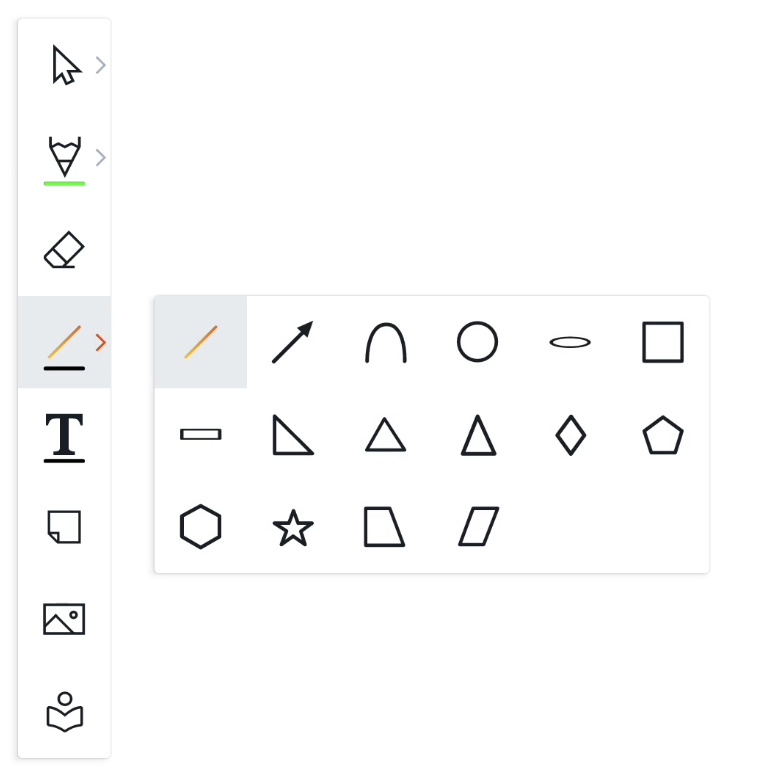
You can, as with any other tool, also customize the color and line size in the Features menu.
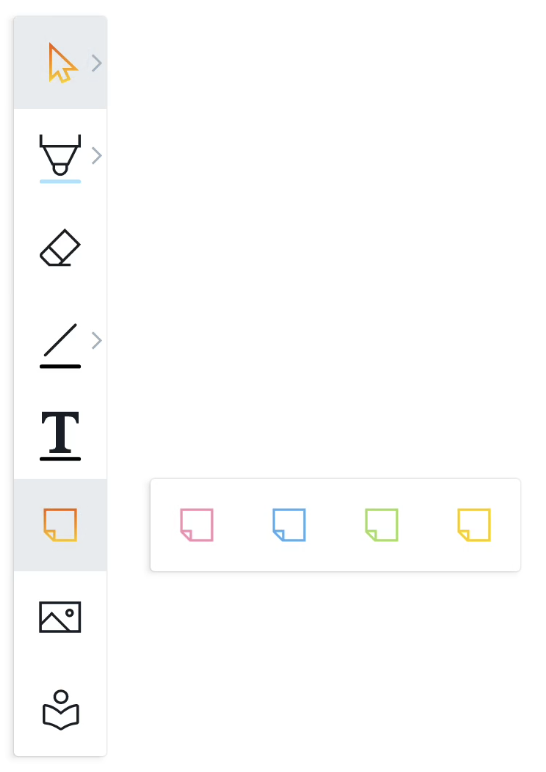
Sticky note
You can add 4 types of preset sticky notes to the canvas.
Once a sticky note is created, you can freely select and customize it like any other object.
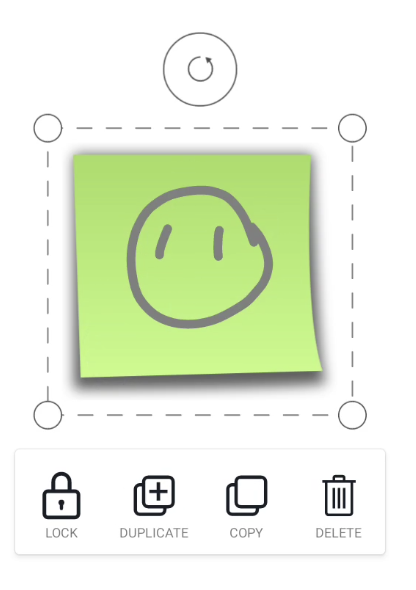
Write or draw on the sticky note. Any writing within its boundaries will stay on the sticky note, allowing you to easily scale, rotate, or even duplicate it.
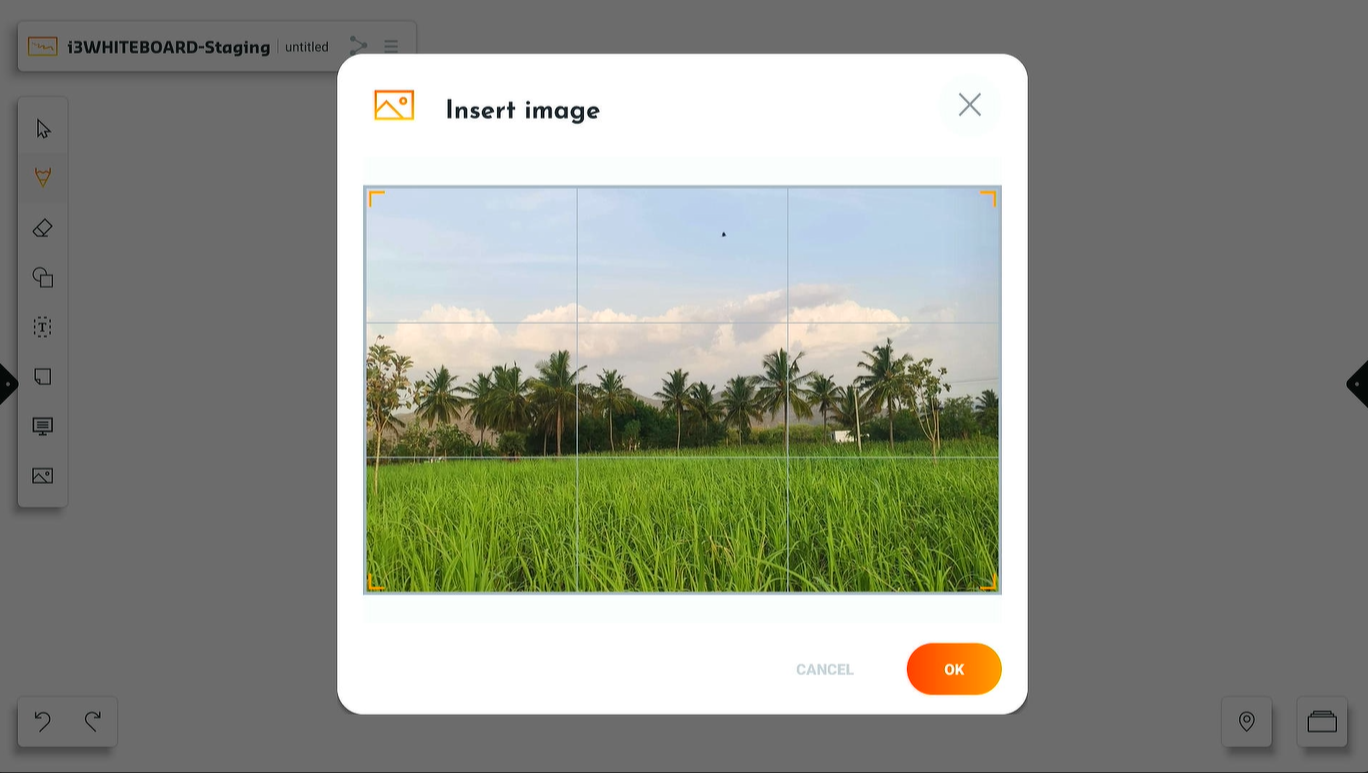
Image tool
i3WHITEBOARD now gives you several ways to import images onto the board.
Import with the Tool menu
The easiest way to import an image onto the board is through the Tool menu. Select the image icon from the bottom of the Tool menu.
A dialog will pop up where you can select a file source. Locate the image using the folder structure and select it. You’ll see a preview window of your image. Drag from the corners to import only the part of the image you need, or select OK to continue.
Import from the file explorer
Use the File explorer in i3STUDIO to import the image. Note that you may not have the user rights to select apps from the App tray. Locate the file and long-press it. from the dialog select i3WHITEBOARD and the image will be placed on the board.
Import from the web browser
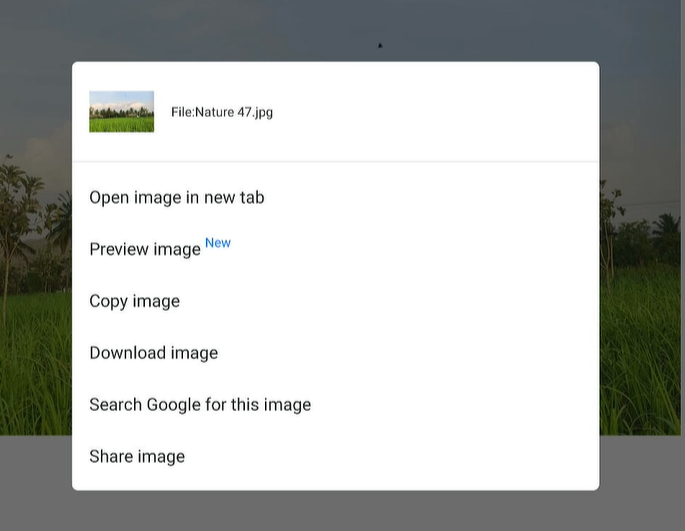
A very quick way to get images in i3WHITEBOARD is to search for one, using the web browser. Open the web browser from the side menu in the launcher. Search for an image or go to a specific web page. Long press on the image to load the image menu. just like you can open the image in a new tab, at the bottom you’ll see a menu item called “Share image”. Select it and locate i3WHITEBOARD in your list of available apps. Select i3WHITEBOARD and the image will be placed on your board.
Icon library
The Icon library allows users to drag and drop icons on the canvas. We already added popular and extensive icon libraries that you can use right now, such as Material Icons, FontAwesome and OpenMoji, giving you immediate access to thousands of icons.
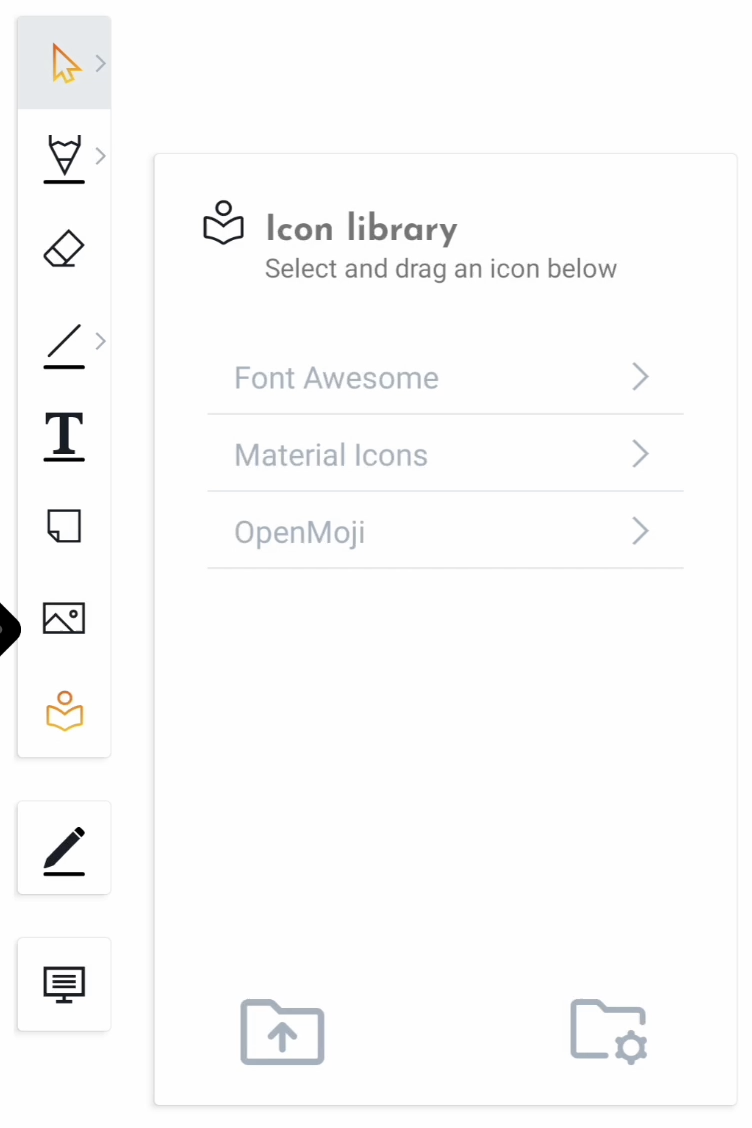
Browsing the icon libraries
The first time you load the icon library, you’ll see each icon library displayed in its own folder, along with sub folders for each category. You can easily browse through the folders by selecting them. If only the parent folder is shown, there are no more sub folders or categories at this level. You’ll have to navigate back by selecting the parent folder.
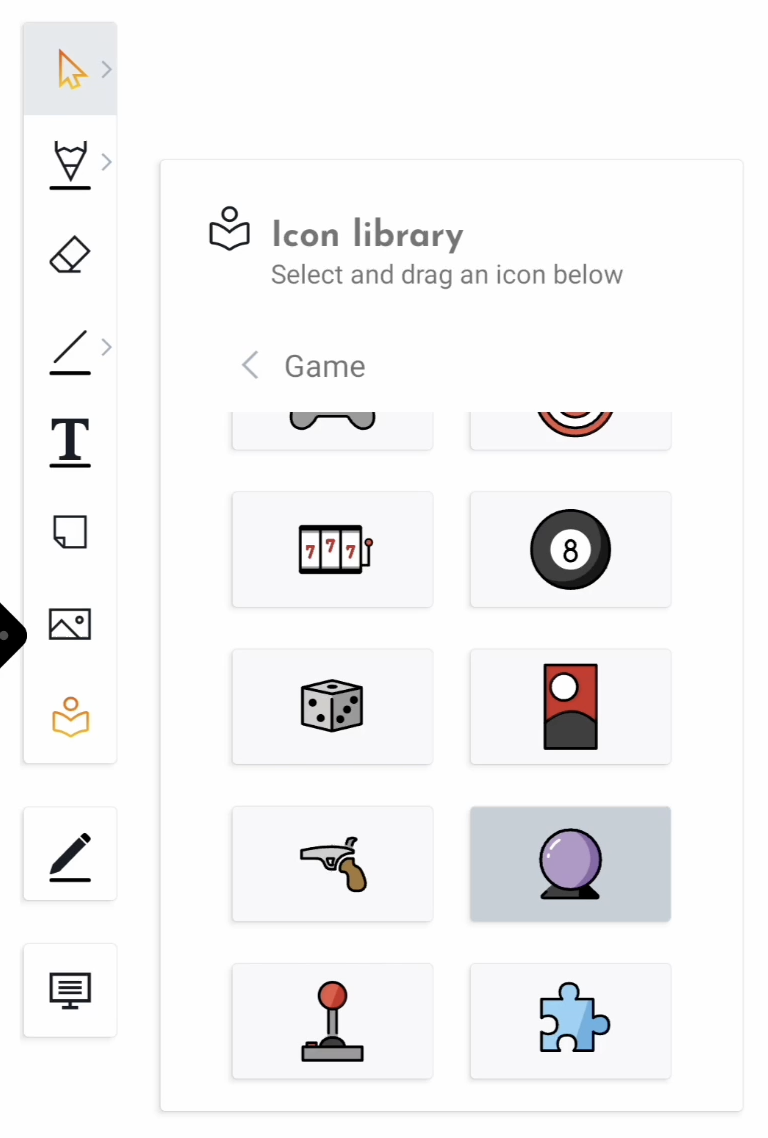
Dragging icons to the canvas
Select an icon from the library. Once selected, you can drag it to the canvas. It now becomes an object on the canvas that you can later select and manipulate.
You can also select multiple icons within a folder and drag them all to the canvas at once. They will all be separate objects that you can still move around as you like. Note that the icons will be saved to the document and could impact the file size.
Create your own libraries
Want to create your own libraries? Well, you can do that easily in i3WHITEBOARD by putting a folder with all your svg, png, jepg, WEBp files, organised in sub folders, on the i3TOUCH display or copying them from a USB stick. i3WHITEBOARD will recognise the sub folders and add them to the library.
At the bottom of the Icon library, select the Upload button.
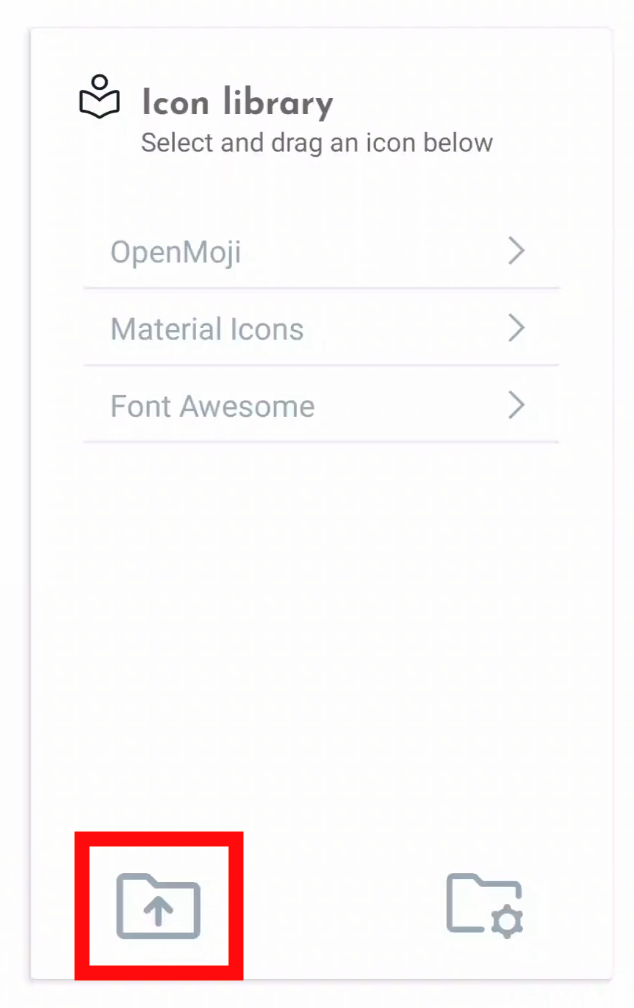
Locate the source of your icons, either on the i3TOUCH display or USB drive. Select the parent folder and all its sub folders/ items at once by selecting the circle in the top left corner. Don’t forget to add a title.
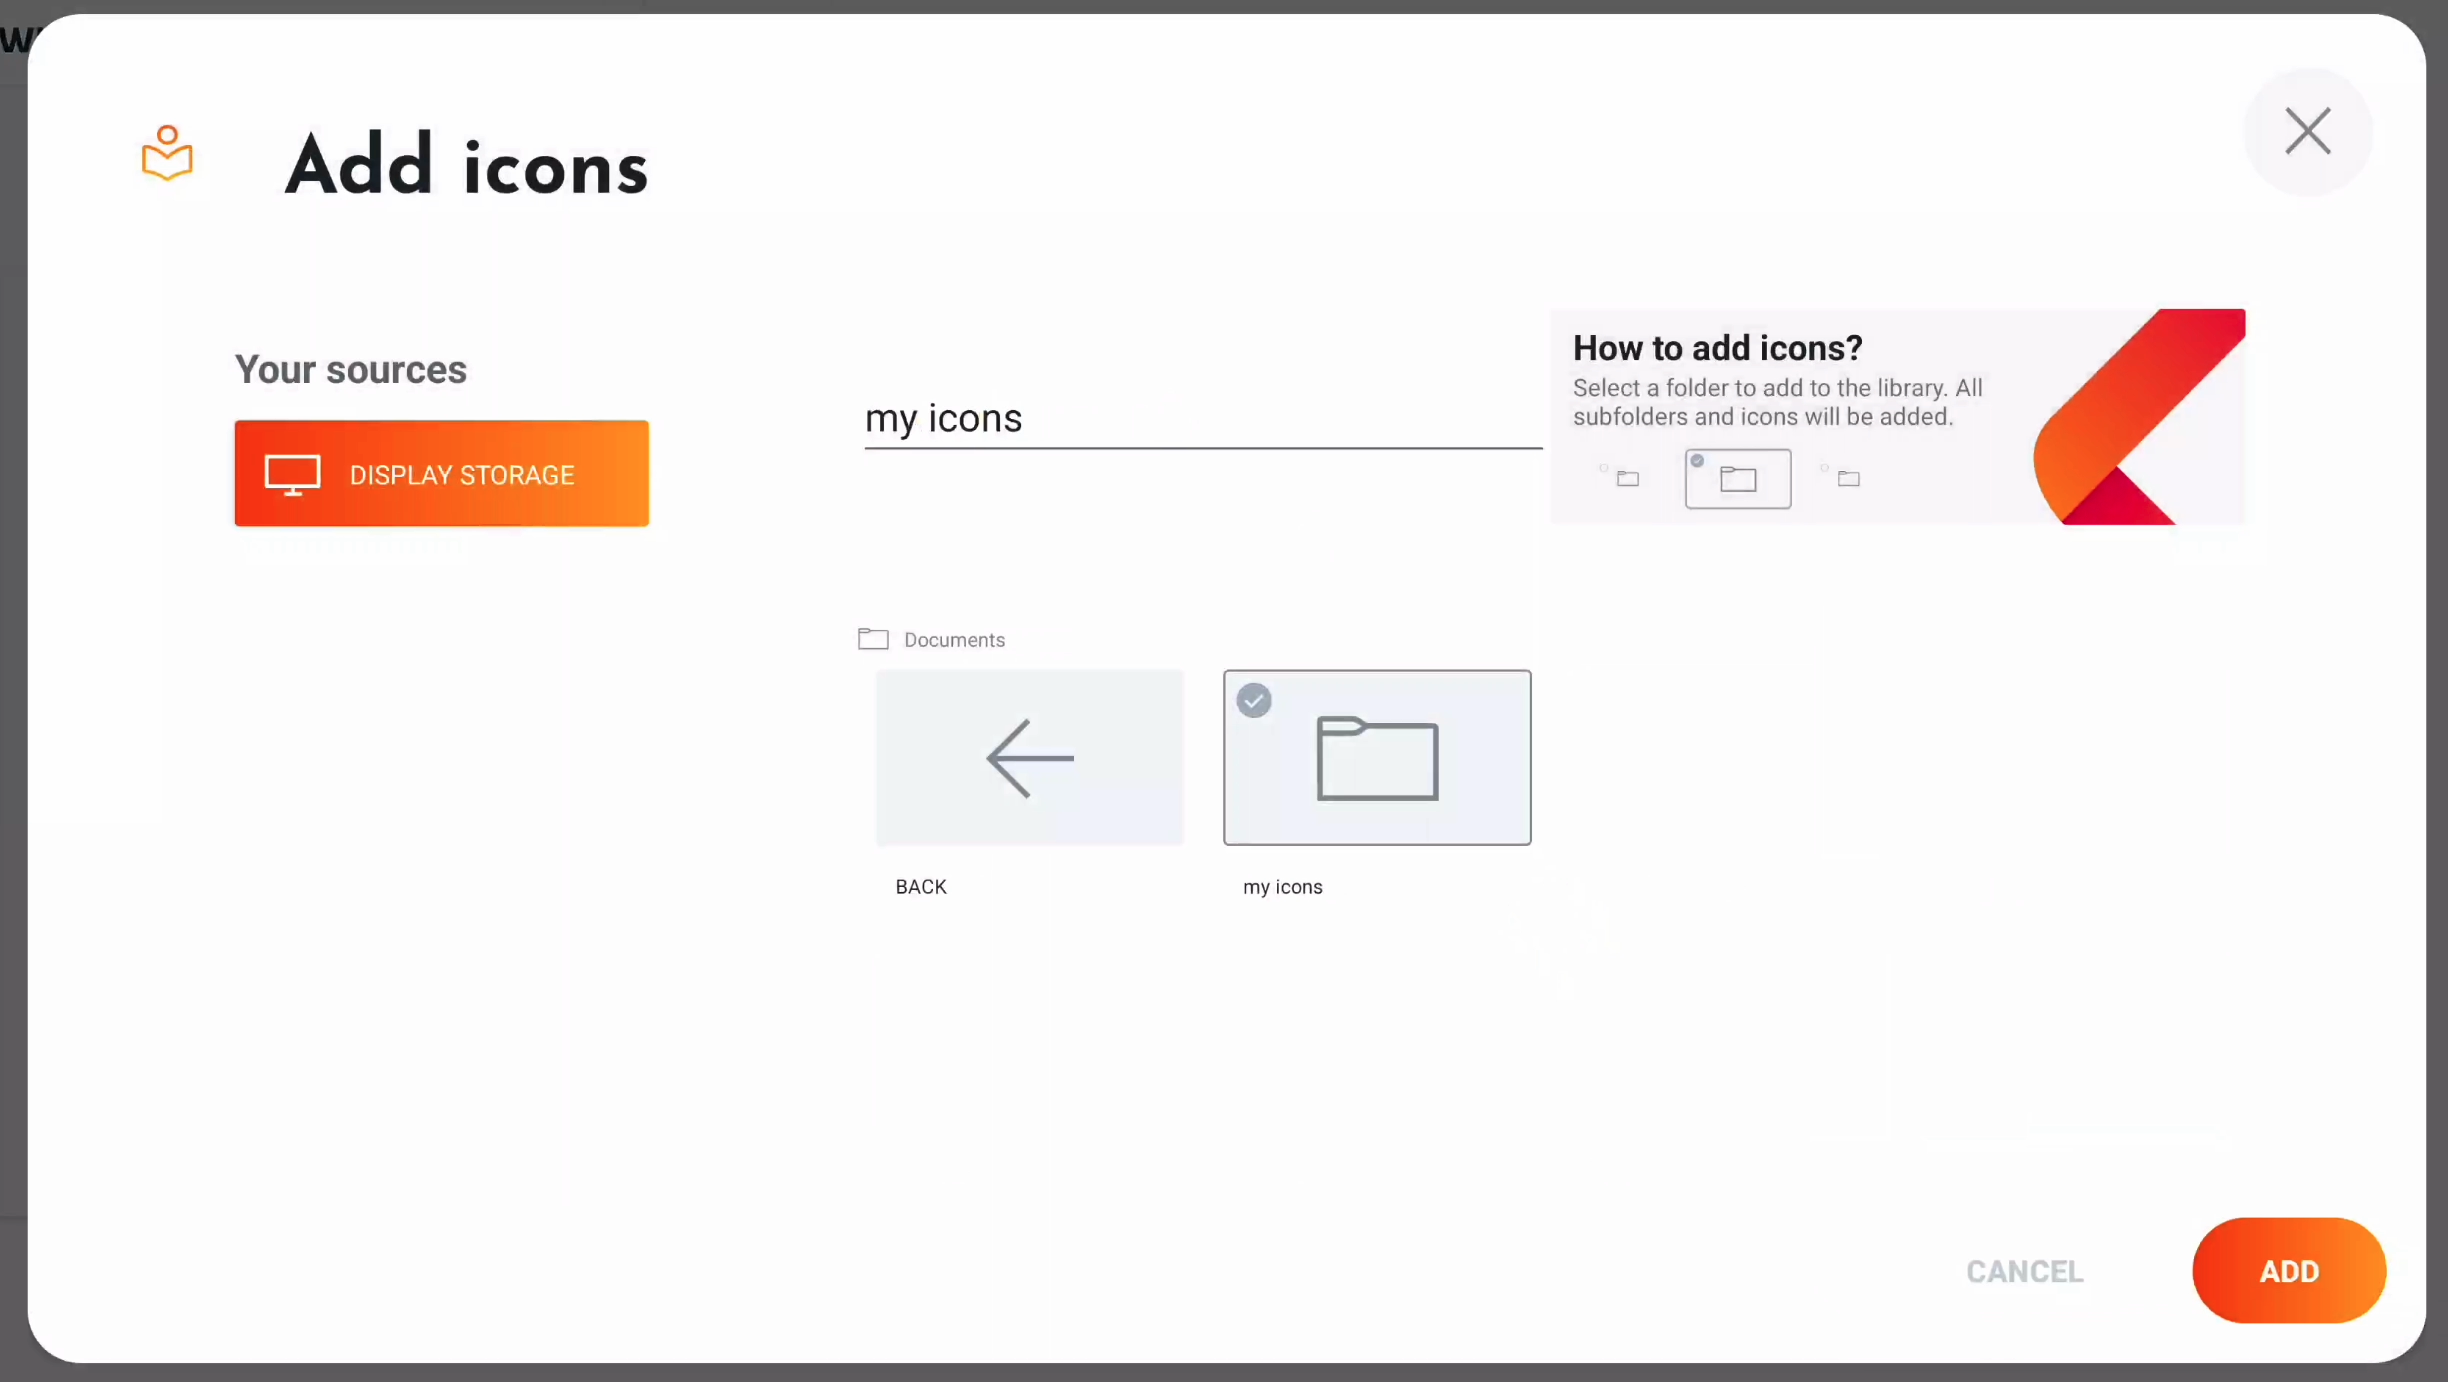
Select add and your new icon folder is available in the Icon library. If it takes time to import the icons, a loading menu might appear.
Alternatively, you can have your IT administrator upload them using our remote management system i3RDM. This way, they can add them to a remote configuration and copy the library to all i3TOUCH devices within your organisation!
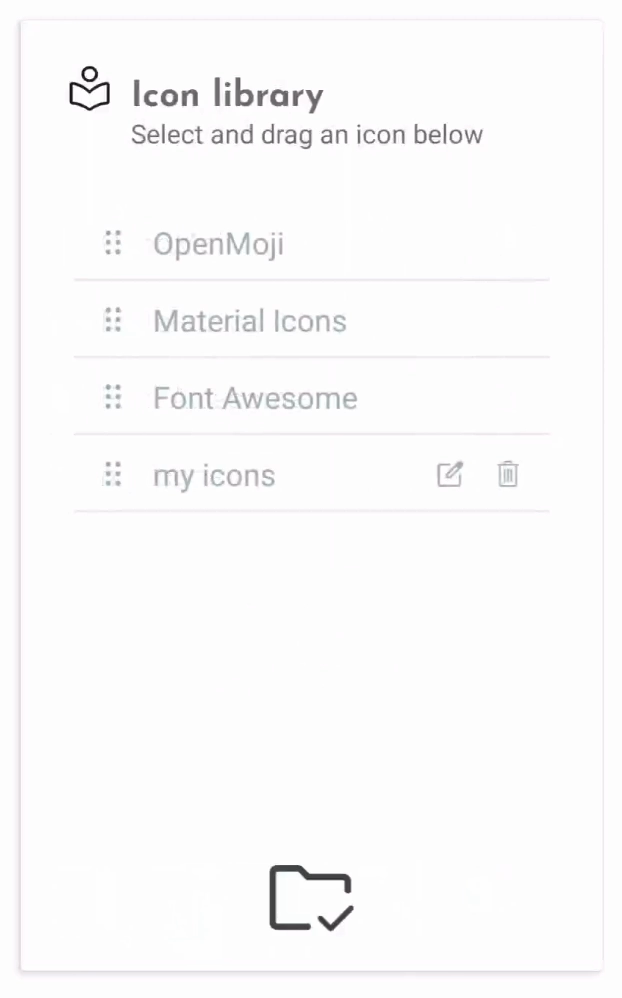
Managing your icon libraries
Select the Manage icon at the bottom right of the Icon library.
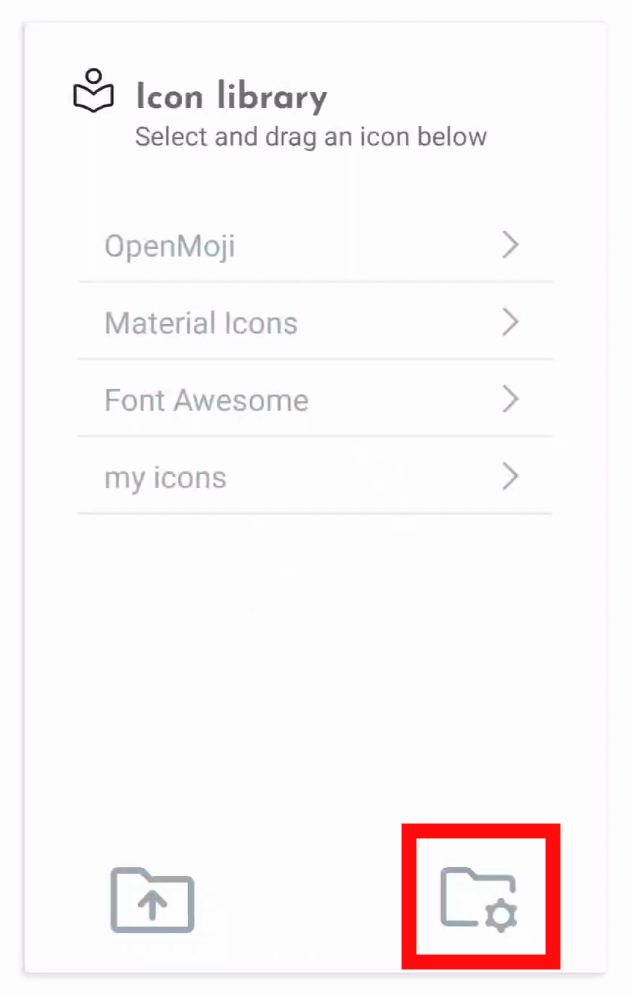
This changes the view of the libraries and adds the feature to drag the libraries around. User libraries can also be renamed and/ or removed.
Licenses
Material Icons icon library is licensed under the Apache License version 2.0.
OpenMoji icon library emojis are designed by OpenMoji – the open-source emoji and icon project. License: CC BY-SA 4.0
Font Awesome icon library is fully open source and is GPL friendly. License: SIL OFL 1.1
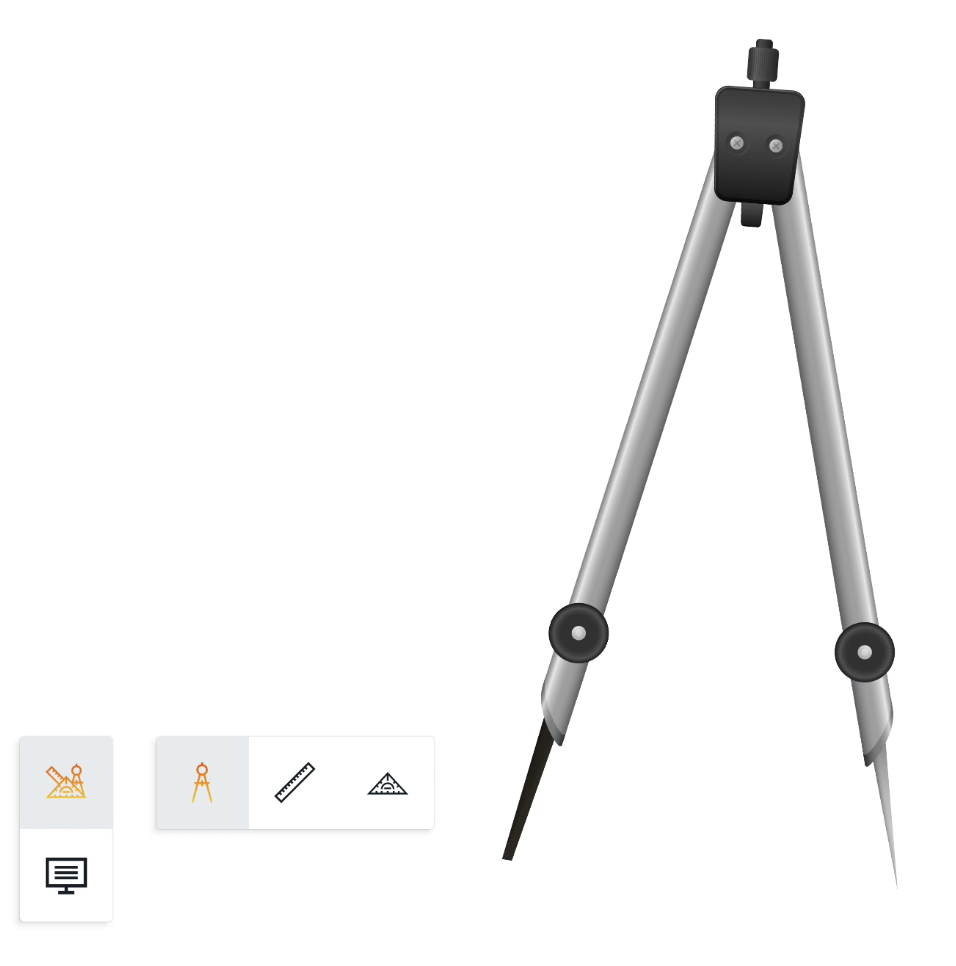
VR Tool and Templates menu
VR Tools
Note: Virtual Reality (VR) tools can be activated from the Settings menu.
There are three tools: Nautical Protractor Ruler, a Normal Ruler, and a Drawing Compass. These tools will appear on the screen once their toggle is activated. To remove them from the screen, they must be untoggled.
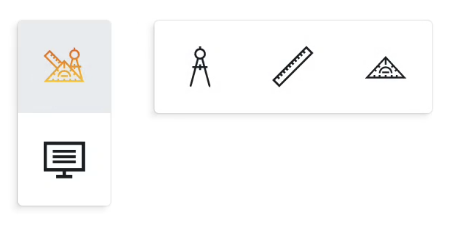
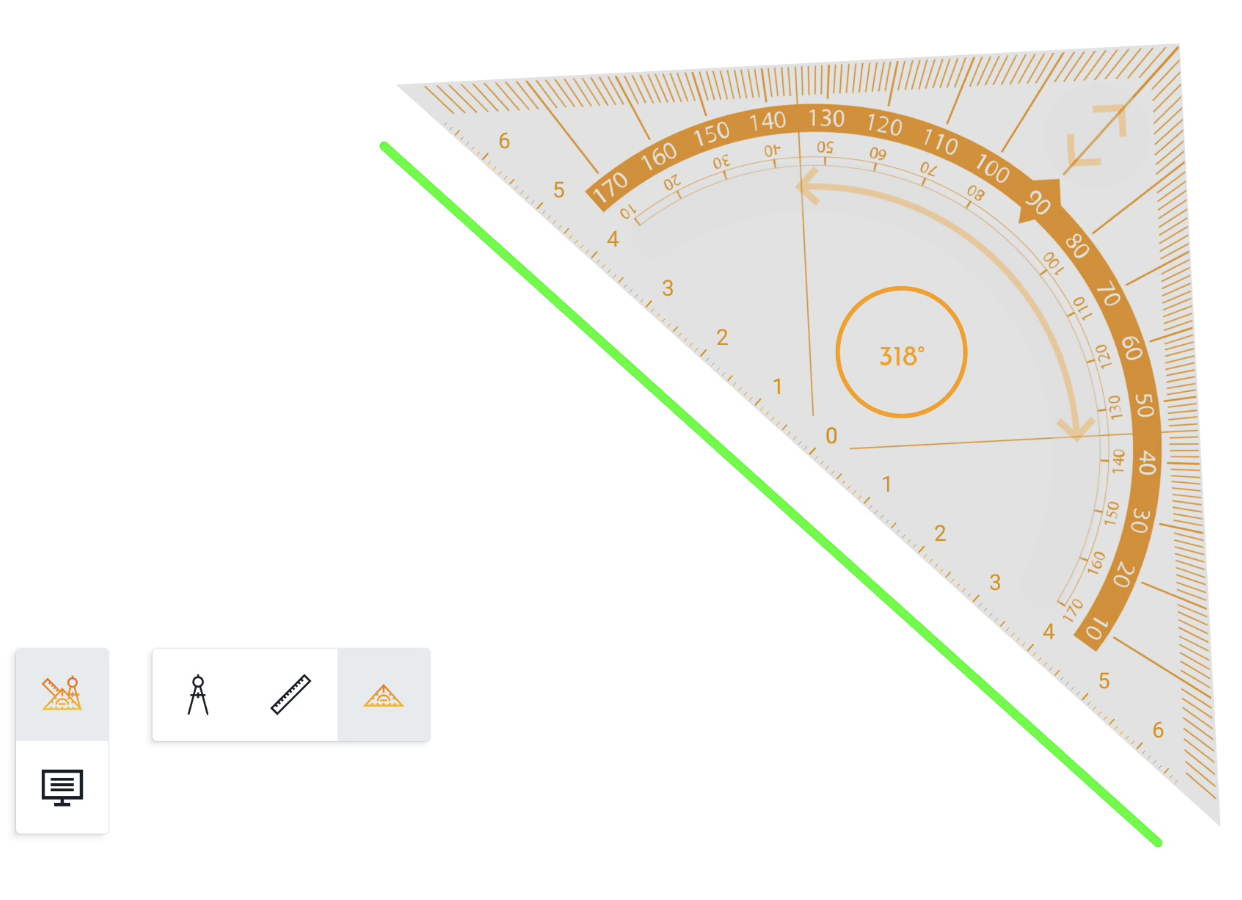
Nautical Protractor Ruler/Triangle Protractor
The nautical protractor triangle can be found as the first option in the VR tools menu. It has three sides; two show degrees from 0 to 180, and the bottom side shows length in centimeters (cm).
Drawing
Using a pen or finger near the ruler borders, we can draw straight lines that will follow the border.
Besides drawing, this ruler also helps define and measure angles by placing the center of the ruler (bottom) at the starting point of the lines we want to measure.
Rotating
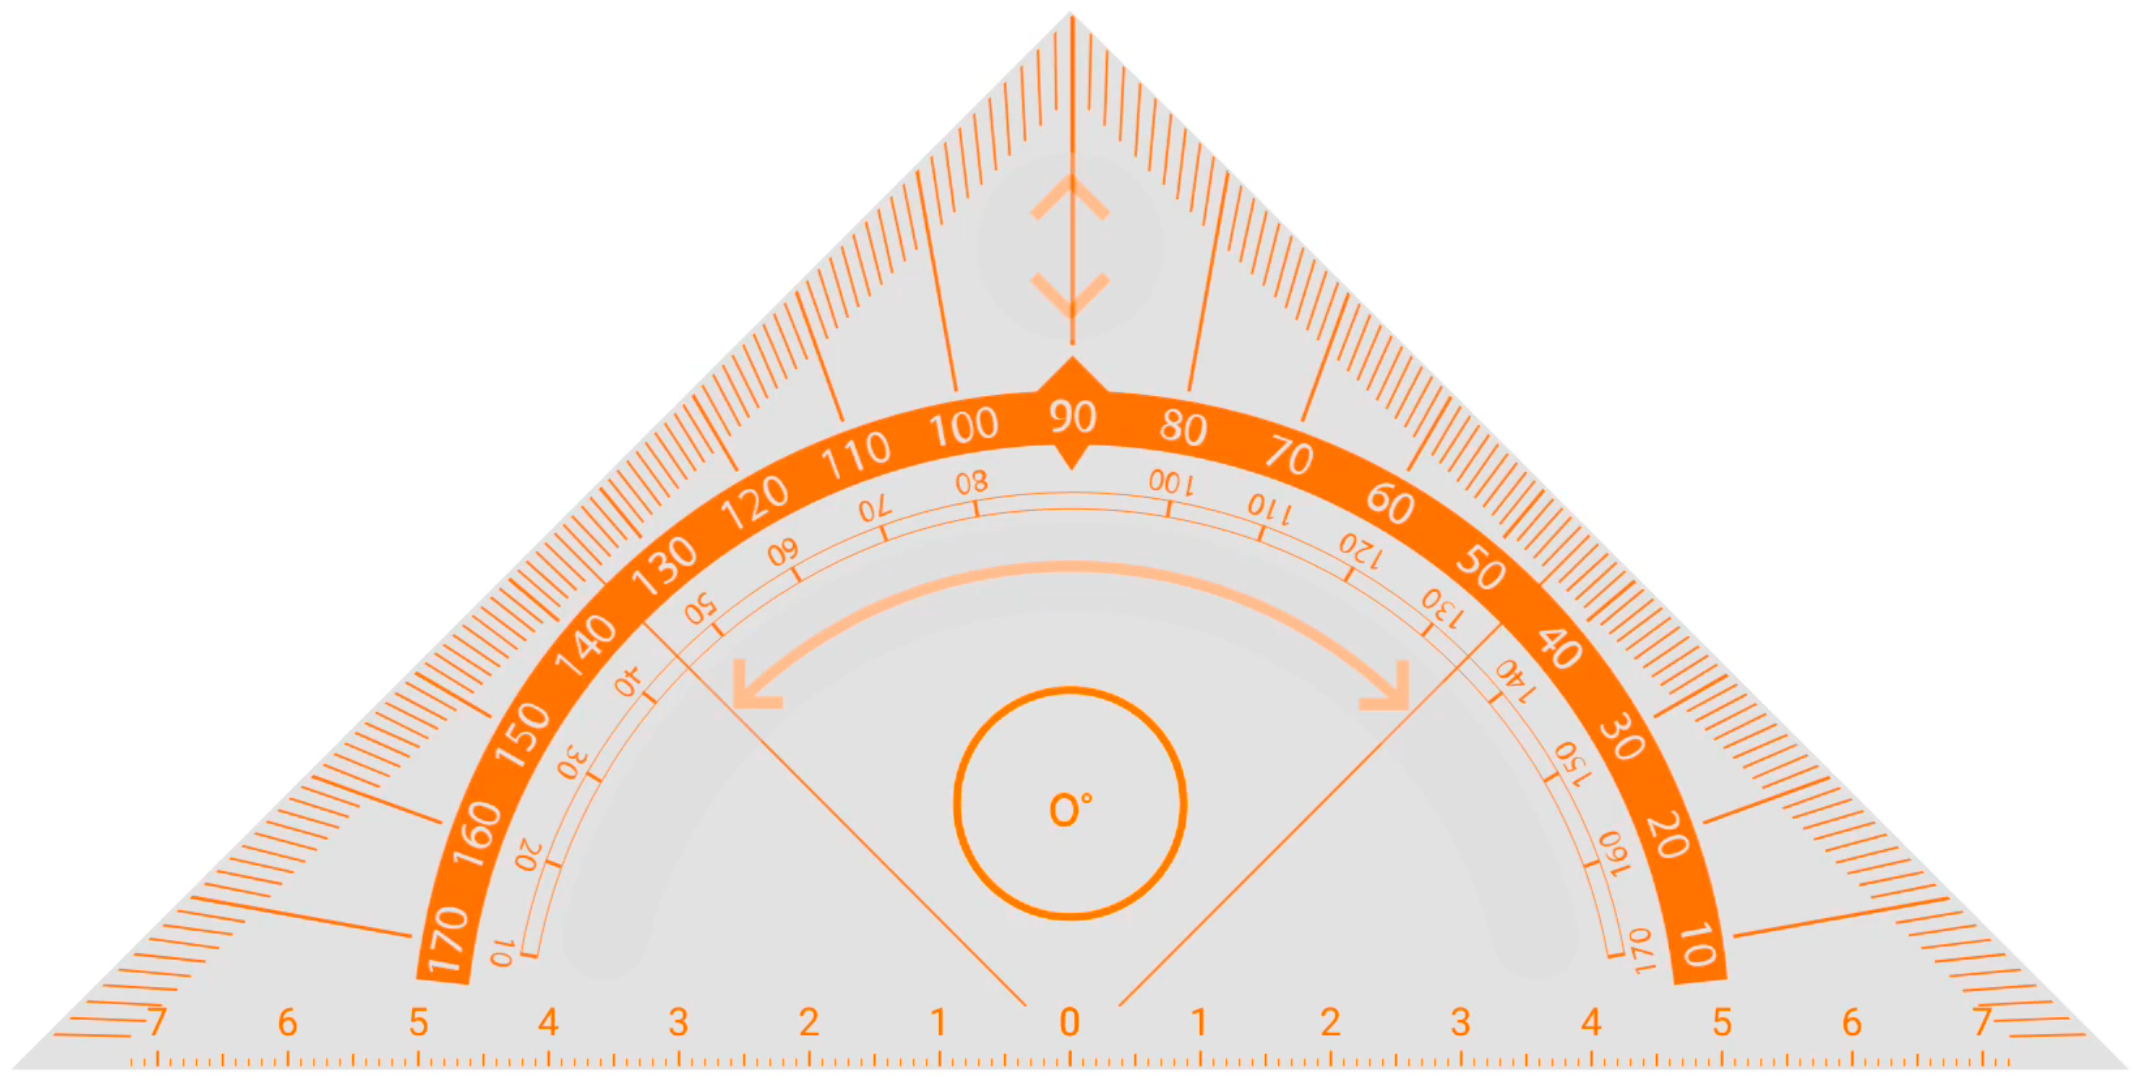
Rotating the triangle can be done by selecting the rotation handle. The triangle will rotate around its' center point and the indicator will tell the user the angle. While rotating, the triangle can no longer accidentally be scaled or moved. Additionally, a red dot will appear to indicate the center point.
Scaling
The triangle can be scaled bigger and smaller by using the scale arrow in the top corner of the triangle. While scaling, you’ll notice that the measurement range will no longer scale along with the triangle but will now give you more or less range depending on the size on the triangle.
Zooming
A similar functionality can be observed if you zoom the canvas in or out:
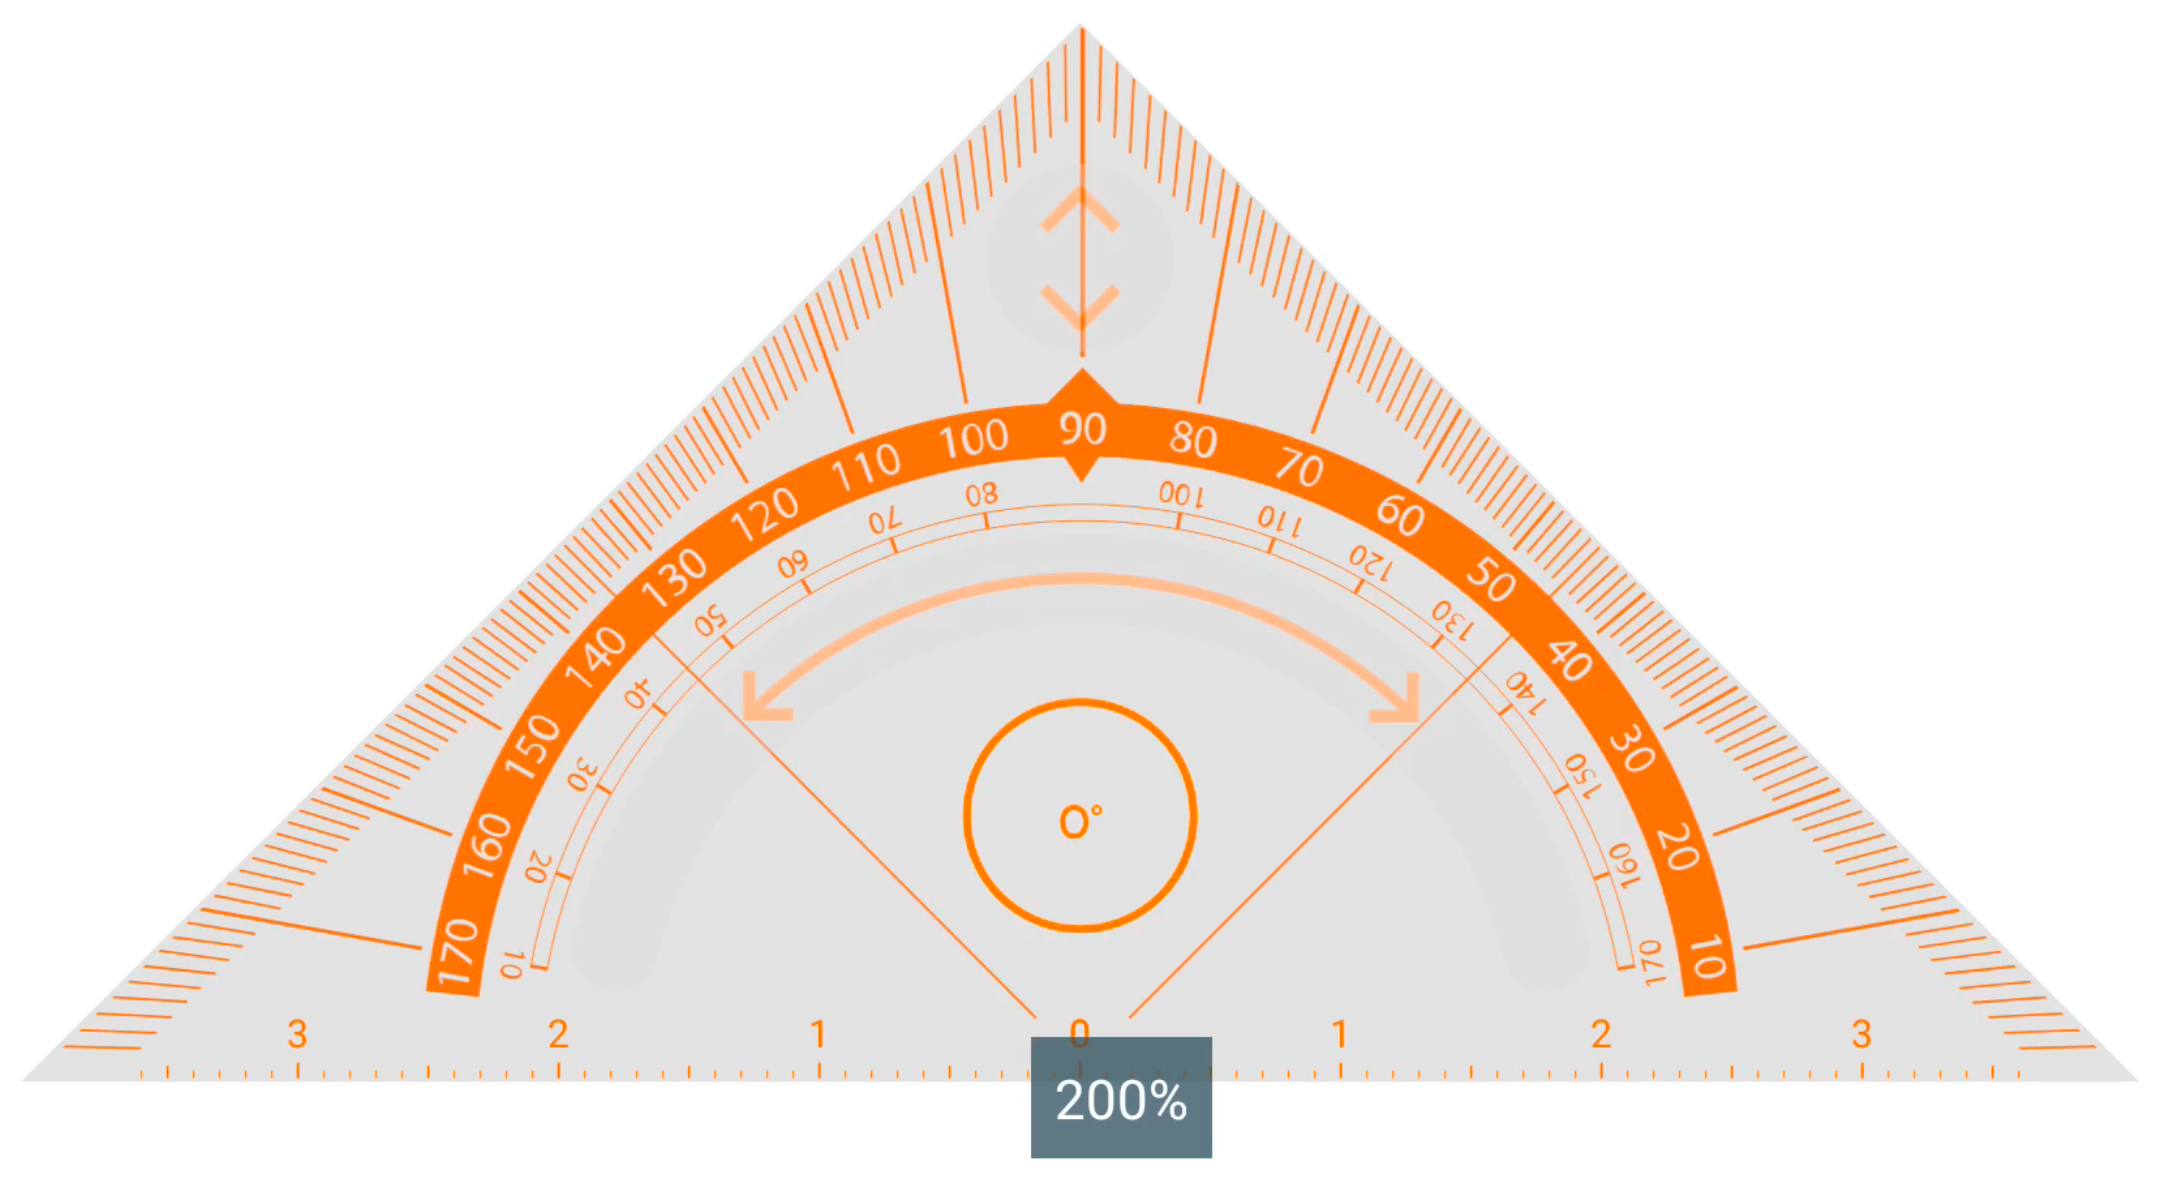
If you add a triangle or ruler to the canvas and start zooming in or out, you’ll notice that the measurement range increases or decreases according to the zoom scale. This is very handy if you’ve drawn a line and ran out of space but need to draw a new line using the same measurement scale.
Ruler
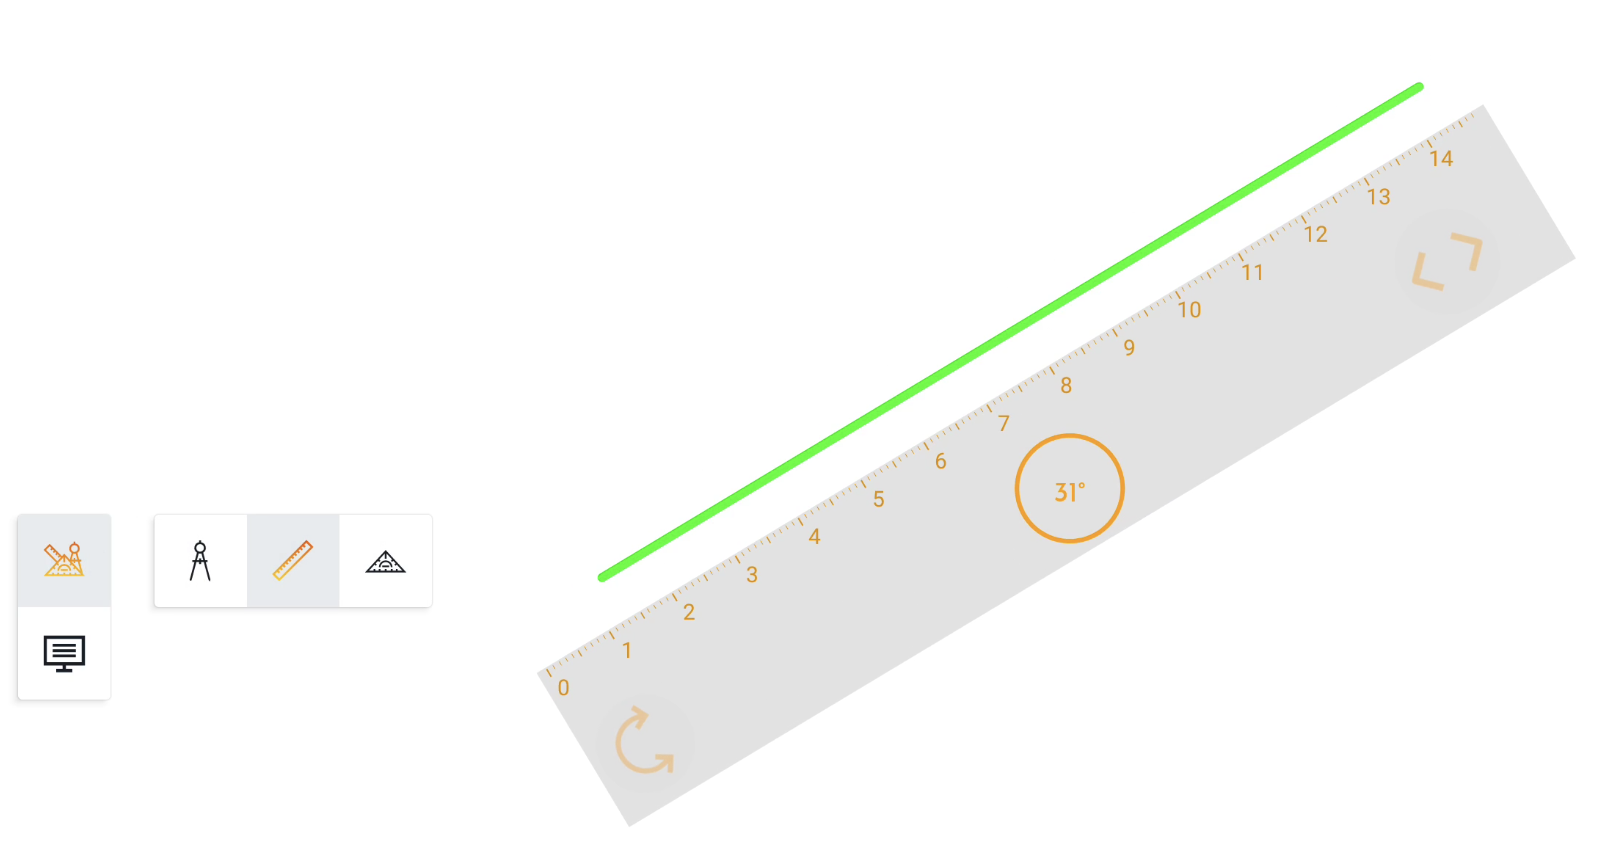
Apart from the protractor ruler, there is also the possibility of a regular ruler, which can be found as the second option in the VR tools menu. This ruler can draw straight lines or make relative measurements on the device.
Drawing
Both rulers could extend the drawn line outside their borders as long as the drawing started on the ruler, with all the sides available for drawing.
Note: When using the ruler, only one side will be available at a time while drawing. In order to use another side of the ruler, the drawing needs to be interrupted and started again in the desired side/border.
Rotating

Rotating the ruler can be done by selecting and moving the rotation button at the left end of the ruler. The value in the middle of the ruler will indicate the angle the ruler is in.
While rotating, a red dot will appear to indicate the center point.
Scaling
Scaling the ruler can be done by selecting and moving the scale button at the right end of the ruler. This will either contract or expand the ruler. You’ll see that expanding will give you a larger measurement range while scaling down, gives you a smaller range.
Zooming
Note that, just like with the triangle, zooming in or out will now update the measurement range based on the new scale.
Drawing compass
The drawing compass is the third option in the VR tools menu. Unlike the other tools, the drawing compass has different sections with which you can interact, namely the handle and the wheels.
First, when using the compass, it needs to be placed in the desired position. To move it, the right wheel can be used. If there is the need to enlarge the distance between the compass leg, the left wheel can be used to set the preferred size/distance.
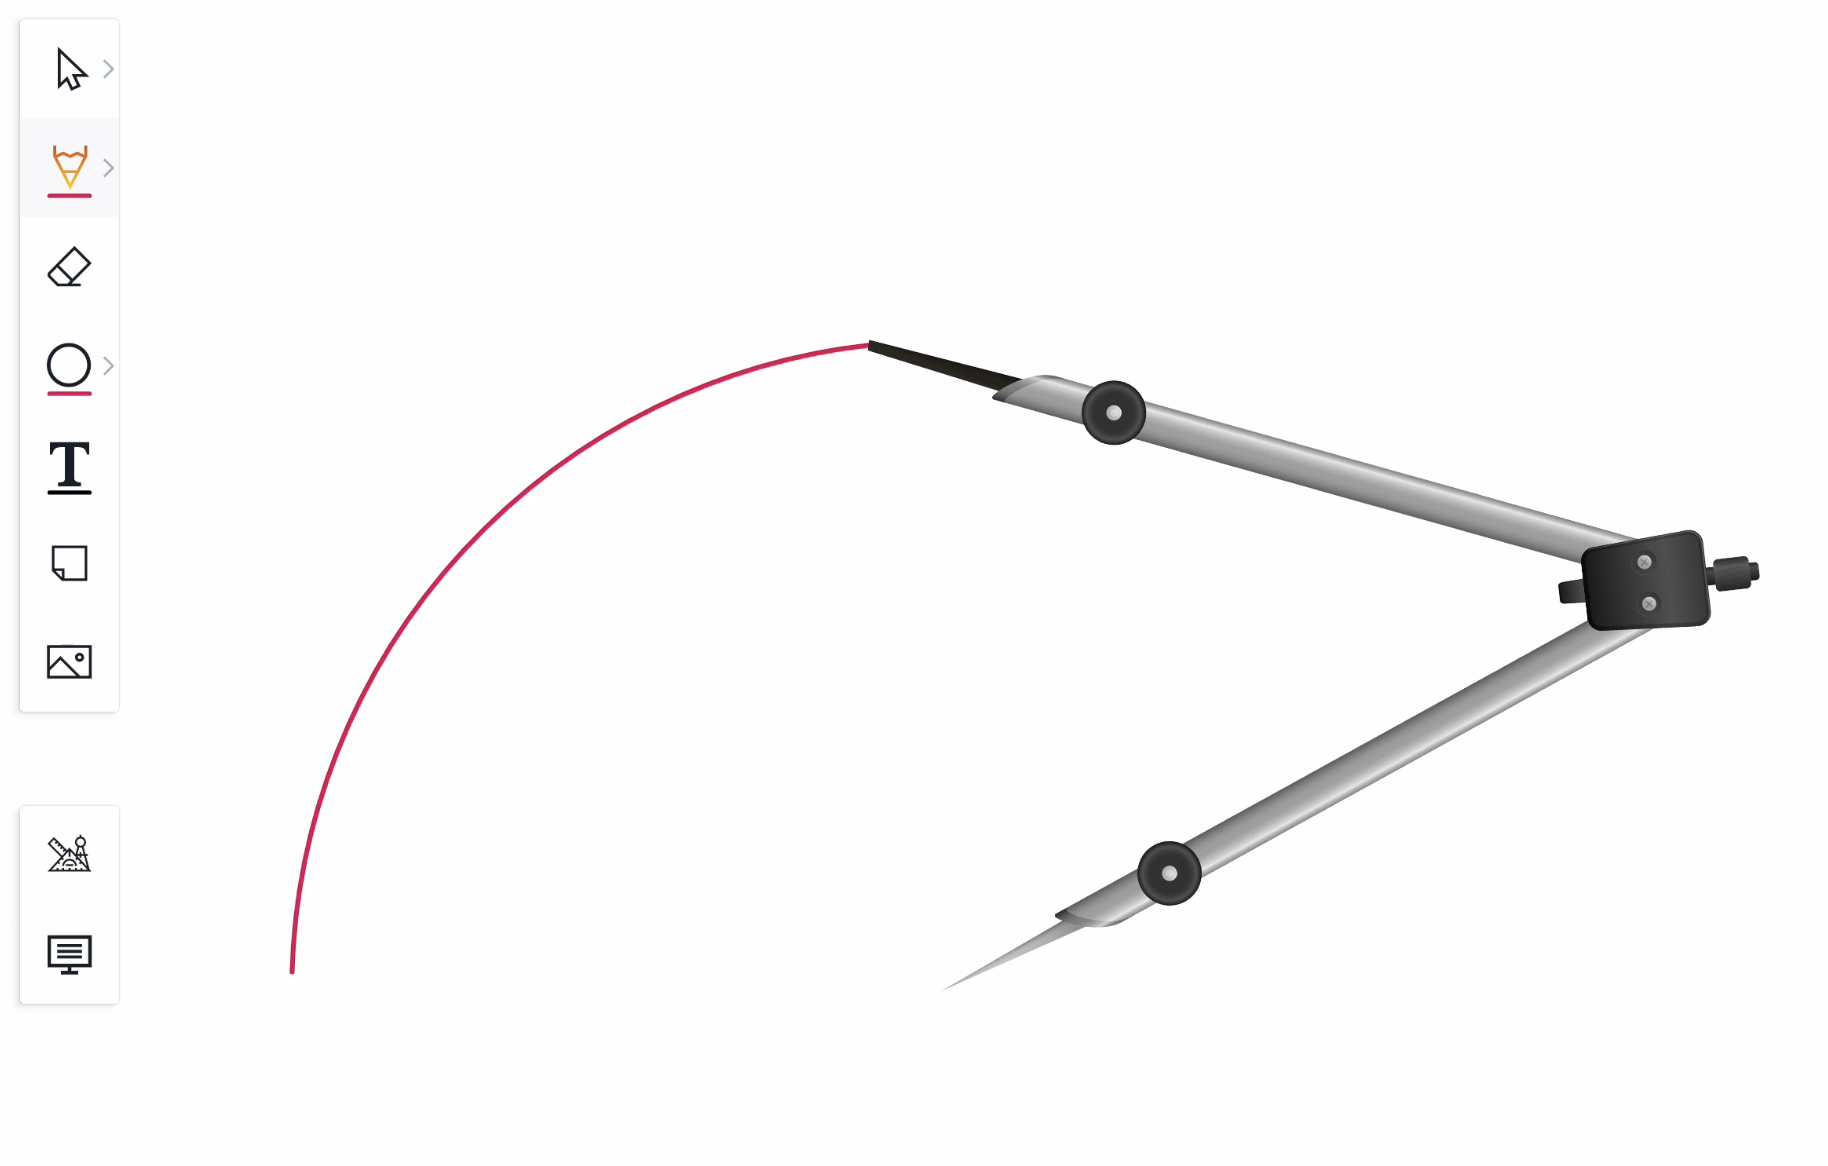
To start drawing, the handle has to be moved around. Depending on the desired output from the compass drawing, it can be released, and the compass will stop drawing.
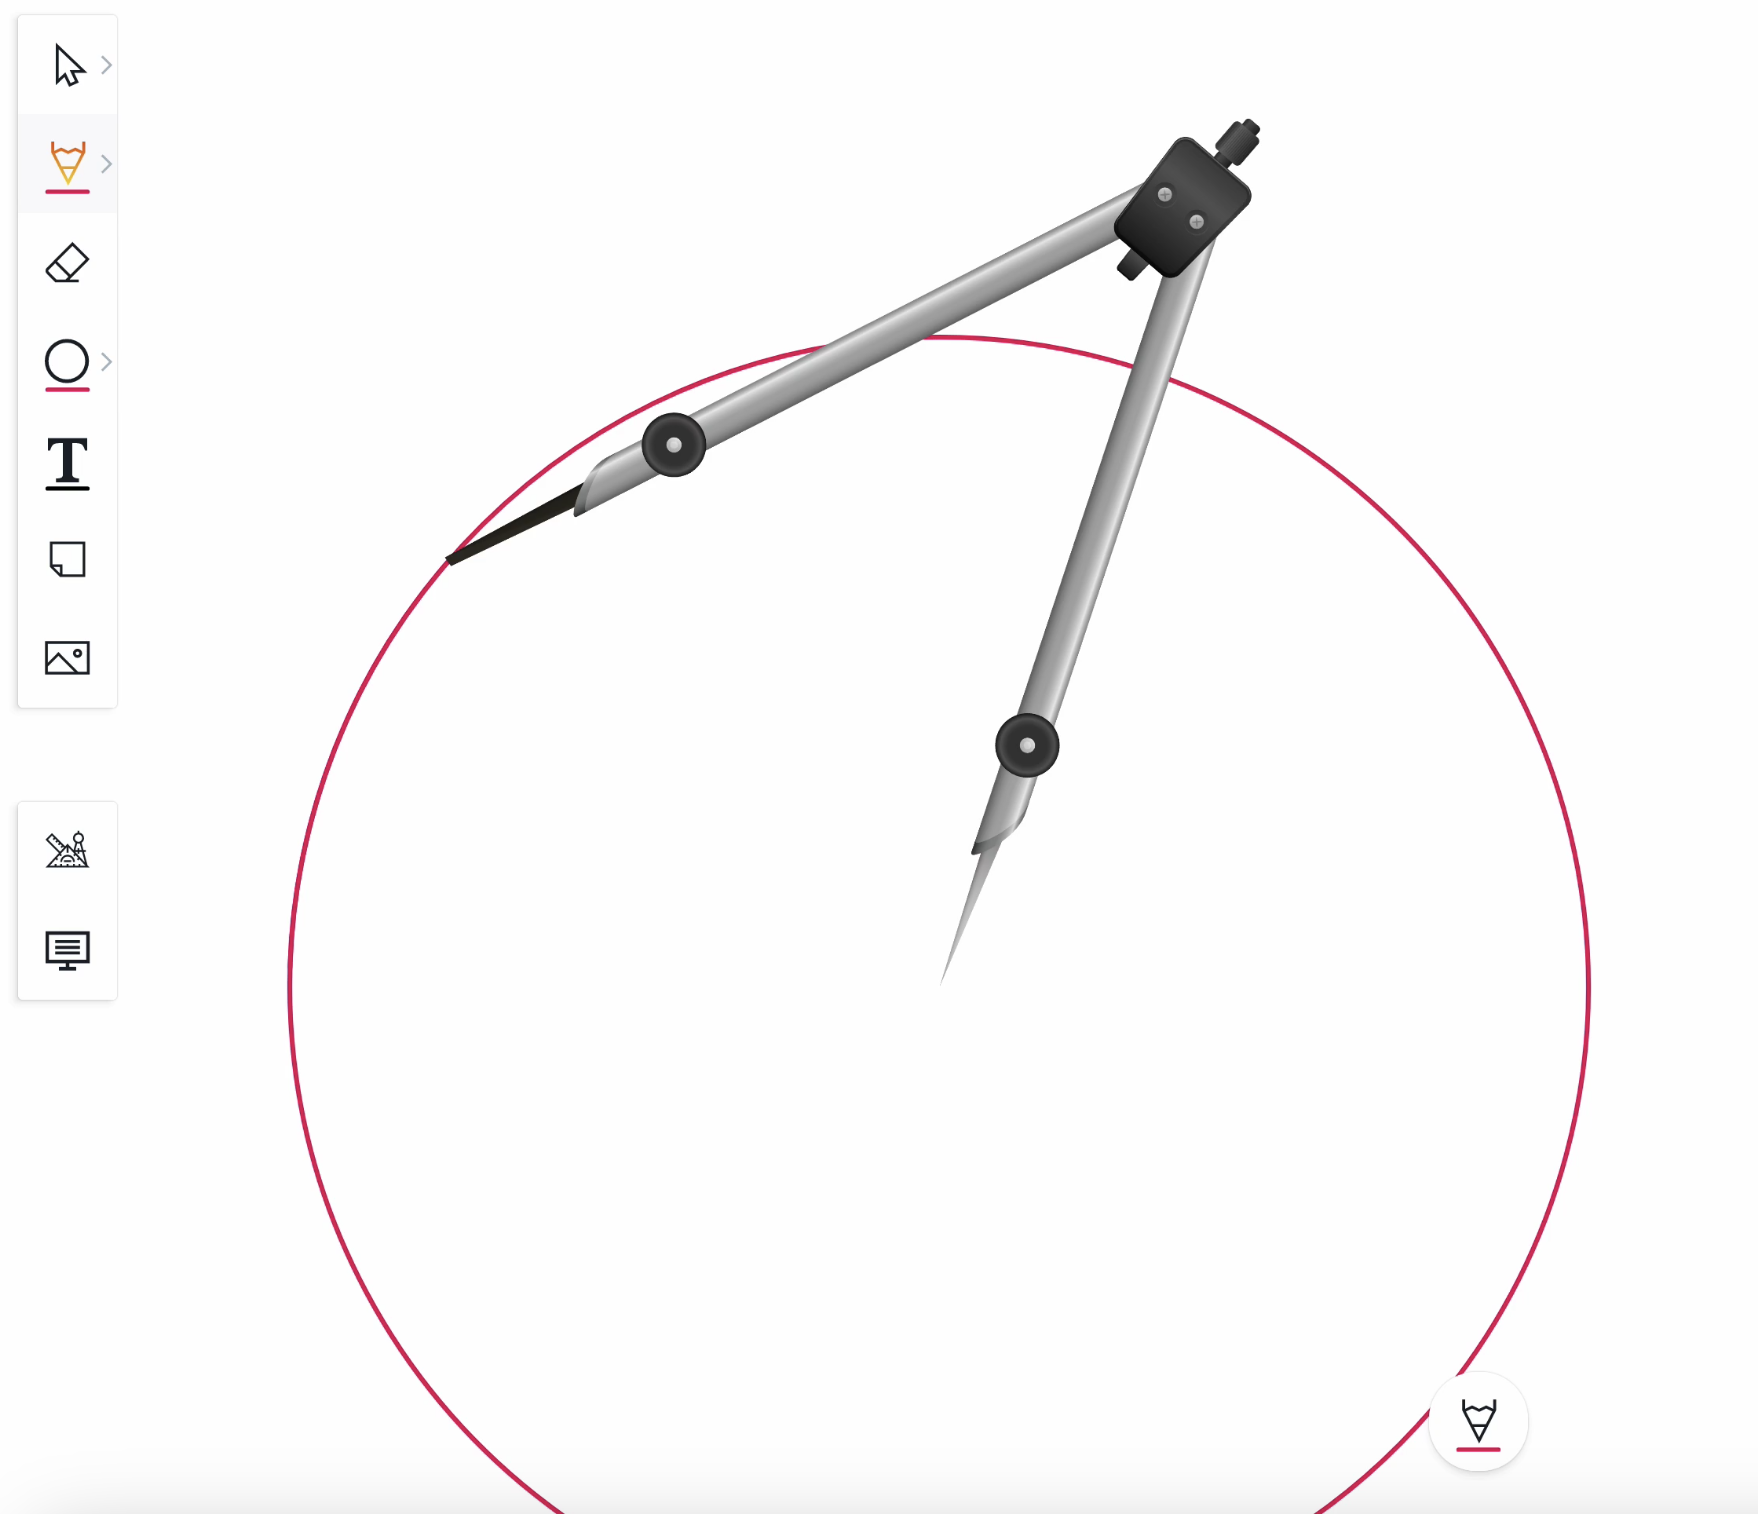
If a full circle is the desired output, a full rotation of the compass should be performed.
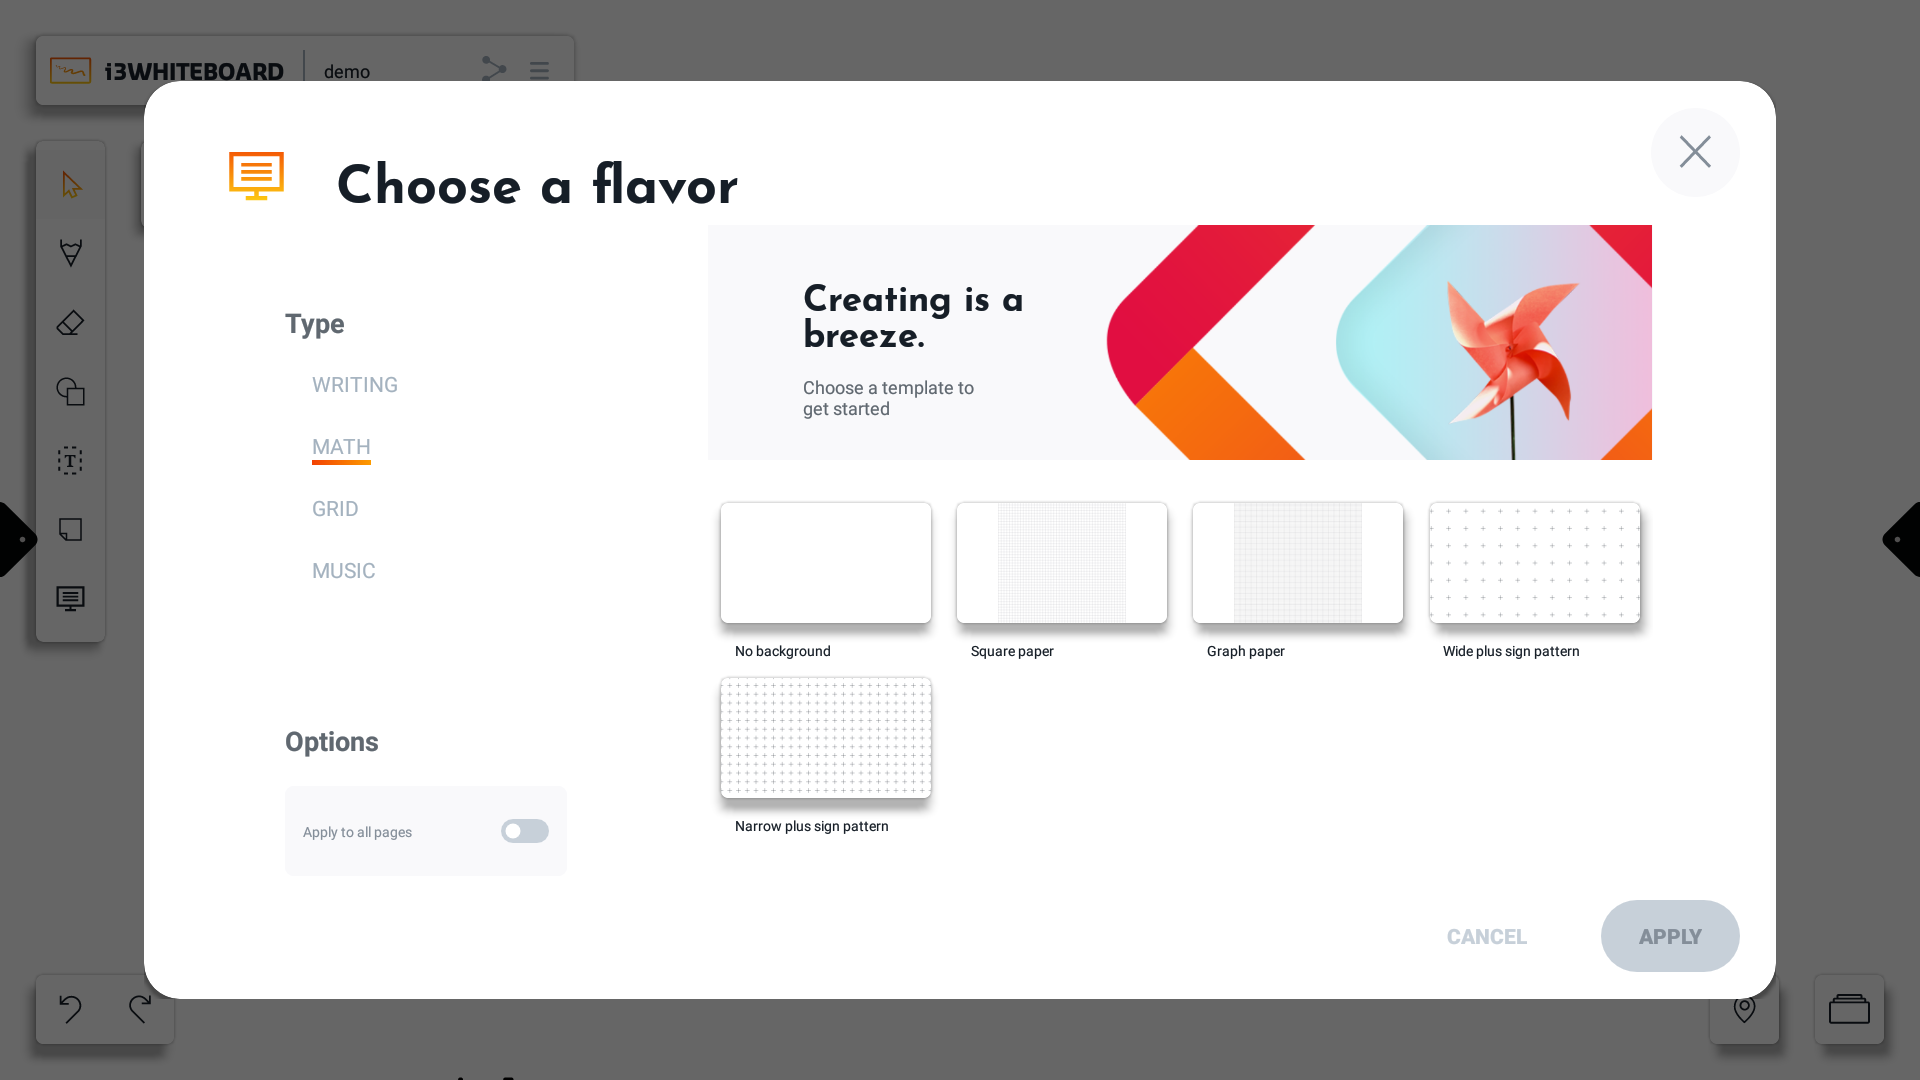
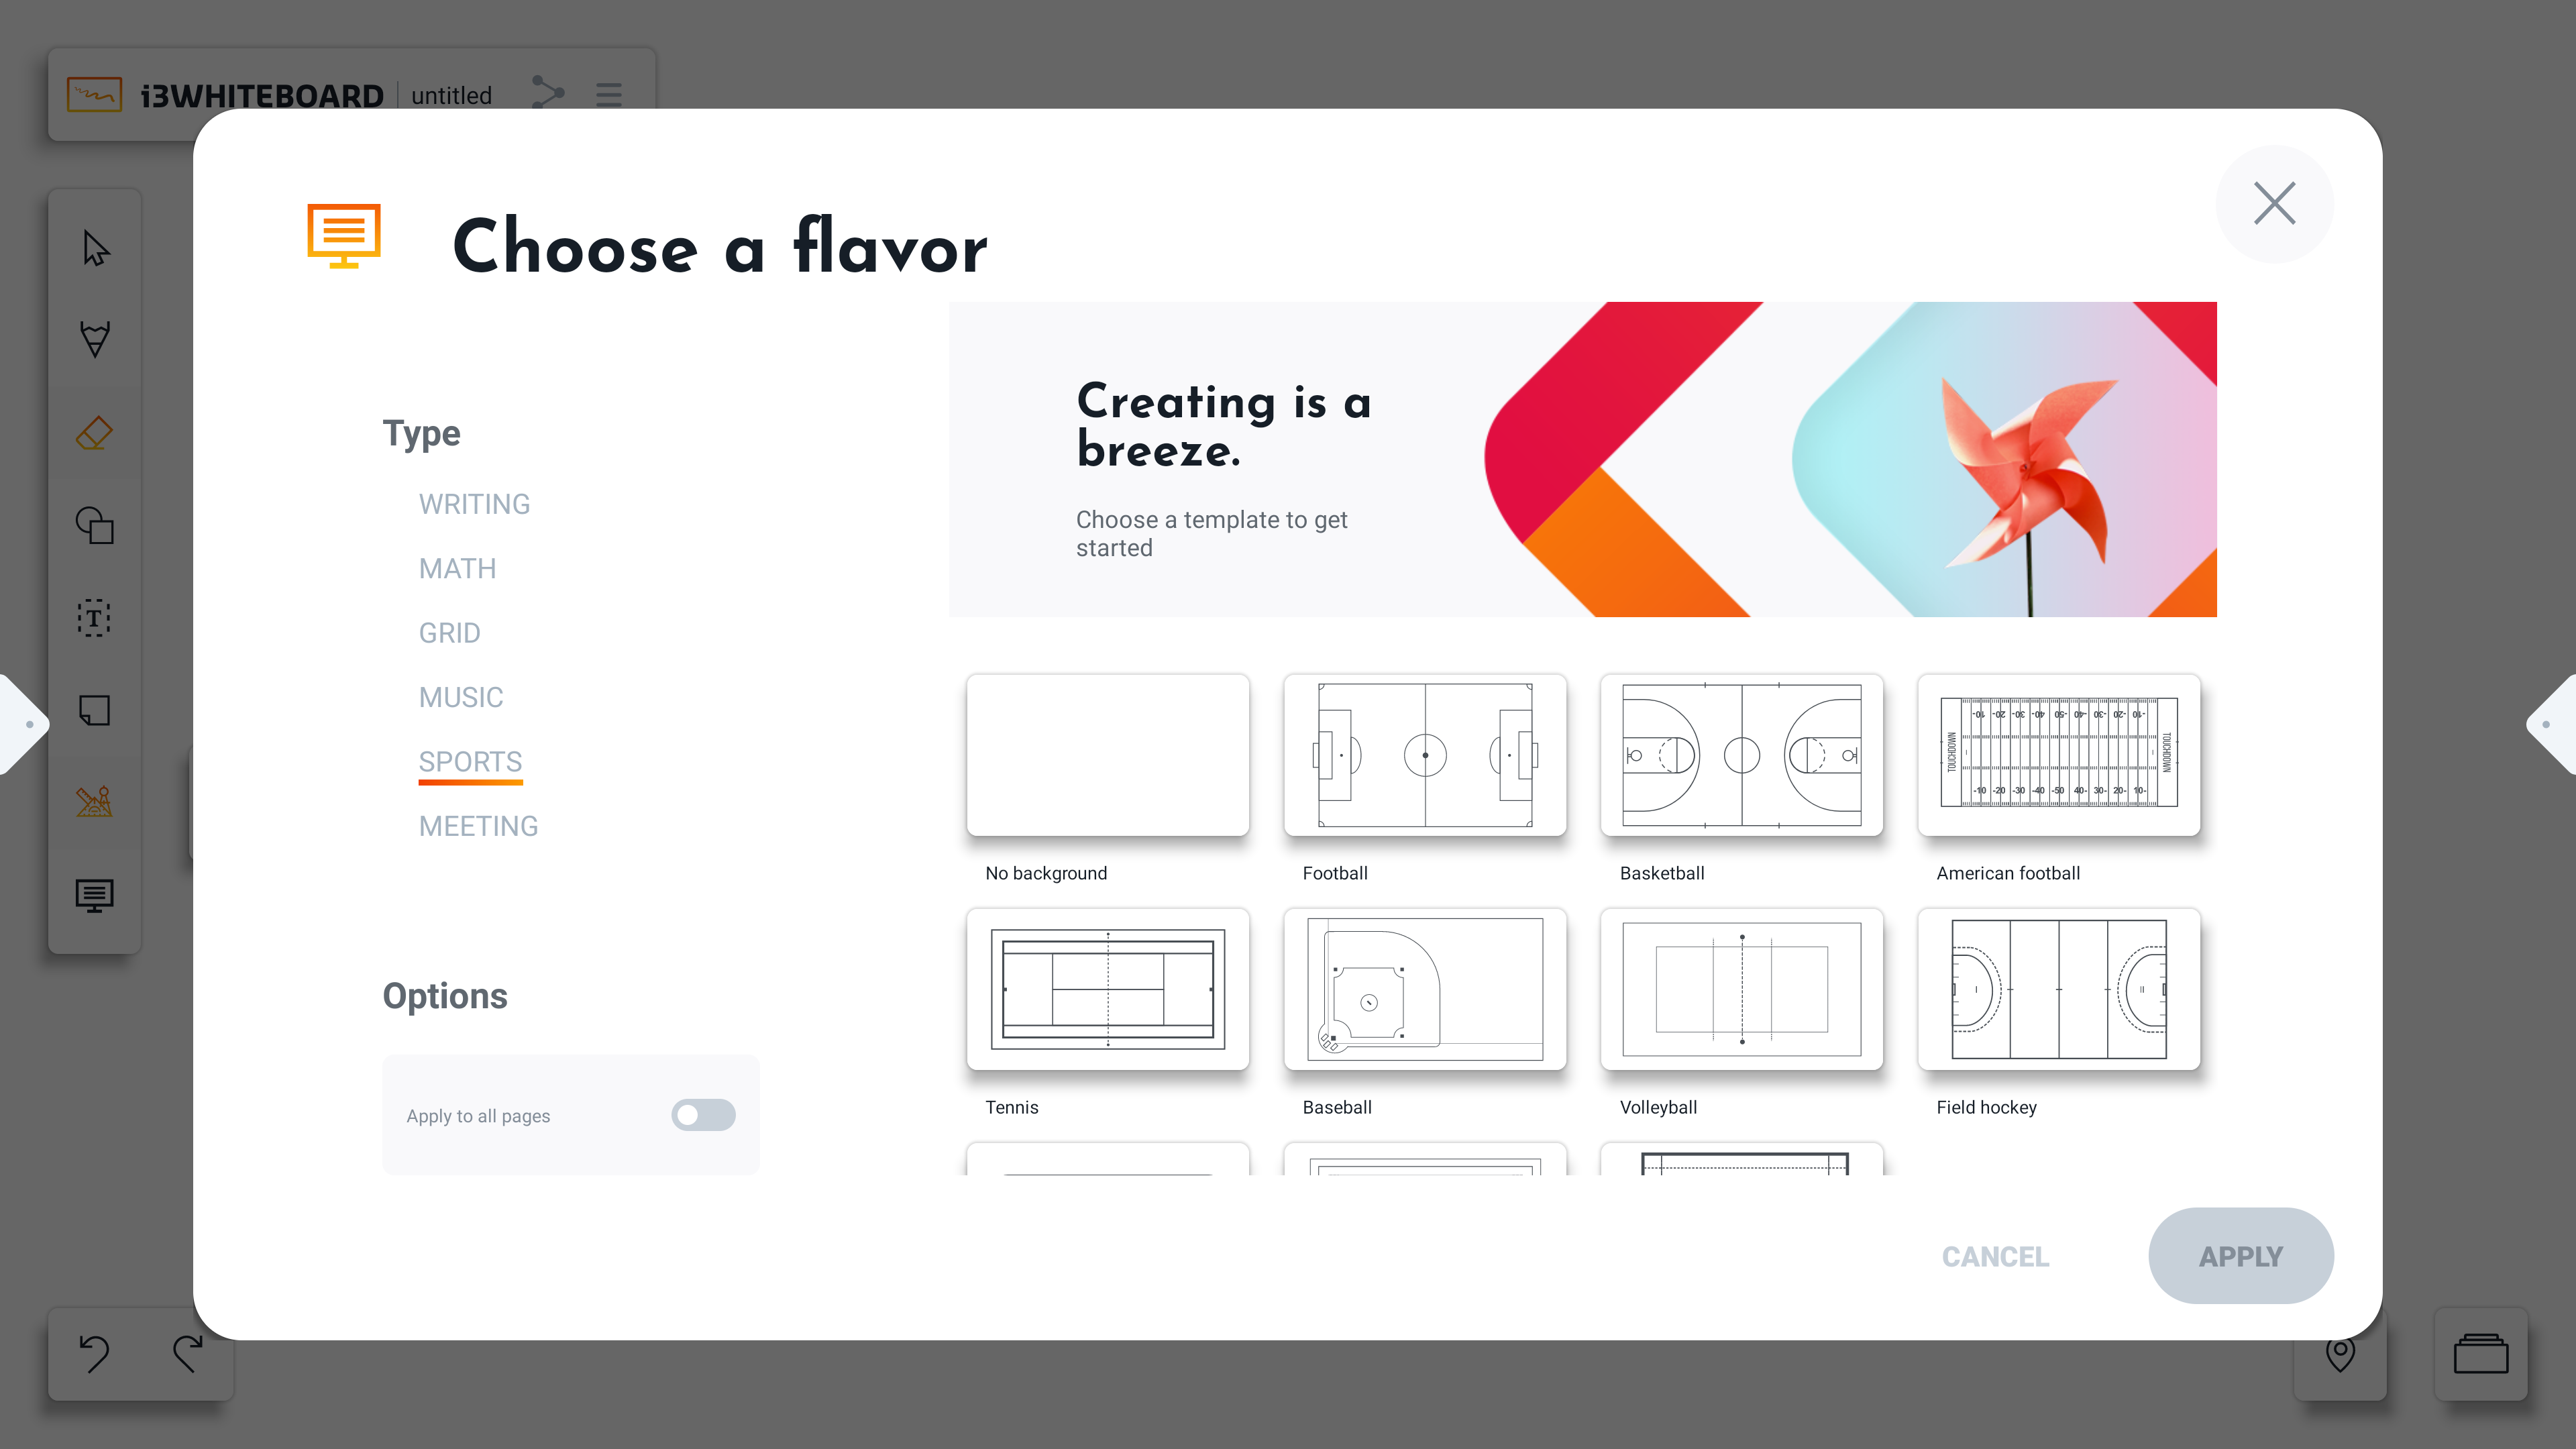
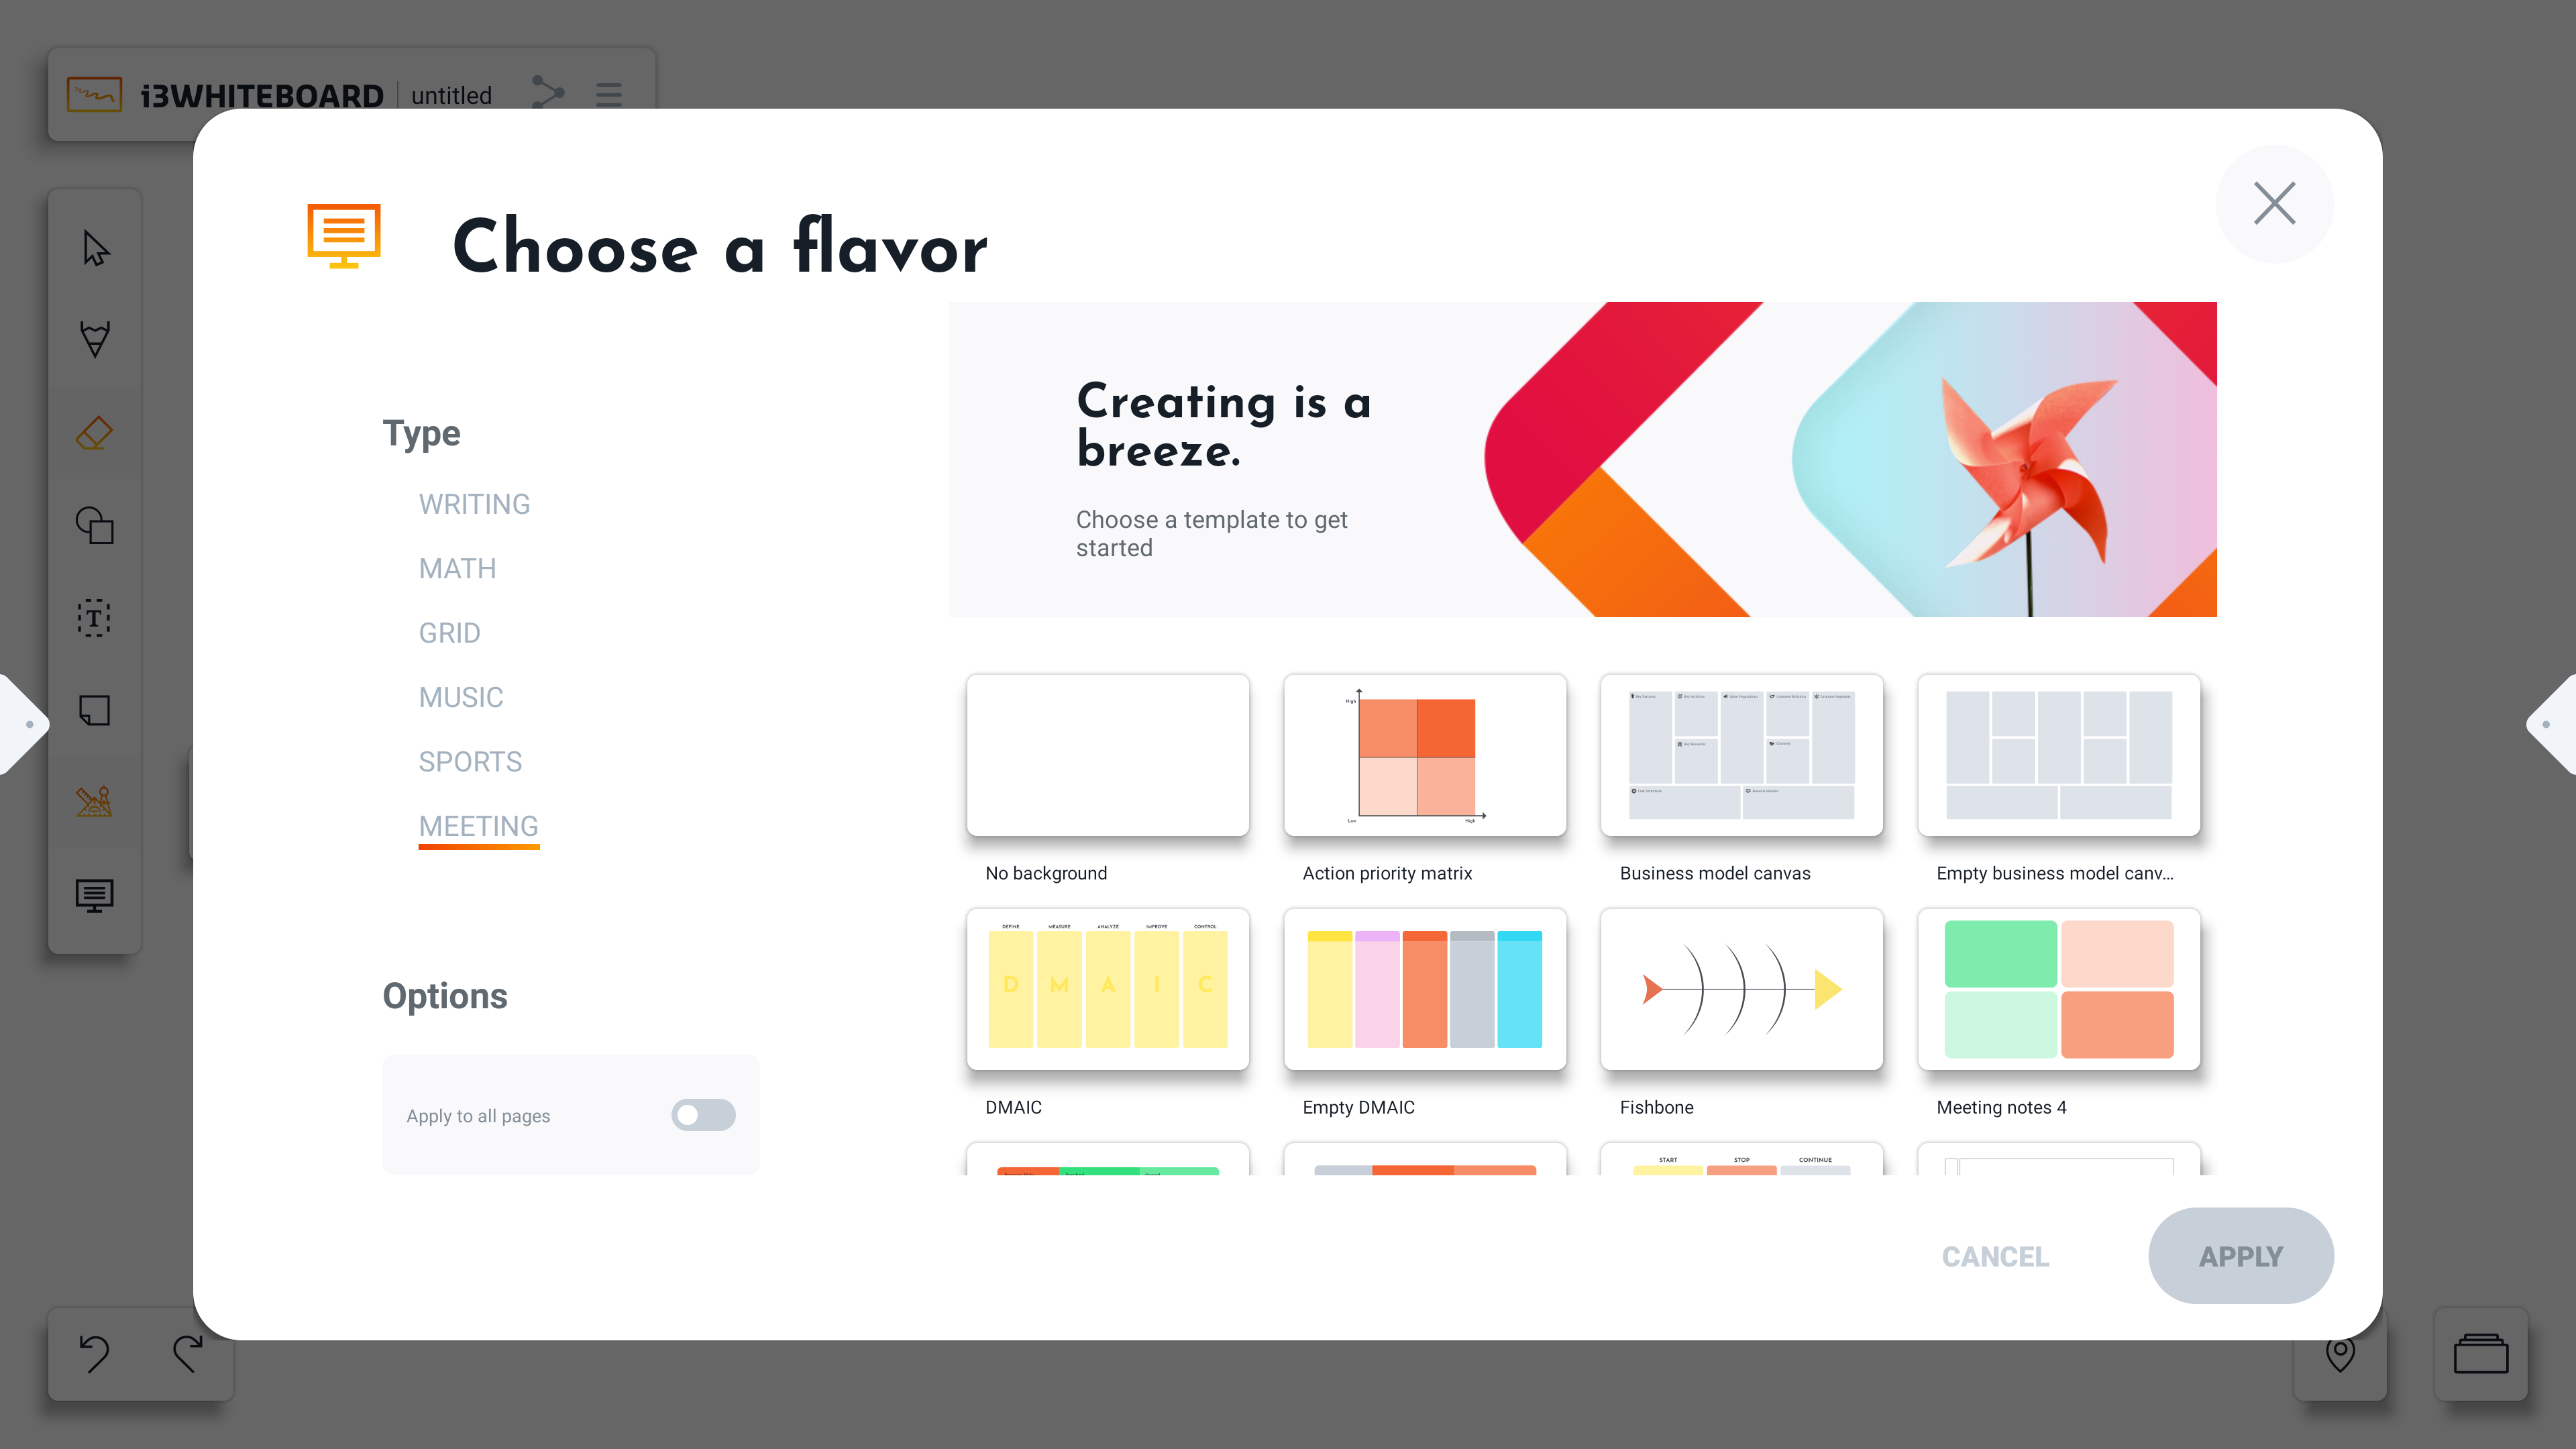
Backgrounds and templates
The backgrounds option will open the “Choose a flavor” dialog.
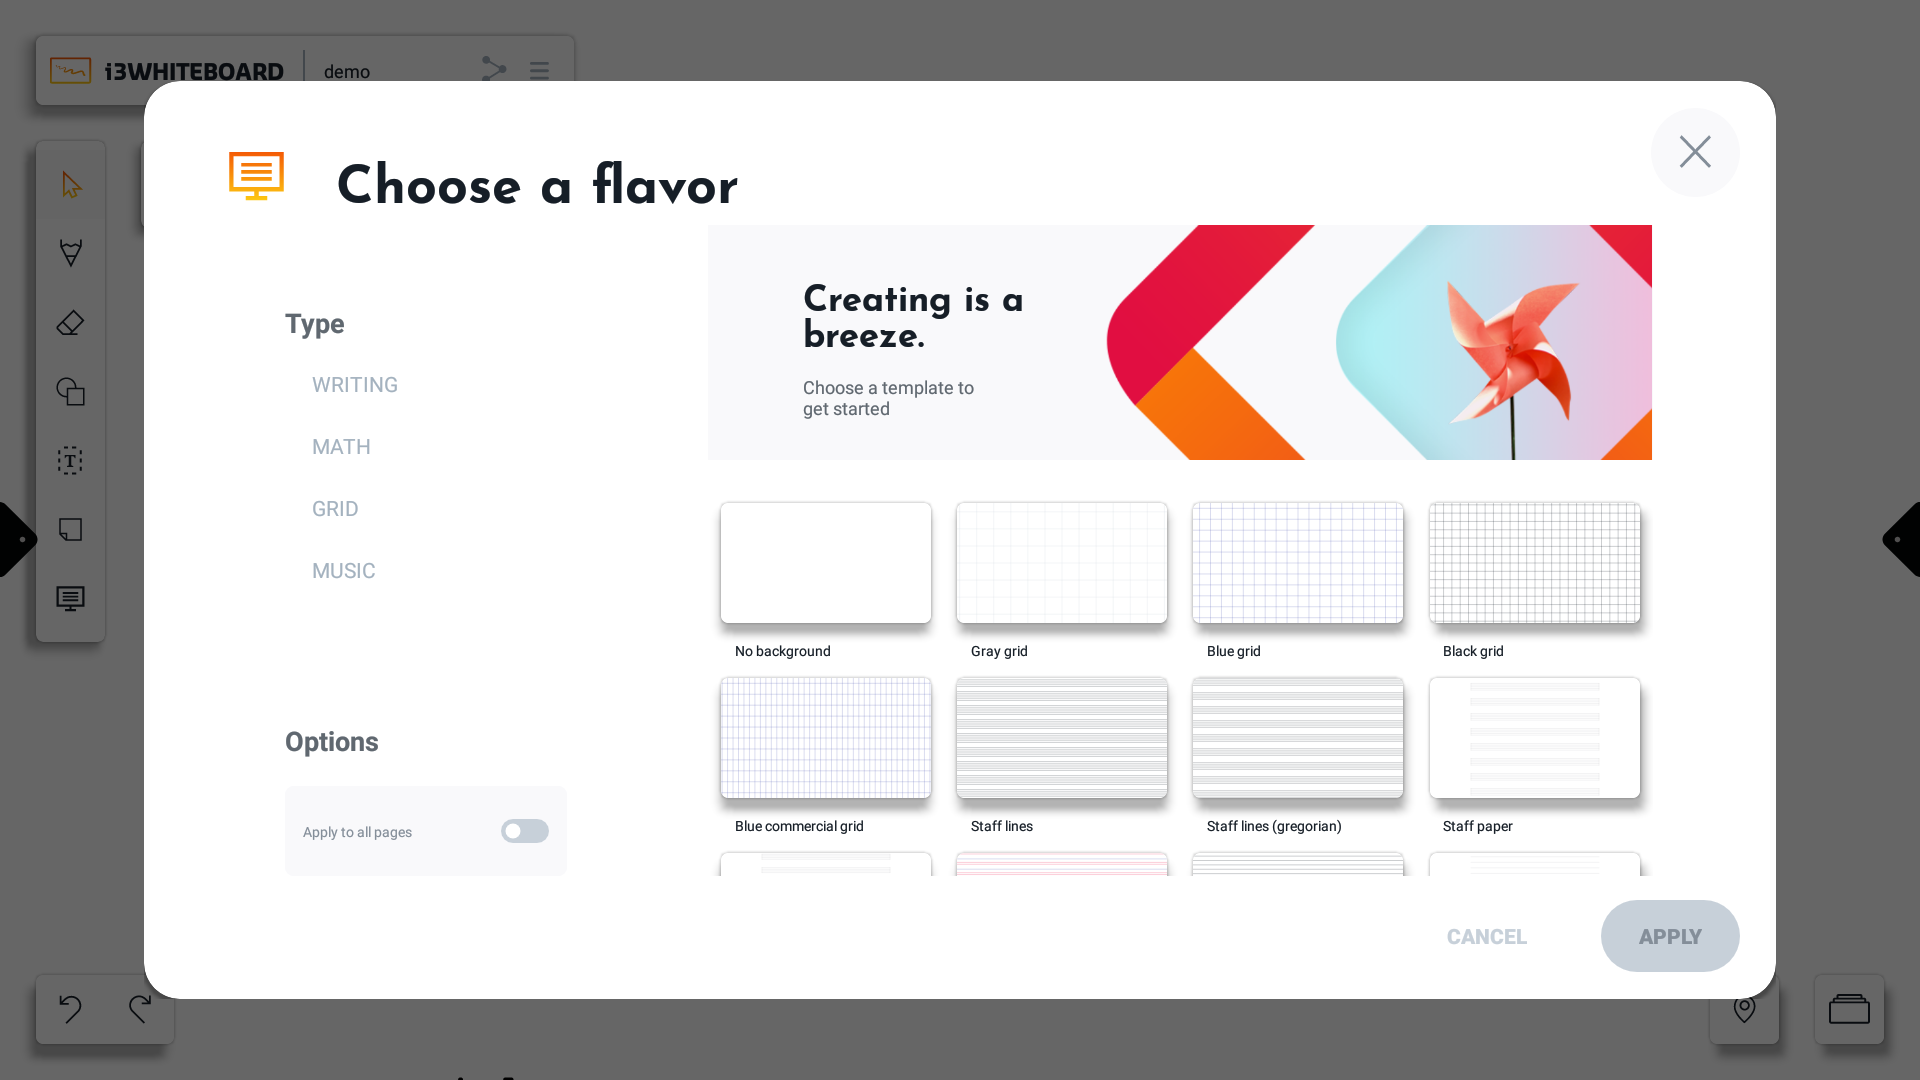
Choose a background or template.
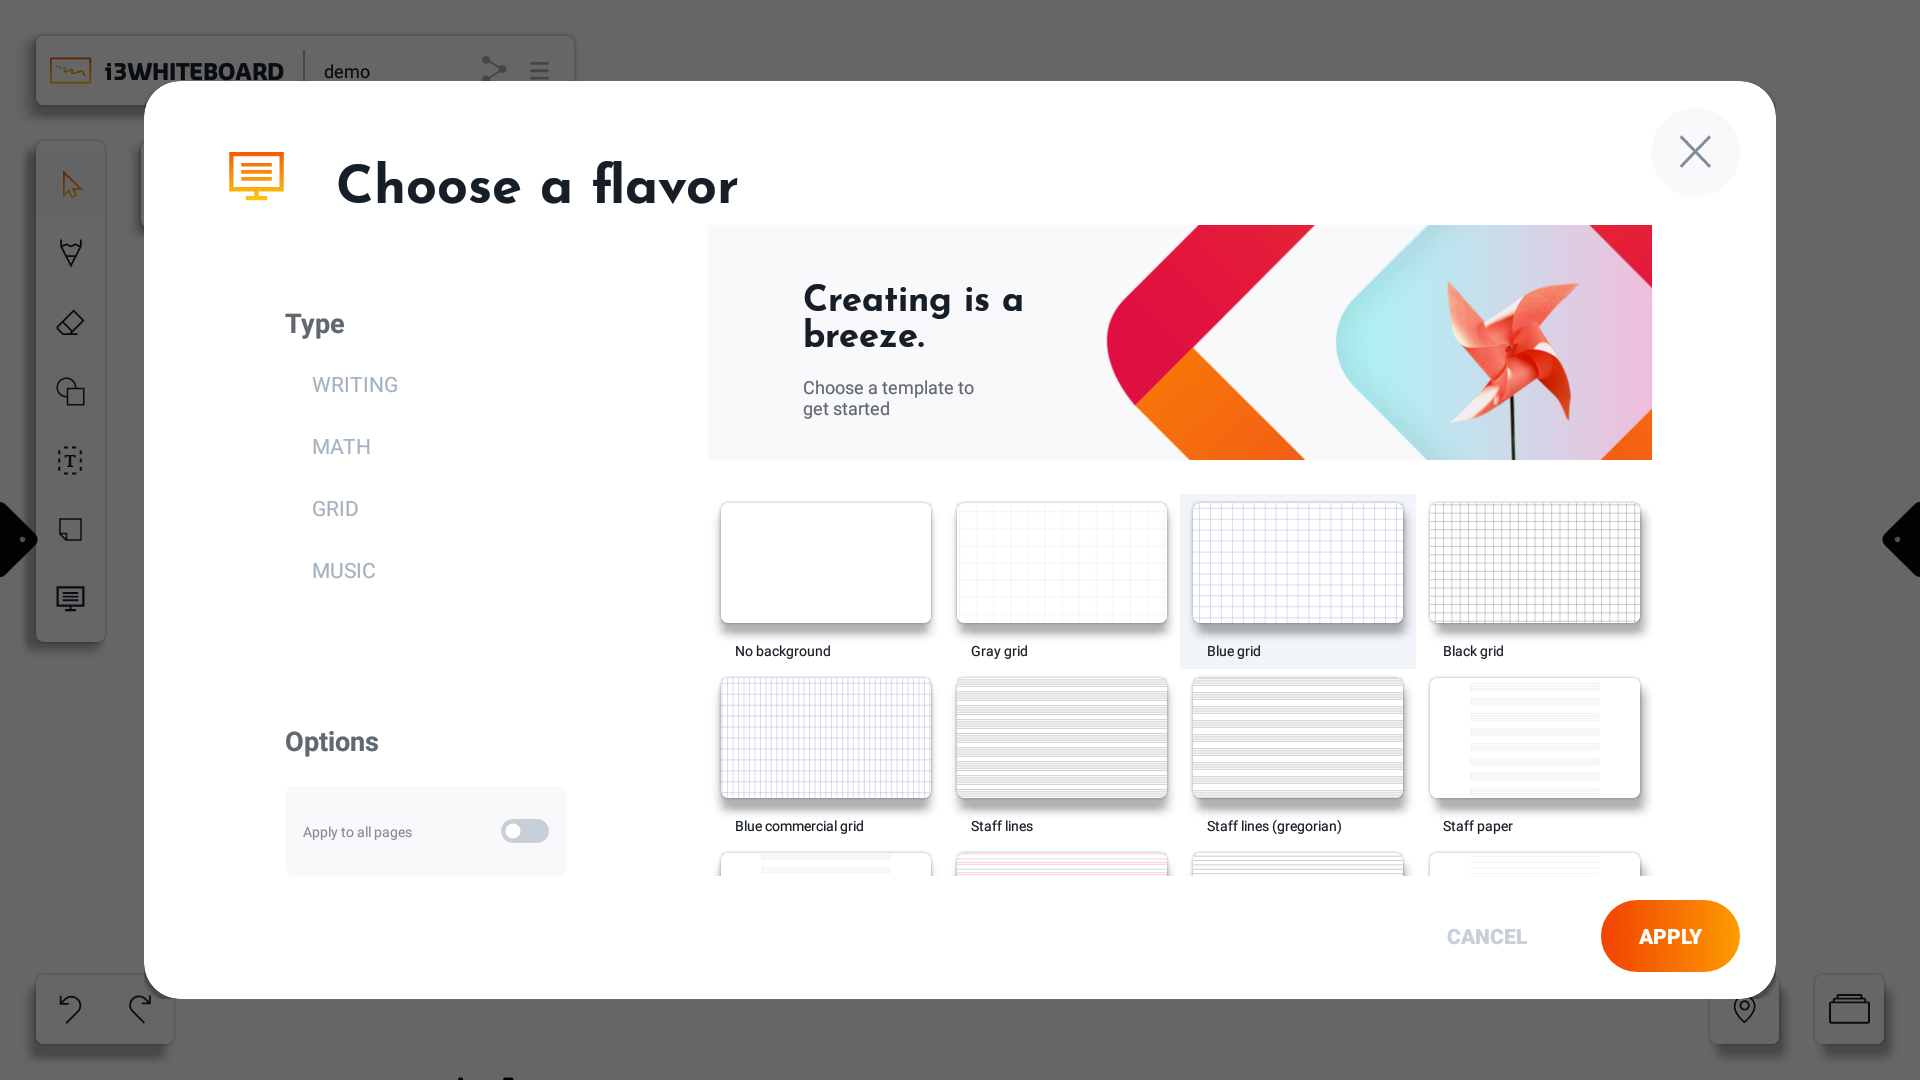
The “Apply to all pages” option will apply the background to all existing boards.
Press “APPLY” to apply the background to the canvas.
You can also filter by category by pressing on a flavor type.
See our variety of sports and meeting backgrounds:
(Physical) Pen tool menu
Some i3TOUCH displays come with one or more physical pens. If you have one, you will see the number of pens in i3WHITEBOARD as a separate tool menu. Each pen size will have its own icon, with the color indicator visible. This way you’ll always have a good overview of the colors you’re drawing with.
If you draw straight away with the pens, you will see that the active pen is highlighted and its' Features menu appears.
You can also select the icons and change the features in the Features menu before drawing. The Pen tool does not allow you to draw shapes or text. However, if you select the Shape tool, you can easily draw shapes with your finger while using the pens for drawing. Each in their own color!
Note: The i3TOUCH X2 comes with 4 pens, but one behaves identically to the finger. Therefore, the Pen tool menu will only display 3 pen icons that you can customize.
If you set Pen & finger preference to Single Mode, you won’t see the Pen tool. In Single Mode, there’s no differentiation between pen and finger touch events.