User Controls
User Controls
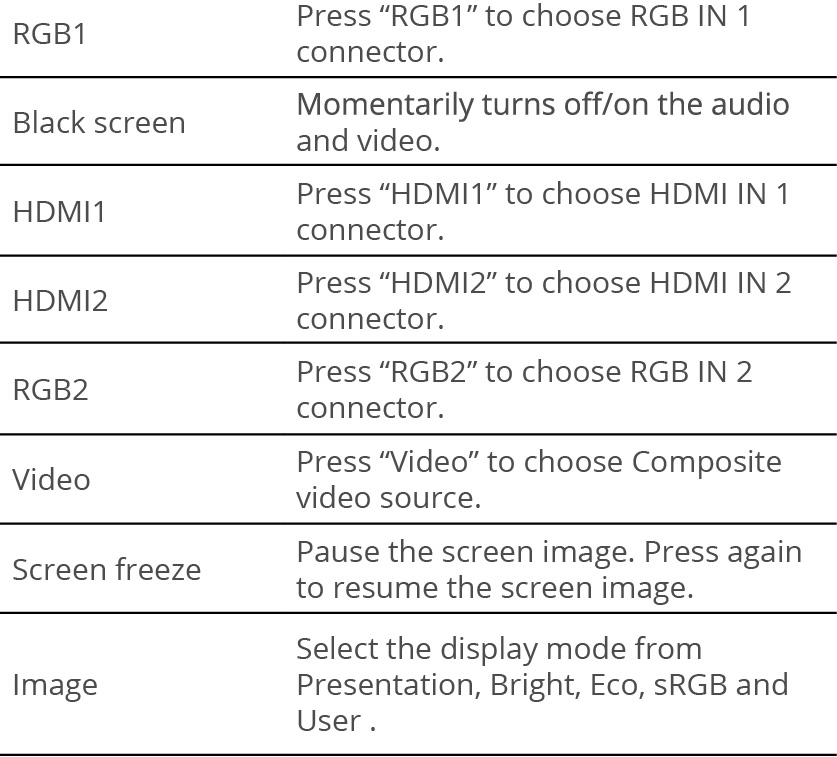
Control Panel & Remote Control
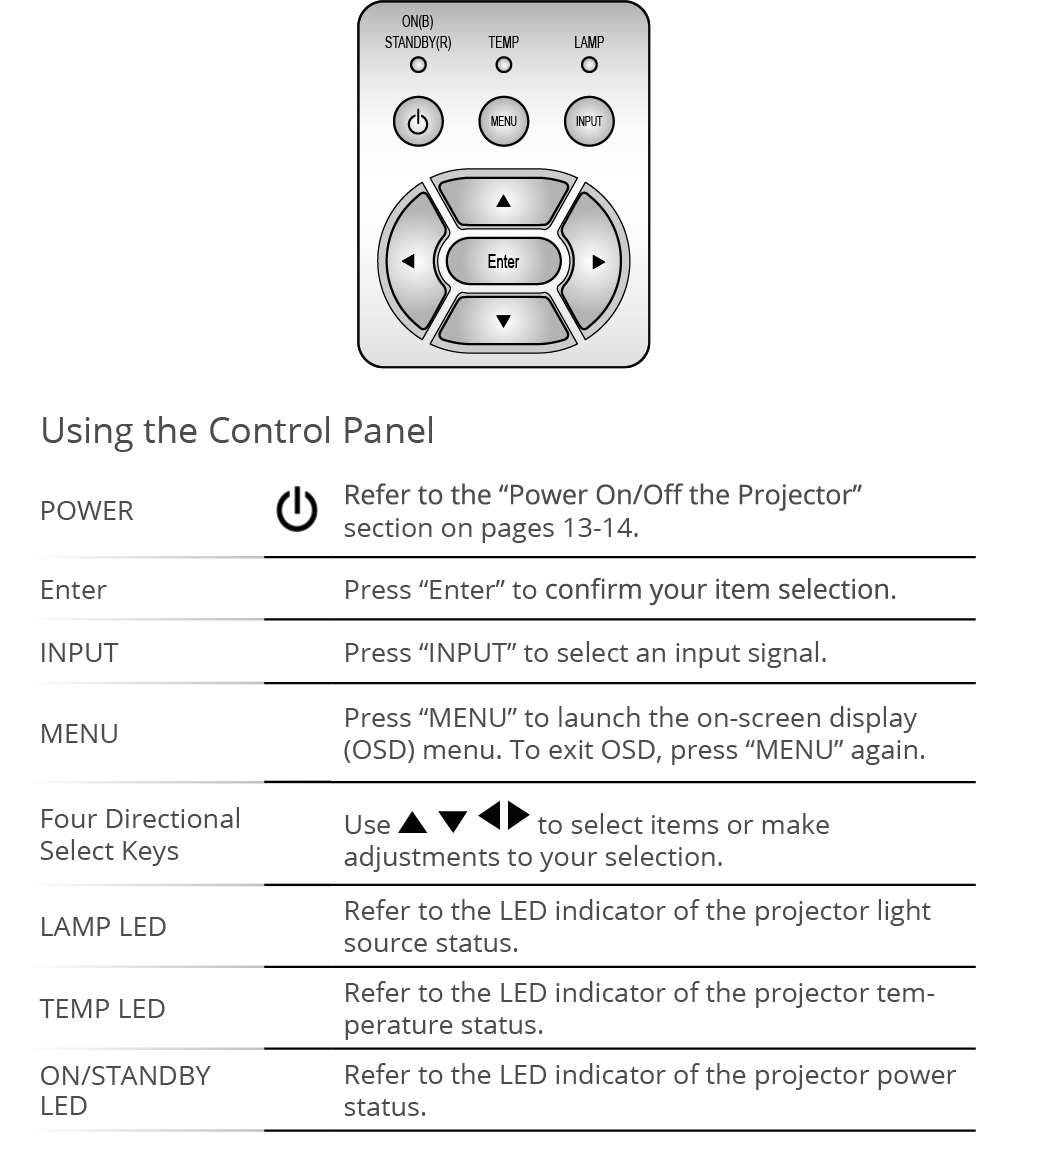
Control Panel
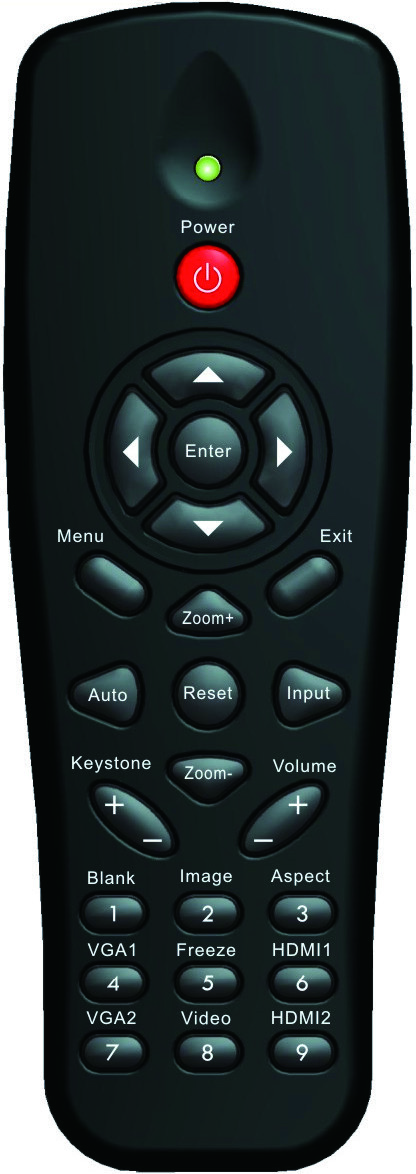
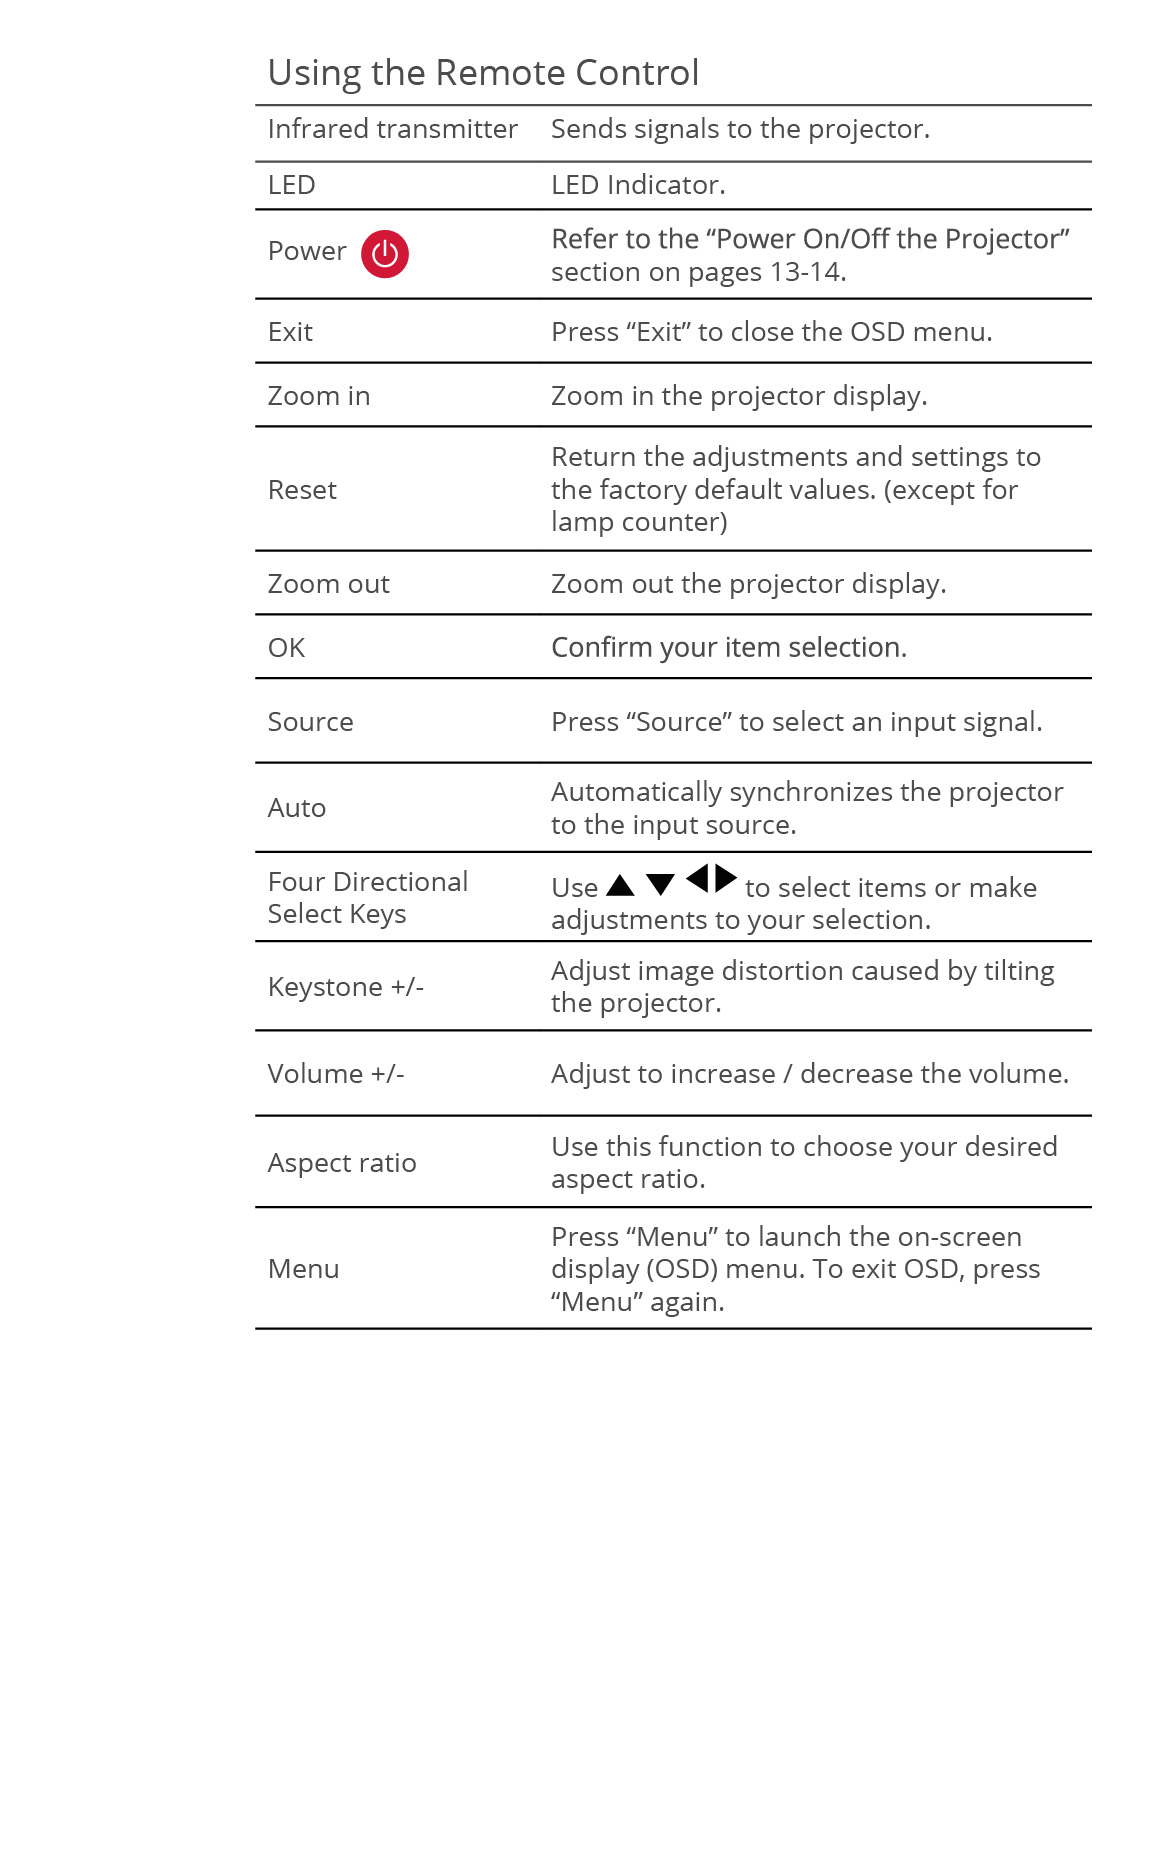
Remote Control
On-screen Display Menus
The Projector has multilingual On-screen Display menus that allow you to make image adjustments and change a variety of settings.
How to operate
To open the OSD menu, press “Menu” on the Remote Control or Projector Keypad.
When OSD is displayed, use the ▲▼ keys to select any item in the main menu. While making a selection on a particular page, press the ► or “Enter” key to enter sub menu.
Use the ▲▼ keys to select the desired item and adjust the
settings using the ◄ ► key.
Select the next item to be adjusted in the sub menu and adjust as described above.
Press “Enter” to confirm, and the screen will return to the main menu.
To exit, press “Menu” again. The OSD menu will close and the projector will automatically save the new settings.

Picture

Color Mode
There are many factory presets optimized for various types of images. Use the ◄ or ► button to select the item.
Bright: For brightness optimization.
PC: For meeting presentation.
Movie: For playing video content.
Game: For game content.
User: Memorize user’s settings.
Wall Color
Use this function to choose a proper color according to the wall. It will compensate the color deviation due to the wall color to show the correct image tone.
Brightness
Adjust the brightness of the image.
Press the ◄ button to darken image.
Press the ► button to lighten the image.
Contrast
The Contrast controls the difference between the lightest and dark- est parts of the picture. Adjusting the contrast changes the amount of black and white in the image.
Press the ◄ button to decrease the contrast.
Press the ► button to increase the contrast.
Sharpness
Adjust the sharpness of the image.
Press the ◄ button to decrease the sharpness.
Press the ► button to increase the sharpness.
Color
Adjust the color saturation of image.
Press ◄ to reduce the color saturation of image.
Press ► to increase the color saturation of image.
Tint
Adjust the color balance of red and green.
Press the ◄ button to decrease the value of hue.
Press the ► button to increase the value of red hue.
Gamma
Effects the representation of dark scenery. With greater gamma value, dark scenery will look brighter.
Color Temp
This allows you to adjust the color temperature. At higher temperature, the screen looks colder; at lower temperature, the screen looks warmer.
Color Settings
Use these settings for advanced adjustment of the individual Red, Green, Blue, Cyan, Magenta and Yellow Colors.
Note: “Sharpness”, “Saturation” and “Hue” functions are only supported under video mode.
Screen
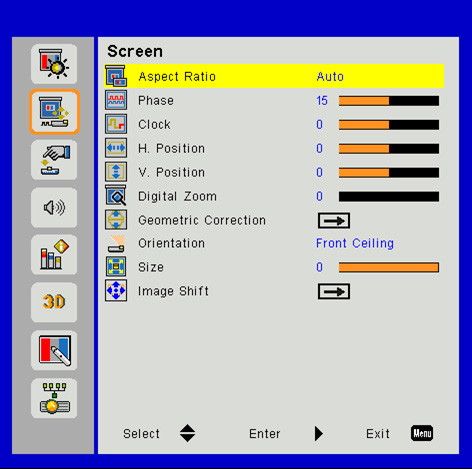
Aspect Ratio
Auto: Keep the image with original width-height ratio and maximize the image to fit native horizontal or vertical pixels.
4:3: The image will be scaled to fit the screen and displayed using a 4:3 ratio.
16:9: The image will be scaled to fit the width of the screen and the height adjusted to display the image using a 16:9 ratio.
16:10: The image will be scaled to fit the width of the screen and the height adjusted to display the image using a 16:10 ratio.
Phase
Synchronize the signal timing of the display with the graphic card. If the image appears to be unstable or flickers, use this function to correct it.
Clock
Change the display data frequency to match the frequency of your computer’s graphic card. Use this function only if the image appears to flicker vertically.
H. Position
Press the ◄ button to move the image left.
Press the ► button to move the image right.
V. Position
Press ▲ button to move the image up
Press ▼ button to move the image down
Digital Zoom
Press the ◄ button to reduce the size of an image.
Press the ► button to magnify an image on the projection screen.
Geometric Correction
Use keystone or 4 corner adjustment features to get perfect, rectangular images.
H. Keystone: Adjust image distortion horizontally. If the image looks trapezoidal, this option can help make the image rectangular.
V. Keystone: Adjust image distortion vertically. If the image looks trapezoidal, this option can help make the image rectangular.
4 Corner On/Off: Select “On” to activate 4 corners correction functions.
Grid Color: Set 4 corners correction function grid color.
4 Corner Adjust: Adjust the image 4 corners pixel by pixel to make the image rectangular.
4 Corner Reset: Return the factory default settings for H/V Keystone and 4 corners parameters.
Orientation
Select the preferred projection between front, rear, front ceiling, and rear ceiling.
Size
Use right button and left button to adjust color bar and the value of number.
Image Shift
Use right button and left button to adjust the scaler.
Settings
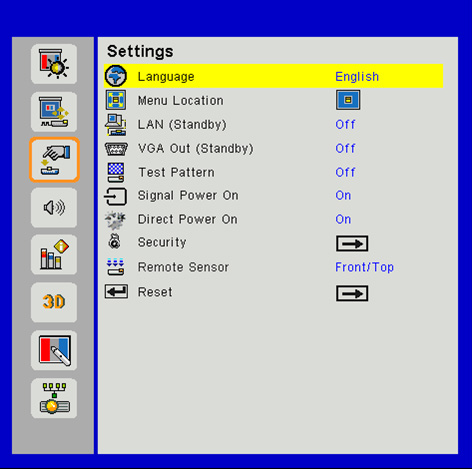
Language
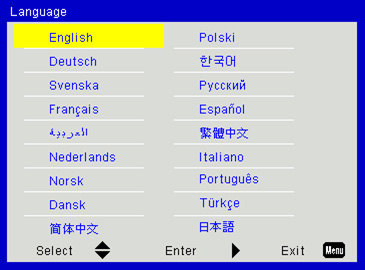
Choose the multilingual OSD menu. Press the ◄ or ► button into the sub menu and then use the ▲ or ▼ button to select your preferred language. Press ► on the remote control to finalize the selection.
Menu Location
Choose the menu location on the display screen.
LAN (Standby)
Choose “On” to enable LAN connection. Choose “Off” to disable LAN connection.
VGA OUT (Standby)
Choose “On” to enable VGA OUT connection.
Test Pattern
Display a test pattern.
Signal Power On
Select the “On” to activate Signal Power mode. The projector will automatically power on when a signal is detected, without pressing the “Power” key on the projector Keypad or on the remote control.
Direct Power On
Select the “On” to activate Direct Power mode. The projector will automatically power on when AC power is supplied, without pressing the “Power” key on the projector keypad or on the remote control.
Security
Enable this function to prompt for a password before using the projector.
On: Select the “On” to use security verification when the turning on the projector.
Off: Select the “Off” to be able to switch on the projector without password verification.
Security Timer
Can be select the Hour function to set the number of hours the projector can be used. Once this time has elapsed you will be requested to enter your password again.
Change Password
Use to set or modify the password that is prompted when turning the projector on.
Remote Sensor
Choose Front/Top to enable both Front/Top IR sensor; choose Front to enable Front IR sensor only; Choose Top to enable Top IR sensor only.
Reset
Choose “Yes” to return the parameters on all menus to the factory default settings.
Volume
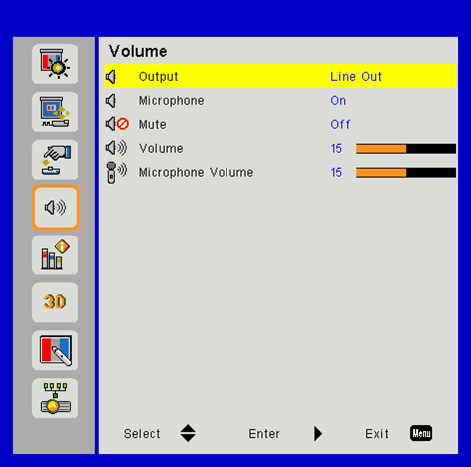
Output
Set the volume output settings. Select between Speaker and Line Out.
Microphone
On: Choose “On” to enable sound from the microphone.
Off: Choose “Off” to disable sound from the microphone.
Mute
On: Choose “On” to turn mute on.
Off: Choose “Off” to turn mute off.
Volume
Press the ◄ button to decrease the volume.
Press the ► button to increase the volume.
Microphone Volume
Press the ◄ button to decrease the microphone Volume.
Press the ► button to increase the microphone Volume.
Options
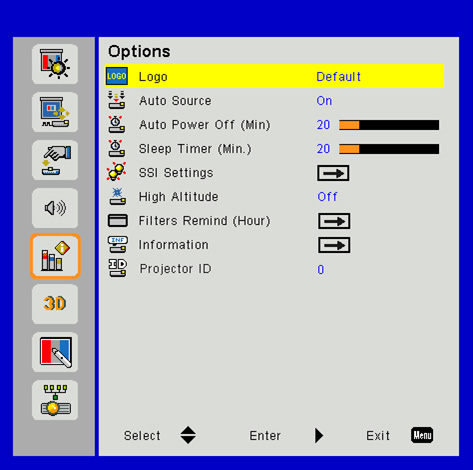
Logo
Use this function to set the desired startup screen. If changes are made they will take effect the next time the projector is powered on.
Default: The default startup screen.
User: Use stored picture from “Logo Capture” function.
Auto Source
On: The projector will search for other signals if the current input signal is lost.
Off: The projector will only search current input connection.
Auto Power Off (Min)
Sets the countdown timer interval. The countdown timer will start, when there is no signal being sent to the projector. The projector will automatically power off when the countdown has finished (in minutes).
Sleep Timer (Min)
Sets the countdown timer interval. The countdown timer will start, with or without a signal being sent to the projector. The projector will automatically power off when the countdown has finished (in minutes).
The Sleep Timer is reset every time when the projector is powered off.
SSI Settings
SSI Hours Used (Normal): Display the projector time of normal mode.
SSI Hours Used (ECO): Display the projector time of ECO mode.
SSI Power Mode: Set the power mode settings.
Normal: Select the “Normal” to return to normal standby.
ECO: Select the “ECO” to save power dissipation further < 0.5W.
The fans will still run in active standby if “Signal Power On” is enabled.
SSI Power Mode
Normal: Normal mode.
ECO: Use this function to dim the projector laser diode which will lower power consumption and extend the laser diode life.
Constant Luminance
Choose “On” or “Off” by using right button and left button.
High Altitude
When “On” is selected, the fans will spin faster. This feature is use- ful in high altitude areas where the air is thin.
Filter Remind (Hour)
Filters Remind (Hour): Set the filter reminder time.
Cleaning Up Reminder: Select “Yes” to reset the dust filter hour counter after replacing or cleaning the dust filter.
Filter Remind Setting
Using left button or right button to set the filter reminder time within 50 hours as a unit. Then, press Menu button to exit.
Clean up
Choose “Yes” to reset the dust filter hour counter after replacing or cleaning the dust filter.
Choose “No” to return Setting Menu.
Press Menu button to exit.
Information
View the projector information as listed below:
Model Name
SNID
Source
Resolution
Software Version
Aspect Ratio
Display the projector information for model name, SNID, source, resolution, software version and aspect ratio on the screen.
Projector ID
ID definition can be set up by menu (range 0-99), and allow use control an individual projector by using RS232 command.
3D
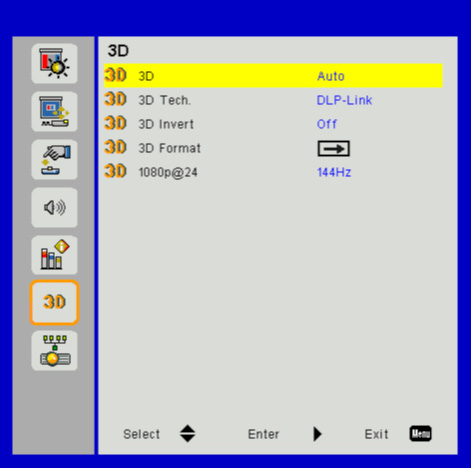
3D
Auto: When HDMI1.4 3D timing identification signal is detected, the 3D image is selected automatically.
Choose “Off” to disable 3D function.
Choose “On” to enable 3D function.
3D Tech.
Use this option to select 3D technology.
DLP-Link: Select to use optimized settings for DLP 3D Glasses.
3D Sync: Select to use optimized settings for IR, RF or polarized 3D Glasses.
3D Invert
Use this option to enable/disable the 3D invert function.
3D Format
Use this feature to select the 3D format. Options are: “Frame Packing”, “Side-by-Side (Half)”, “Top and Bottom”, “Frame Sequential” and “Field Sequential”.
1080p @24
Use this feature to select 96 or 144Hz refresh rate as using 3D glasses in the1080p @ 24 frame packing.
“Frame Sequential” is supported the DLP Link 3D input signals from VGA / HDMI connector.
“Frame Sequential” / “Field Sequential” are supported the HQFS 3D input signals from Composite/ Svideo connector.
“Frame Packing” / “Side-by-Side(Half)” / “Top and Bottom” are supported from HDMI 1.4a 3D input signals.
LAN Menu
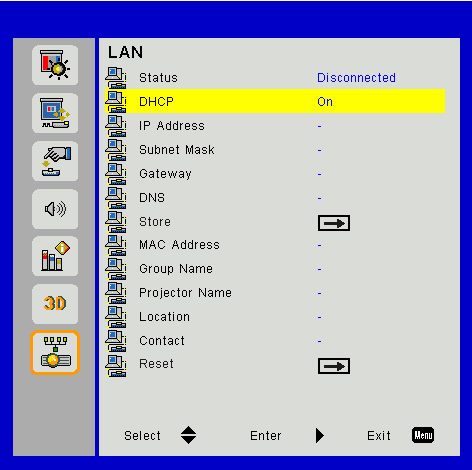
Status
Display the network connection status.
DHCP
Configure the DHCP settings. If a DHCP server exists in the network to which the projector is connected, the IP address will automatically be acquired when you select DHCP On. If DHCP is Off, manually set the IP Address, Subnet Mask, and Gateway. Use
▲ or ▼ to select the number of IP address, Subnet Mask, and Gateway.
On: Select the “On” to let the projector to obtain an IP address automatically from your network.
Off: Select the “Off” to assign IP, Subnet Mask, Gateway, and DNS configuration manually.
IP Address
Display an IP address.
Subnet Mask
Display the subnet mask number.
Gateway
Display the default gateway of the network connected to the projector.
DNS
Display the DNS number.
Store
Select the “Yes” to save the changes made in network configuration settings.
MAC Address
Display the MAC address.
Group Name
Display the group name.
Projector Name
Display the projector name.
Location
Display the projector location.
Contact
Display the contact information.
Reset
Select the “Yes” to return the display parameters on all menus to the factory default settings.
Remote Management
With a Web Browser
How to use web browser to control your projector.
Turn on DHCP to allow a DHCP server to automatically assign an IP.
Go to “Accessing the Network Management Page” below.
Record the IP address, open a Web browser, and enter the IP address.
When you used the projector IP addess, you can not link to your service server.
Direct Connection from Computer
When making a direct connection from your computer to the projector.
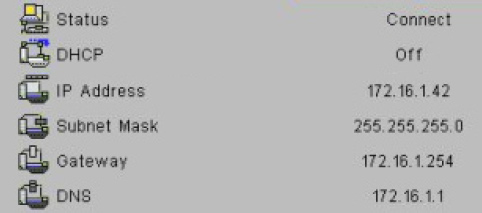
Step 1: Find an IP Address (192.168.0.100) from LAN function of projector.

Step 2: Select apply and press “Enter” button to submit function or press “menu” key to exit.
Step 3: To open Network Connections, click Start, click Control Panel, click Network and Internet Connections, and then click Network Connections. Click the connection you want to configure, and then, under Network Tasks, click Change settings of this connection.
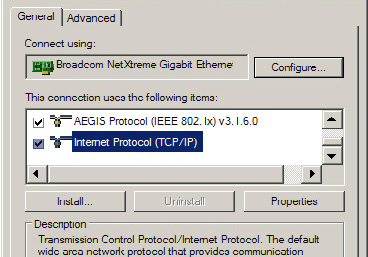
Step 4: On the General tab, under This connection uses the following items, click Internet Protocol (TCP/IP), and then click “Properties”.
Step 5: Click Use the following IP address, and type in as below:
IP address: 192.168.0.101
Subnet mask: 255.255.255.0
Default gateway:192.168.0.254

Step 6: To open Internet Options, click IE web browser, click Internet Options, click the Connections tab and click “LAN Settings...”.

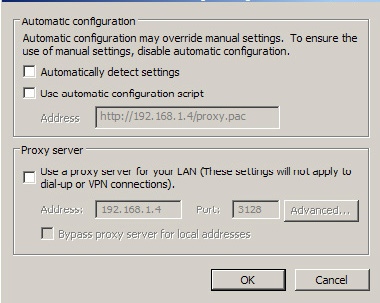
Step 7: The Local Area Network (LAN) Setting dialog box appears. In the Proxy Server area, uncheck Use a proxy server for your LAN, then click “OK” button twice.
Step 8: Open your IE and type in the IP address of 192.168.0.100 in the URL then press “Enter” key.
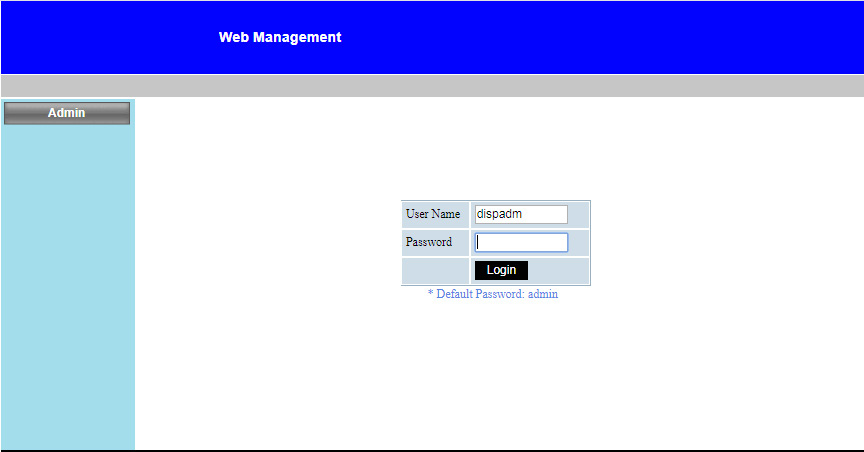
Access to Web Management Page
Open IE browser and type in the IP address 192.168.0.100 in the URL then press “Enter” key and key in password to enter Web Management page. Before using network functions, you must set password by web browser.
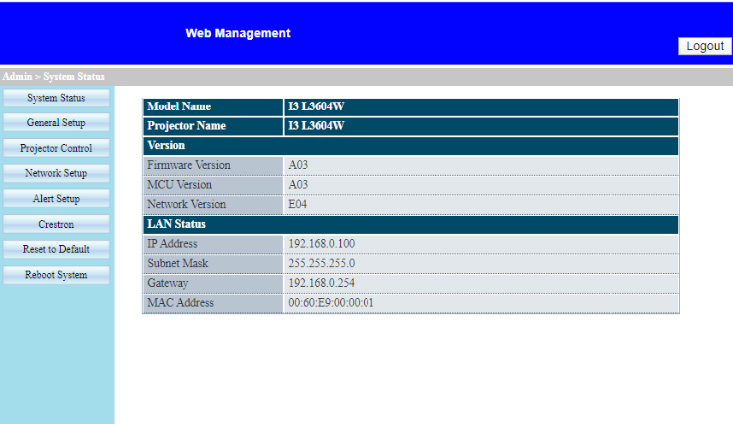
System Status
User can retrieve the System Status in this page
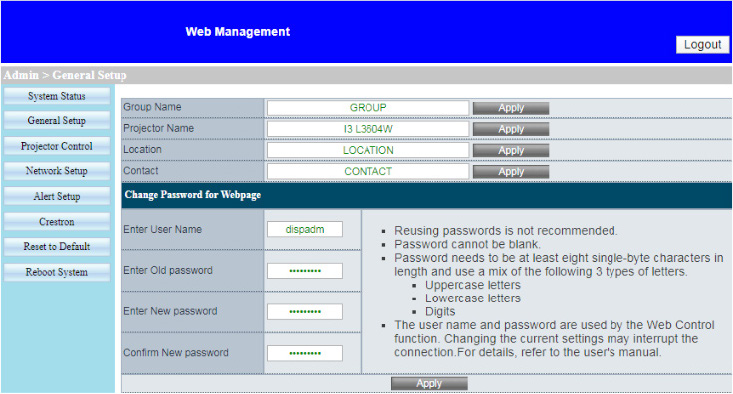
General Setup
User can configure general parameters in this page.
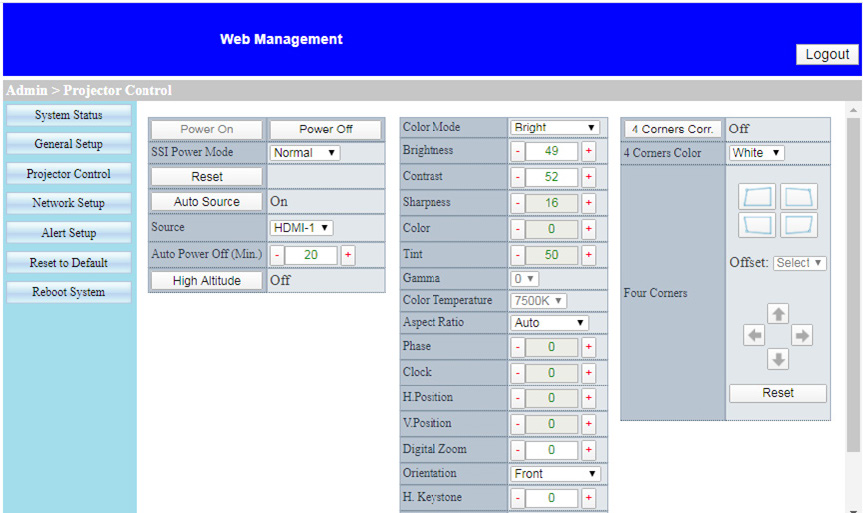
Projector Control
User can configure the projector parameters and control the projector in this page.
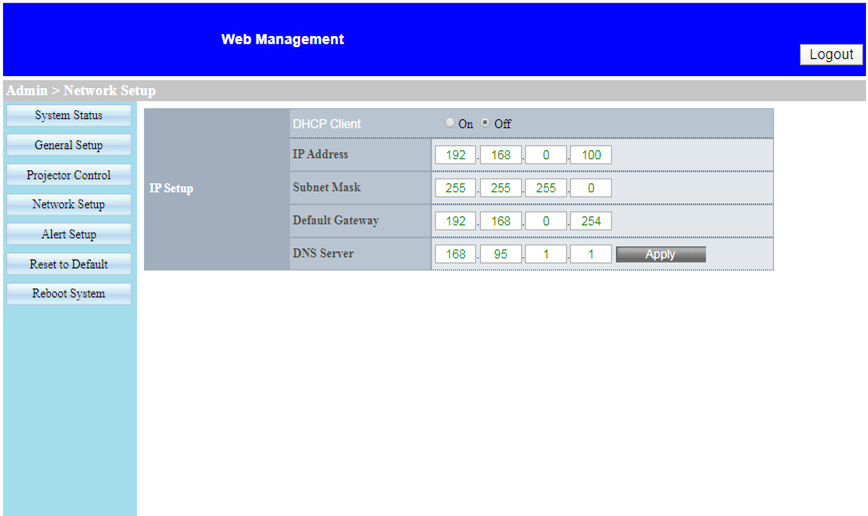
Network Setup
User can configure LAN parameters in this page.
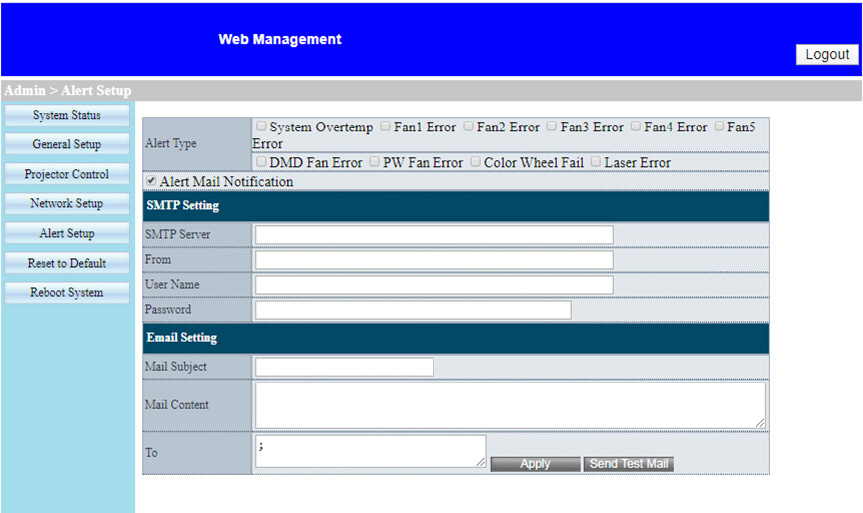
Alert Setup
User can assign the email address and categorize alert notice.
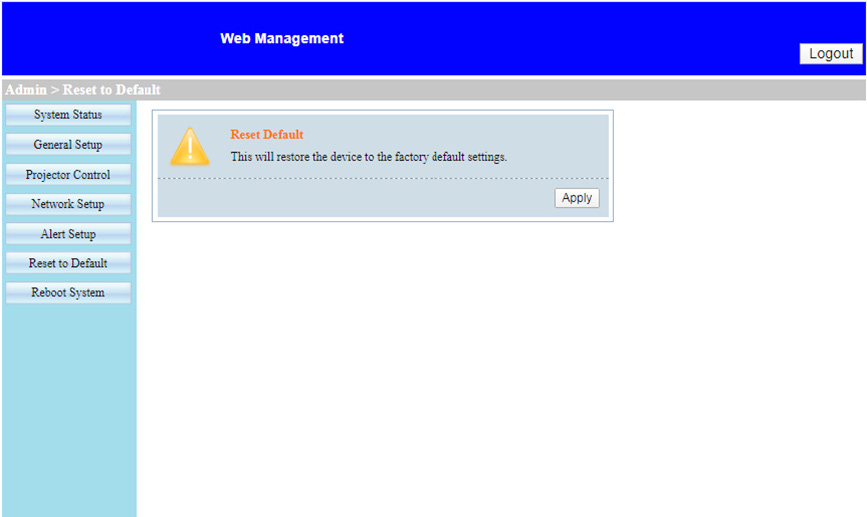
Reset to Default
User can use this function to set the LAN module parameters to default values.
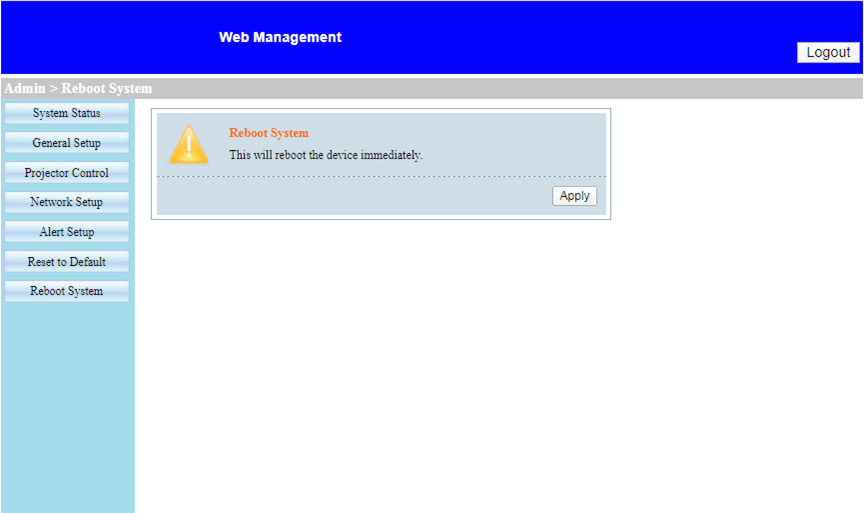
Reboot System
User can use this function to re-boot the LAN module.