
Manual

Welcome
Thank you for purchasing the i3CAIR Indoor Air Quality Sensor. In this manual we will take you for a quick spin around all the features and setup instructions of i3CAIR, the simplest and easy-to-use indoor air quality sensor solution which provides reliable data insights about the indoor air quality in your office space or classroom.
DISCLAIMER
This manual and belongs to i3-Technologies N.V., the copying or distribution of this document or excerpts from it, cannot be done without written permission from i3-Technolgies N.V.
1. Table of Contents
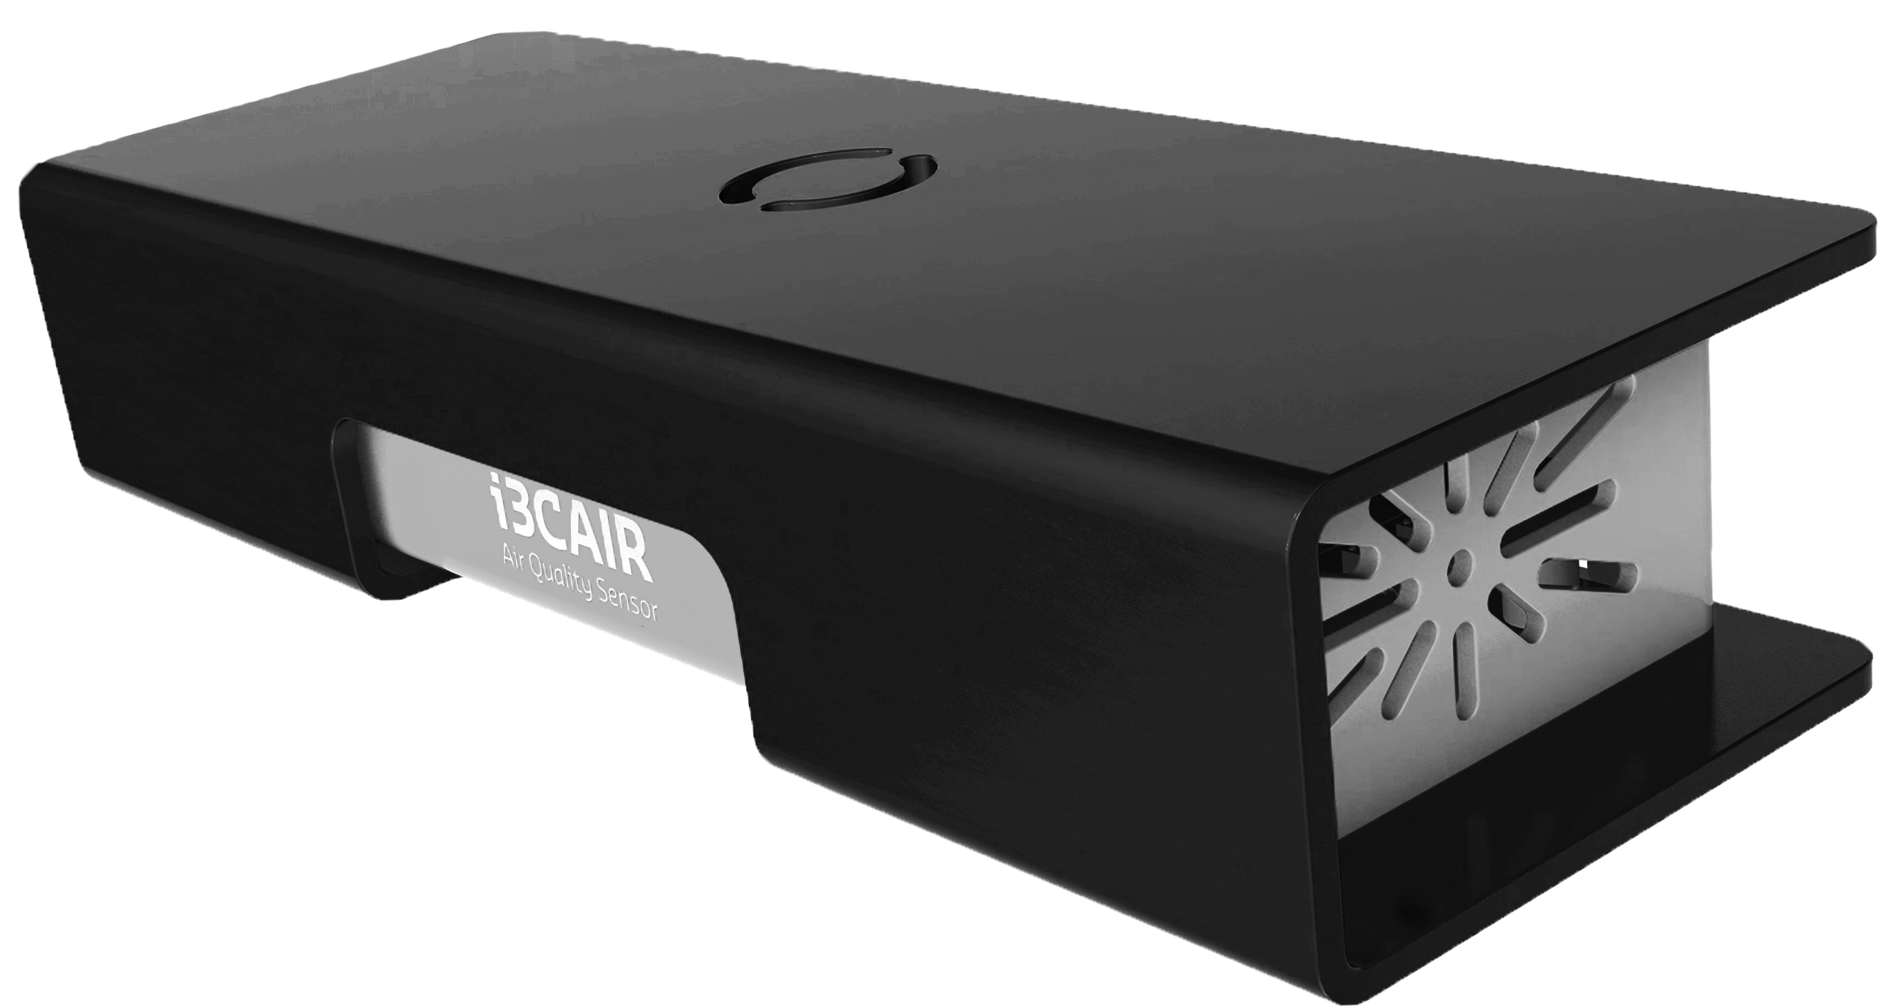
2. What’s Inside the Box?
The i3CAIR sensor
USB cable
Serial / Product #
You can find the serial key of your i3CAIR sensor box at the bottom of the device. You may need this for warranty purposes.
3. Compatibility Requirements
The i3CAIR solution works best in combination with an i3TOUCH interactive display. This i3TOUCH display needs to have an active internet connection along with access to the i3STORE.
The i3CAIR sensor box is compatible with the following i3TOUCH displays:
i3TOUCH E10r
i3TOUCH EX
i3TOUCH PX
i3TOUCH PXr
No need for a power outlet! The i3CAIR gets its power from the i3TOUCH display through the USB cable. No need to struggle with power supply extensions.
4. The Sensors

Carbon dioxide (CO²) sensor :
The levels of carbon dioxide emissions indoors are determined by human breathing. CO² is one of the best indicators of determining indoor air quality.
Ranges from: 0 to 10 000 ppm
Accuracy: ± 40 ppm or ± 3% of readingParticulate matter 2.5 (PM2.5) sensor:
The amount of fine inhalable particles in the air. They can be emitted from many sources like construction sites, cleaning products, chemical substances.
Ranges from: 0 to 1000 μg/m3
Accuracy: ± 15 μg/m3 (from 0 to 100 μg/m3) or ± 15% (from 100 to 1000 μg/m3)Temperature sensor :
Make sure the temperature is right for you, allowing you to stay energetic and focused.
Ranges from: -45°C to 55°C / -49°F to 131°F
Accuracy: ± 1°C / ± 1.2°FHumidity sensor :
Keep humidity levels stable. Both high and low humidity impact your comfort and health.
Ranges from: 0 to 100%
Accuracy: ± 5%
5. How to position your i3CAIR
5.1 Avoid influence from external sources
Where to position the i3CAIR?
The i3CAIR is best placed in a ‘neutral’ space in the room. We advise not to place an i3CAIR close to a radiator or any other kind of heating source. The i3CAIR is best placed in the shade, and direct sunlight is to be avoided.
The following circumstances are to be avoided:
Placing your i3CAIR too close to a heat source (avoid proximity of heating system, electronic devices, direct sunlight).
Placing you i3CAIR too close to an air vent or ventilation system, or anything that causes an unnatural airflow.
Do not position your i3CAIR upside-down
Do not position your i3CAIR in such a way that blocks any of the openings on the sides and on the back
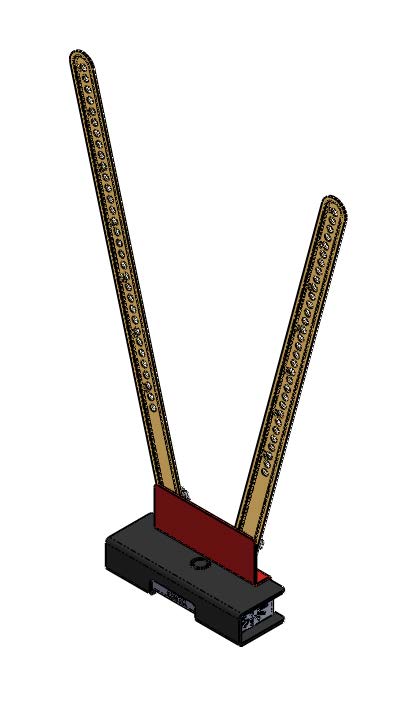
5.2 Mounting the i3CAIR onto an i3TOUCH
Using the specially designed i3MULTIBRACKET
The i3CAIR sensor box is ideally positioned using the specially designed bracket. This bracket can be easily attached to your i3TOUCH.
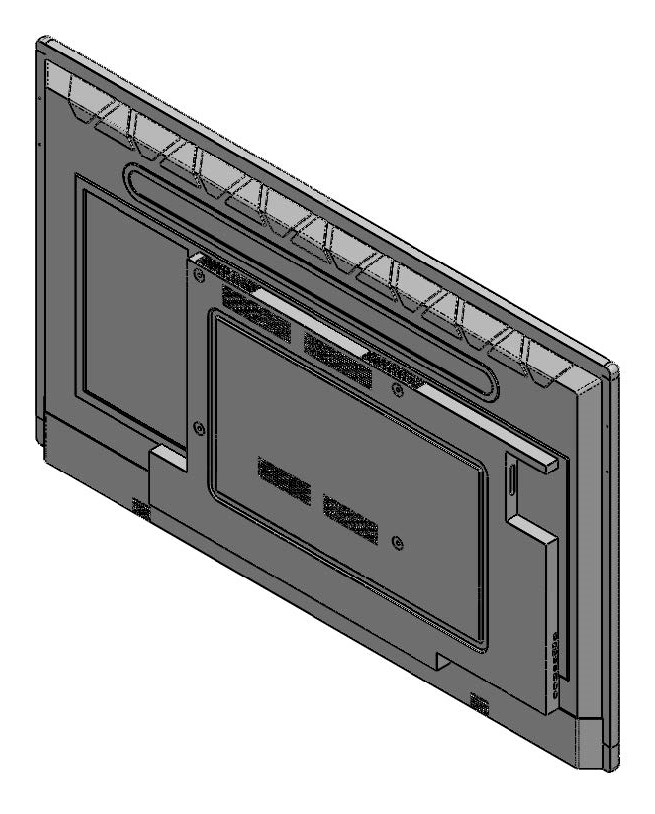
1. Make sure the display is accessible at the rear. If needed, remove the display from its wall or mounting and detach any mounting system or suspension bracket that may be in the way.
2. Mount the i3CAIR on the i3MULTIBRACKET with the supplied screws. The bracket attaches to the backside of the i3CAIR with its arms pointed upwards.
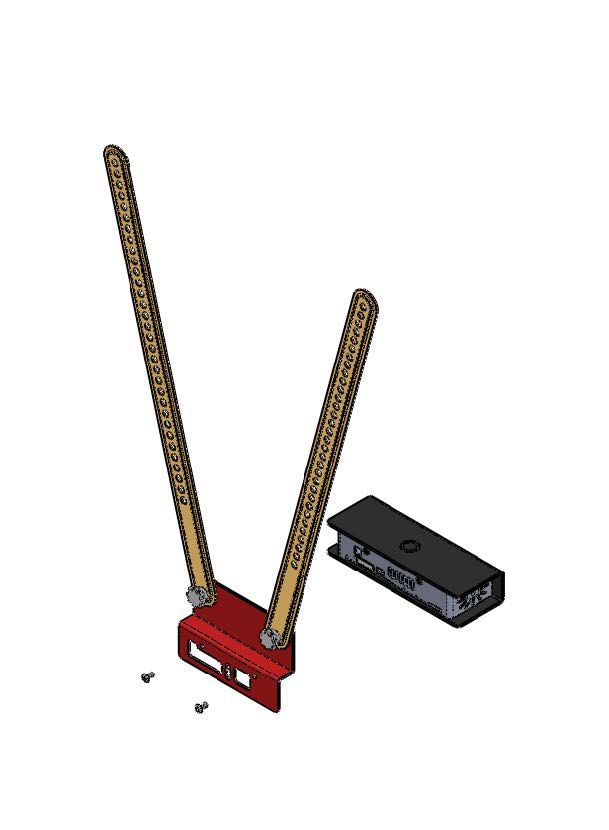

3. Position the i3CAIR in the middle at the back of the screen; against the bottom. Look for a position where the holes on the arms of the bracket align with the bottom VESA holes. Do this by opening or closing the arms until they line up.

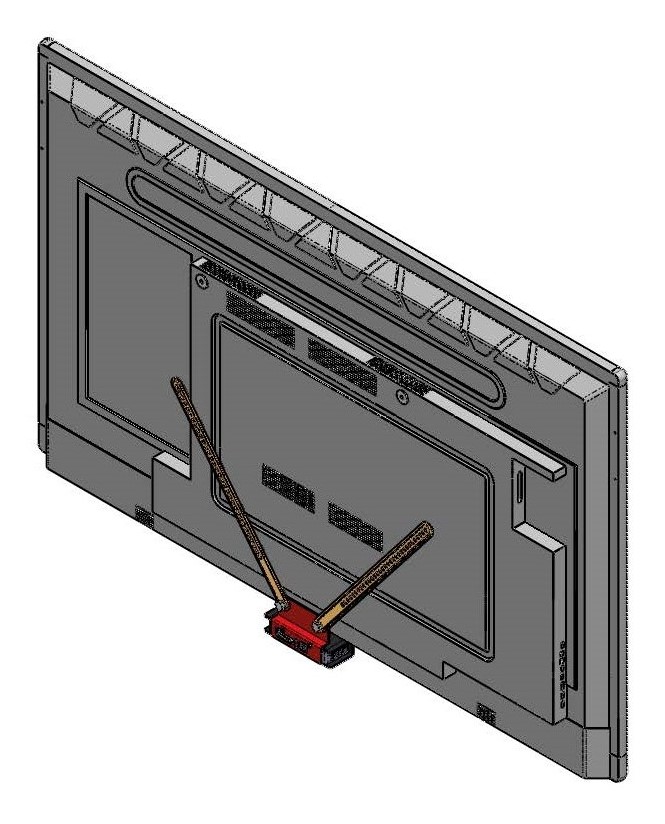
4. Place the supplied rings on the top VESA holes
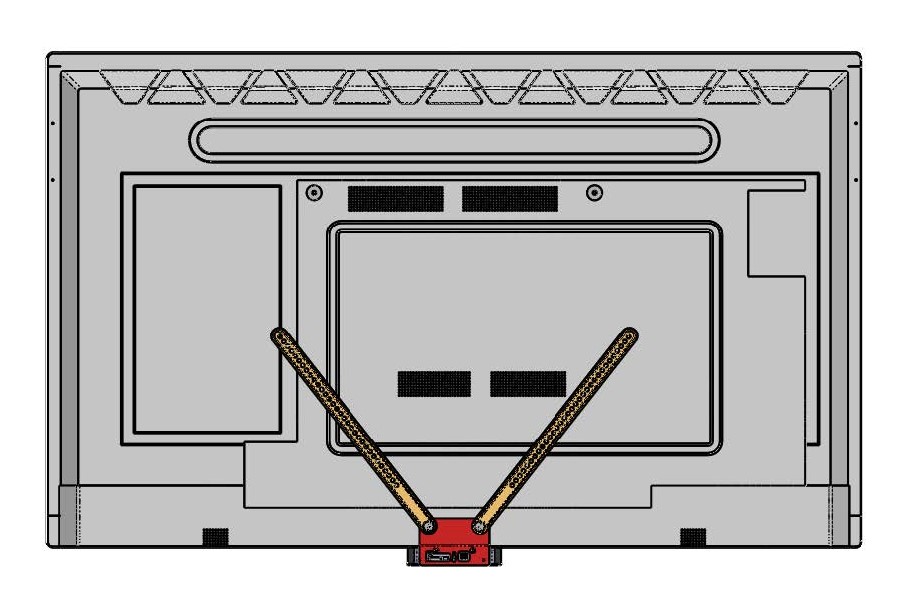
5. Make sure that the i3CAIR is levelled with the bottom of the display and positioned in the center. You can still tweak the position of the i3CAIR by changing the orientation of the arms on the bracket. Fasten the knobs on the bracket once you have found the right position.
6. Now reattach your mounting system or suspension bracket over the i3MULTIBRACKET, locking everything in place.
7. Connect the supplied USB cable to the i3CAIR (micro USB port)
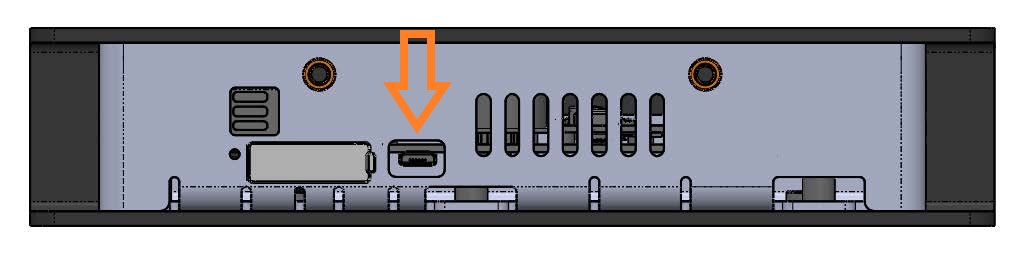
8. Connect the other end of the USB cable to the i3TOUCH display. We recommend to always choose a USB port on the underside of the display. This only applies to i3TOUCH displays that are using an OPS computer because the the USB ports on the side of the display are taken over by the OPS computer when switching to the OPS input. This will disable the i3CAIR as long as the input source is on the OPS.

9. Re-attach the display to the wall or it’s mount.
6. Connect & Setup your i3CAIR
6.1 Connect
Connecting your i3CAIR to an i3TOUCH display is incredibly simple! Use the included USB cable to connect the i3CAIR (micro USB port) with a USB port on the i3TOUCH.
The i3CAIR will get its power from the USB cable so there is no need for an external power supply.
Important
Make sure to connect your i3CAIR to a USB port of the i3TOUCH display! Preferably a USB port on the underside of the display. Other USB ports may connect with an attached HDMI device or an OPS (if present) and cause issues with the i3CAIR. Attaching the i3CAIR to a USB port of the OPS (if present) will not work.
When plugging the micro-USB into your i3CAIR's micro-USB port, please do it gently and avoid twisting the wire. This is to preserve the service life of the micro-USB port.
6.2 Setup & Configure
Open the i3CAIR app
Once the i3CAIR has been attached to the i3TOUCH, navigate to your installed apps and open the i3CAIR application.
Install i3CAIR from the i3STORE
Check out your installed apps by pushing the ‘apps’ icon on the launcher menu. Verify if the i3CAIR application (apk file) has already been installed on your i3TOUCH. If not, then hit the install button and the apk will be downloaded and installed.
Auto-detect the presence of a sensor box
When the i3CAIR application is present on an i3TOUCH display, it will then automatically detect the presence of an i3CAIR sensor box. When you launch the app you will see the connection status in the upper right corner.
6.3 Checking the Connection Status
Check the connection status in the i3CAIR app
When the app has found a new i3CAIR device, status will be ‘yellow’ - 'connecting'. Connecting with the i3CAIR may take a few seconds. When the connection with the sensor box is successful the status will be ‘green' - ‘connected’.
When no i3CAIR is connected, the connection status will be ‘grey’ showing a ‘disconnected’ message. In case of issues, the connection status may be ‘grey' or ‘red’ showing a ‘disconnected’ or 'error’ message. Try to give the i3CAIR app some time, the issue may resolve itself after a few seconds.
Check the connection status in the i3LAUNCHER
If an i3CAIR sensor box has been paired successfully with an i3TOUCH, then the i3CAIR air quality widget will appear in the upper left corner of the i3Launcher
7. Using the i3CAIR app
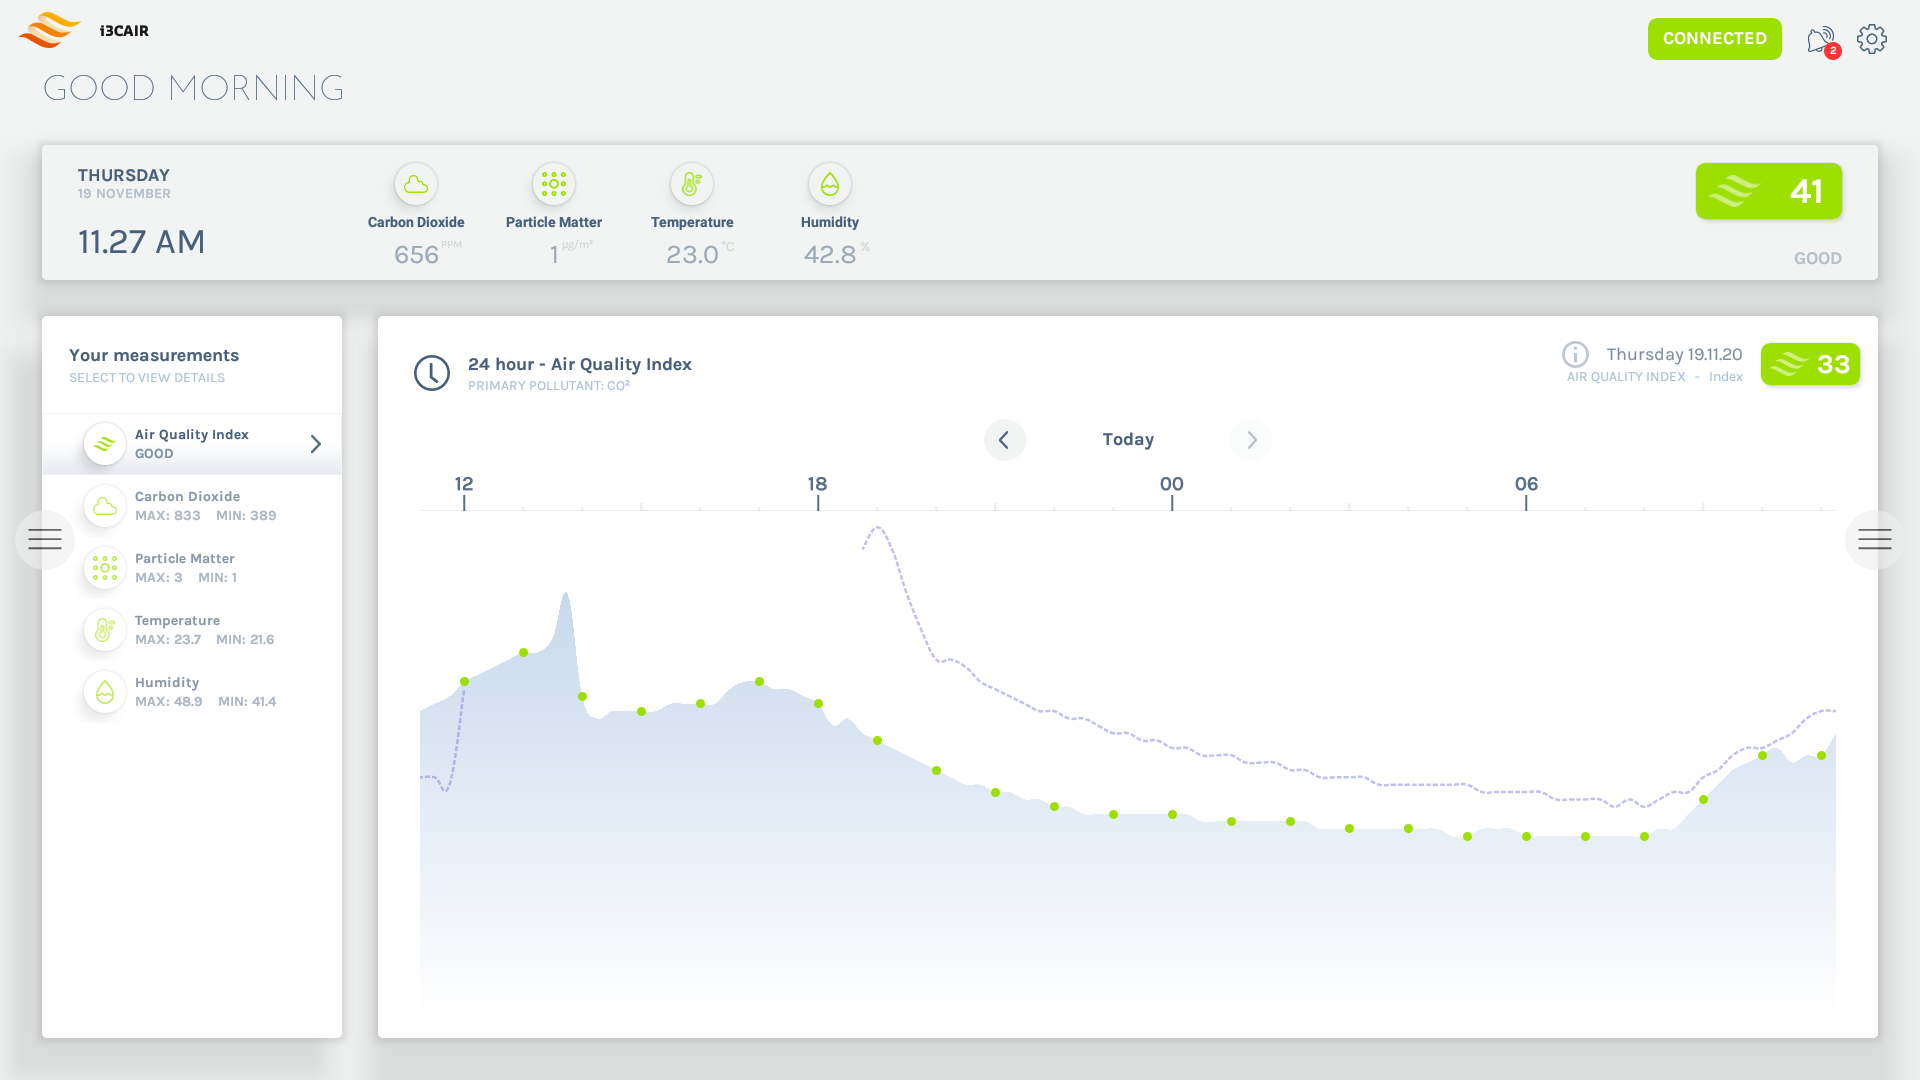
The i3CAIR app on the i3TOUCH is easy to use and self-explanatory.
Explaining the interface
A message welcoming you appropriately according to the time of day
Current date and time
Current sensor data for every sensor type - refreshes every 5 seconds
Connection status (green is connected, grey means not connected)
Current air quality index - refreshes every 5 seconds
The i3CAIR app stores sensor data for 7 days. Via this menu (the horizontal tabs), one can consult the 7-day rolling data of the air quality index or the data from each individual sensor.
Clicking on a tab will display the graph of the past 24 hoursTime range, along with the type of sensor that was chosen
Day of the week when the measurements were stored - clicking on the arrows will move to the past/next 24 hours
The currently selected day and selected sensor type with its measurement unit
Graph - refreshes every 15 minutes - touching the graph will provide you detailed information of the data measured at that point in time. The dotted line shows the data exactly 24 hours prior to that point for comparison
The alerts and settings buttons. The alerts button shows how many unread alerts are available. Tapping the alerts button will open a side panel with alerts and additional information. Tapping the settings button will open the settings panel
The average value for the selected day and selected sensor type - refreshes every 15 minutes
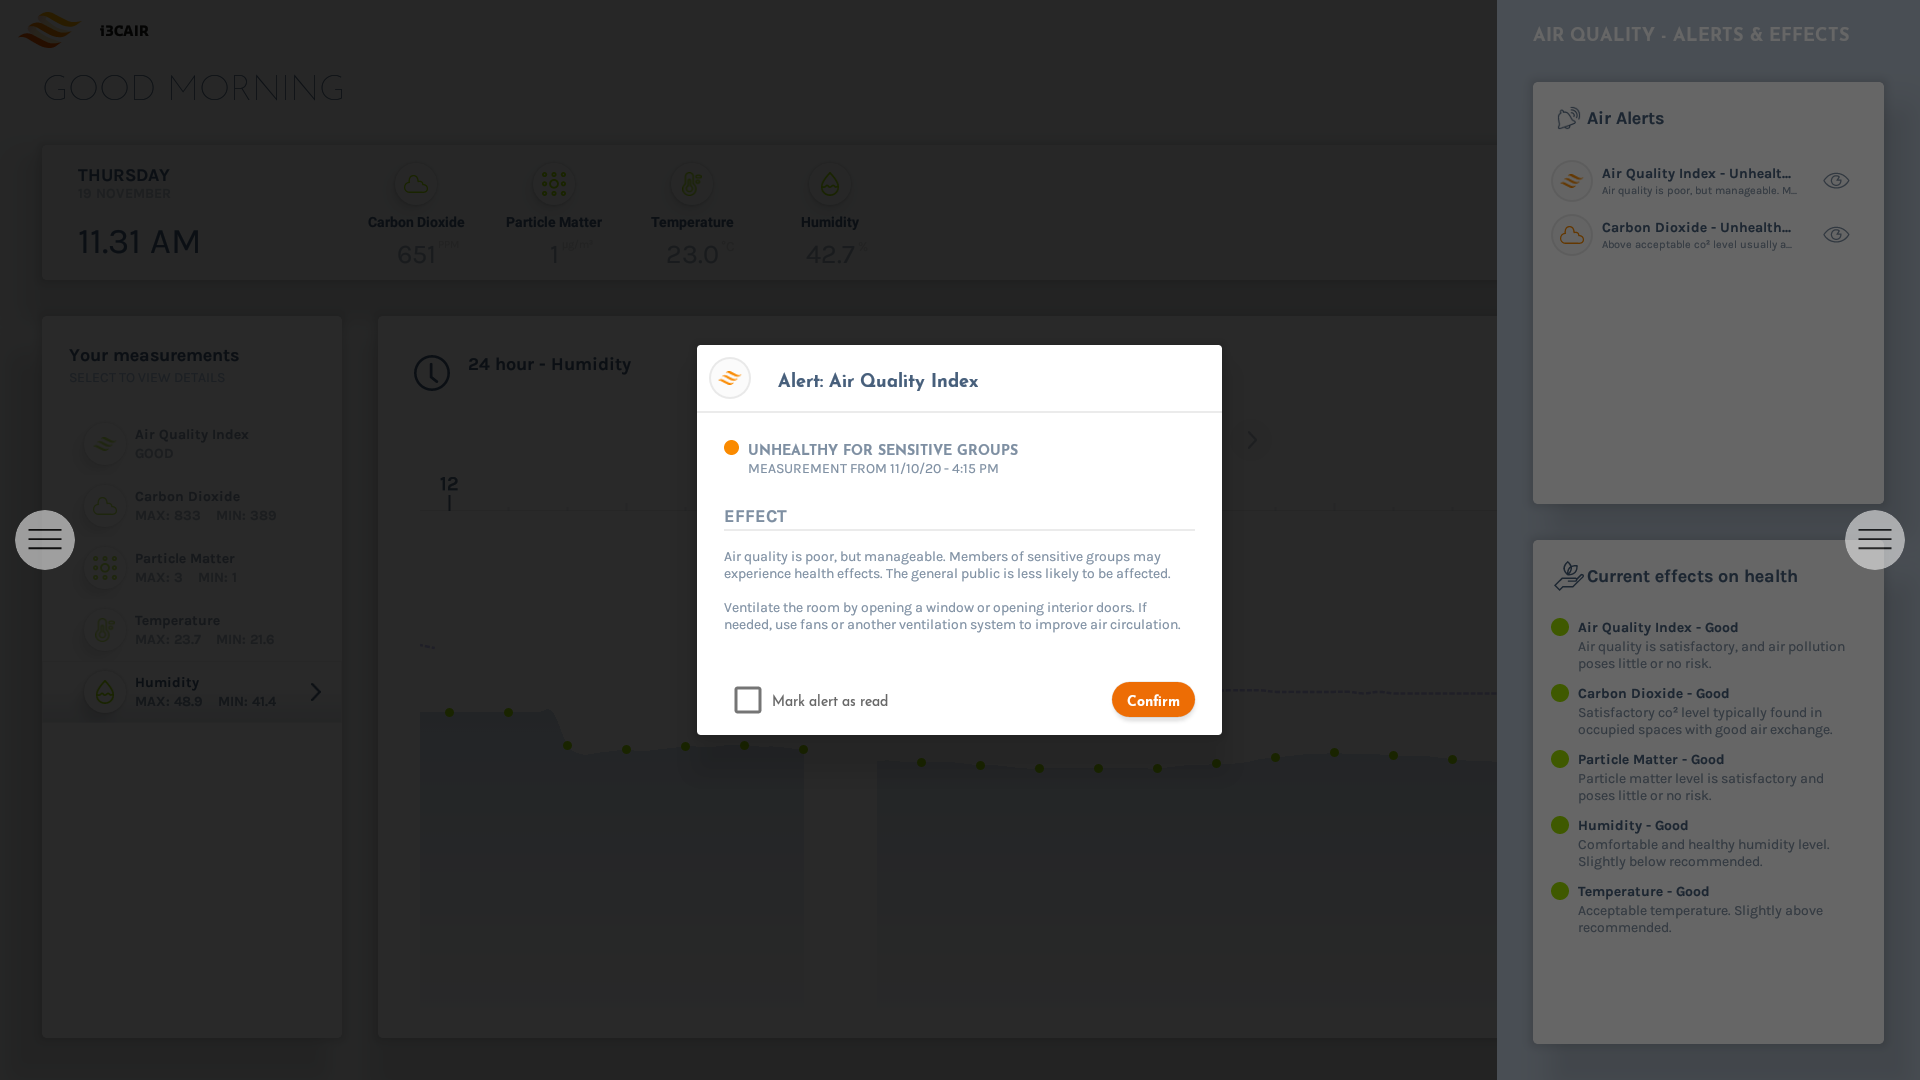
Alerts
The alerts side panel will display a list of alerts that were triggered due to unhealthy or dangerous sensor value readouts. When a sensor value reaches a certain threshold, a new alert will appear here with a short description. Tapping the alert will open a dialog with the full description and additional details.
Below the alerts list are detailed explanations for the current sensor value readouts and what the possible current effects on health in the room are.
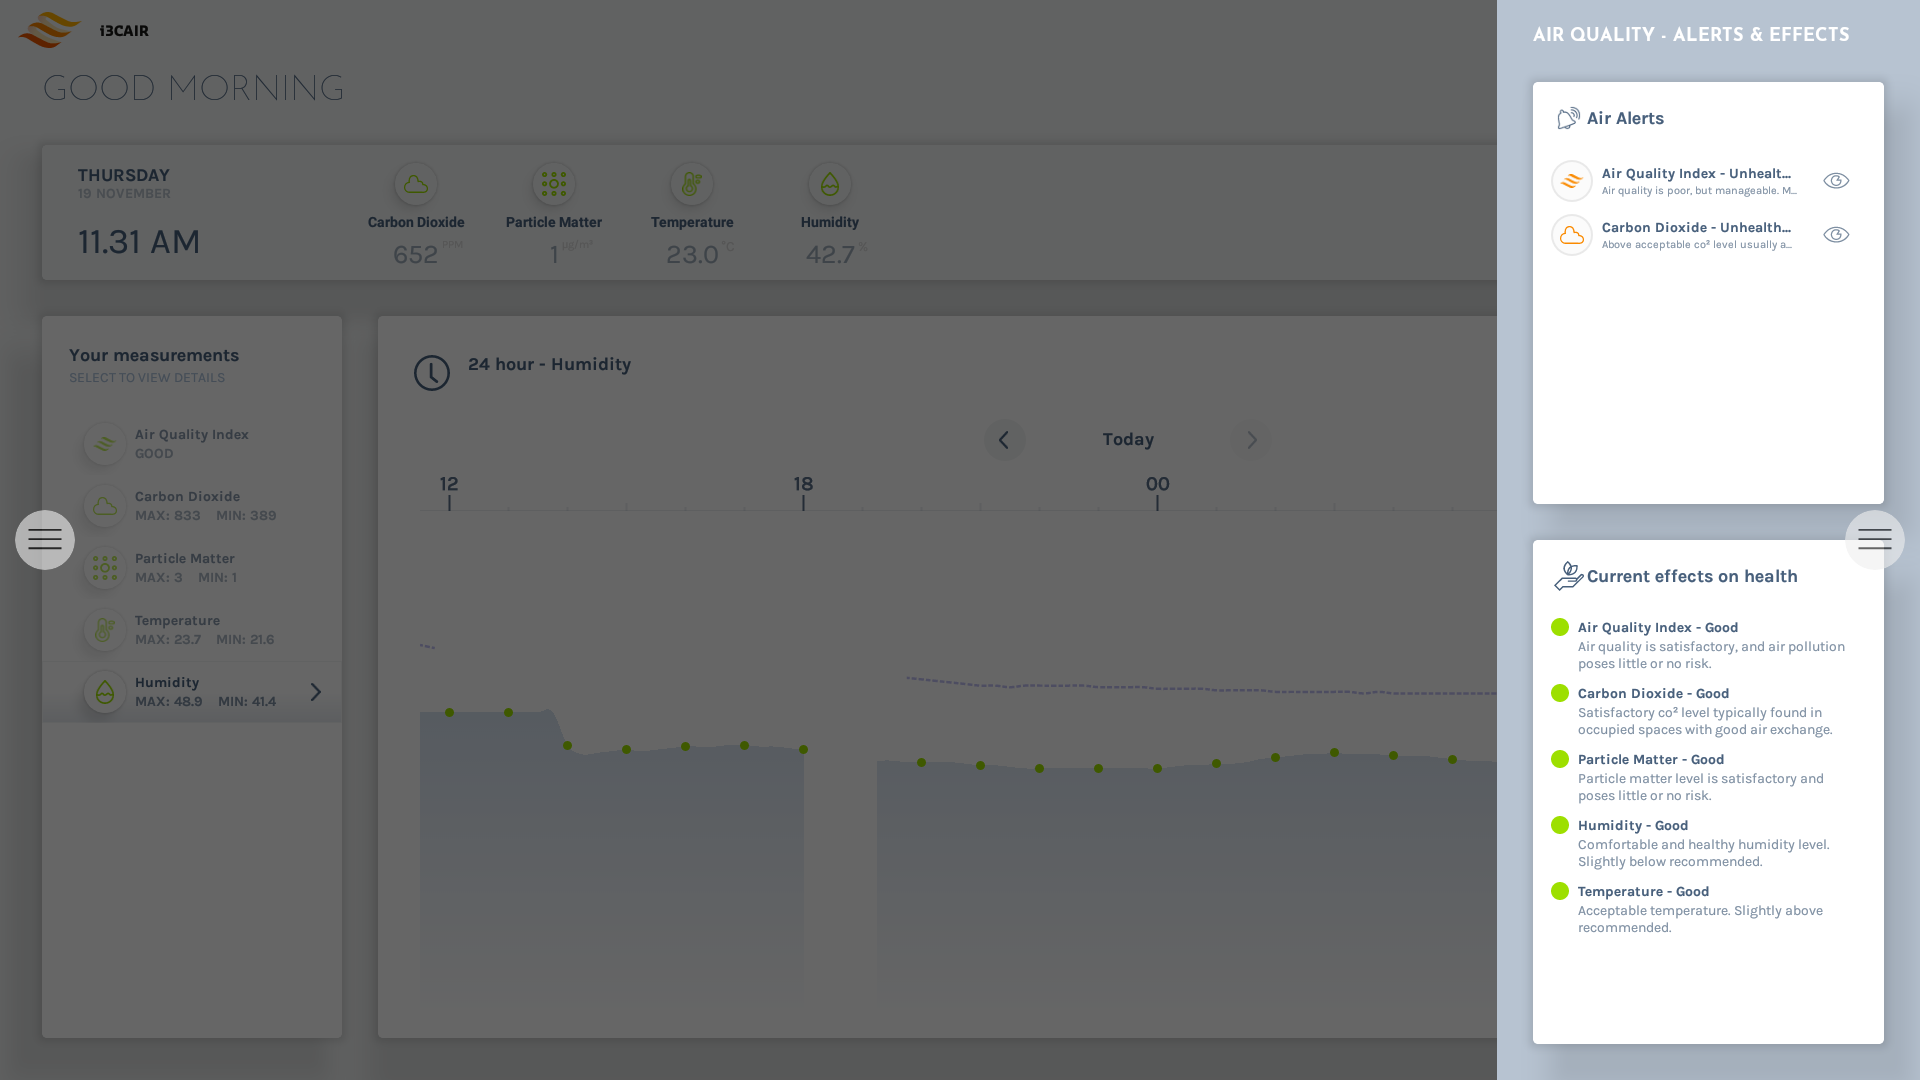
The alert dialog will display the full description and explanation for the cause of the alert. As well as a short recommendation on what you can do to improve the situation along with the time and date when the alert was triggered.
Settings
The settings panel has a few options that you can customize:
Enable or disable alerts for different sensor types. When disabled, no alert will ever be created for that sensor type.
Global android notifications. When enabled and an alert is triggered, a popup will appear on the screen in real time. Even when the i3CAIR app is currently not in the foreground.
Preferred temperature unit. Choose here between °C or °F for displaying temperature values in the app.
Start CO² calibration, see below for more details.

CO² calibration
Your device is calibrated out of the box. Only use this function if you notice abnormal or inaccurate CO2 readings.
Before you proceed with the CO2 sensor calibration. Make sure to position the i3CAIR sensor box in a location with good outside air circulation. For example: next to an open window. The i3CAIR sensor box will use the outside air to start the calibration process.
Do not use this calibration function in a closed room with high CO² values or in a location with high outside CO2 values like a polluted city center. Doing this will result in an incorrect calibration and cause inaccurate CO2 readings.
While not required, it is recommended to leave the i3CAIR sensor box powered on for at least three weeks while completing initial calibration. The i3CAIR sensor box will continue to automatically calibrate over a longer period of time to further increase the accuracy of CO2 readings. Even after the device is no longer positioned close to outside air.
More information
If you require more information about the setup and use of this product, please have look at this video: