
Manual - i3TOUCH EX - English
Manual
General Safety Precautions
Before operating, please read this manual thoroughly, and keep it for future reference.
Image shown in this manual is indicative only. There may be differences between the pictures and the actual product, please prevail in kind.
Installation and placement.
Do not put heavy objects on top of the unit.
Do not put the unit near appliances that generate magnetic fields.
Do not expose the unit to direct sunlight and other sources of heat.
Do not place the unit on an unstable cart, stand, tripod, bracket, table, or shelf.
Do not put any liquid near or on the unit, make sure do not spill any liquid inside the unit.
Electrical safety warnings.
Please keep power cable from physical or mechanical damage.
Please check and ensure AC source is connected with the ground.
This power cable comes with the device exclusively for this device only.
Please unplug power supply when the weather is thunder-storm or lightning.
Check that the unit’s operating voltage is identical with your local power supply.
Please use the original power cable from the accessory bag, don’t modify or lengthen it.
Please unplug power supply, when there is nobody home or the unit will be in idle for a long time.
Cleaning and maintenance warnings.
Unplug the power cable before cleaning.
Clean the screen with a soft, dustless and dry cloth.
For deep clean, please contact an authorized service center.
Never use water or the spray type detergent to clean the unit.
Never use any other hard or sharp object to replace the touch pen.
Better for the panel lifetime and display performance, do not display high brightness image for long time.
Temperature precautions.
Normal operating temperature is 0 ~ 40℃.
Do not place the unit near or over a radiator or a heater.
If your unit is suddenly moved from a cold to a warm place, please unplug the power cable and do not turn it on at least 2 hours, making sure the moisture inside the unit is all evaporated.
Humidity precautions.
Do not expose the unit in rain, or place in high humidity area.
Please make sure indoor environment is dry and cool. Normal operating humidity is 10%~90%RH.
Ventilation precautions.
Please put the unit in a well-ventilated place, so the heating can be released easily.
Ensure that the unit has enough space for ventilation.
Space requirement: left, right and back > 10 cm, top > 20 cm.
Standby mode.
It will enter standby mode but not turn off the unit after press the standby key.
Batteries for remote control.
Please make sure the battery gets proper disposal or recycle after using.
Please keep the battery away from kids and don’t throw the battery into fire.
Power switch status signs.
“I” means power on
“O” means power off.
Notes for internal maintenance and repairs.
This machine can only be maintained by certified engineer.
FCC Statement
This equipment has been tested and found to comply with the limits for a Class B digital device, pursuant to part 15 of the FCC Rules. These limits are designed to provide reasonable protection against harmful interference in a residential installation. This equipment generates, uses and can radiate radio frequency energy and, if not installed and used in accordance with the instructions, may cause harmful interference to radio communications. However, there is no guarantee that interference will not occur in a particular installation. If this equipment does cause harmful interference to radio or television reception, which can be determined by turning the equipment off and on, the user is encouraged to try to correct the interference by one or more of the following measures:
Reorient or relocate the receiving antenna.
Increase the separation between the equipment and receiver.
Connect the equipment into an outlet on a circuit different from that to which the receiver is connected.
Consult the dealer or an experienced radio/TV technician for help.
FCC warning.
This device complies with Part 15 of the FCC Rules. Operation is subject to the following two conditions: (1) this device may not cause harmful interference, and (2) this device must accept any interference received, including interference that may cause undesired operation.
Control Panel
Prepare to install.
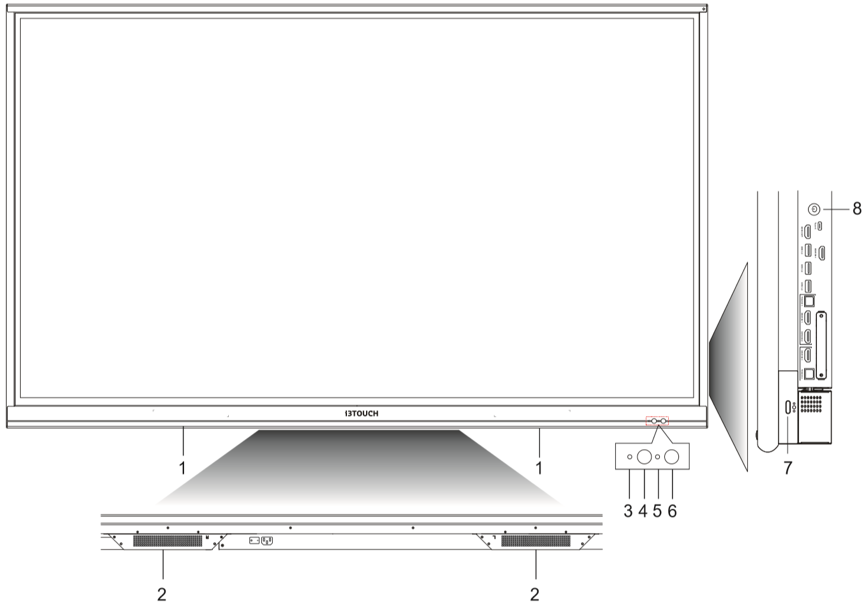
Parts | |
1 | Magnetic stylus holders |
2 | Bottom loudspeakers |
3 | Power indicator light |
4 | Remote control signal receiver |
5 | Light sensor |
6 | PIR sensor |
7 | Multi-function button |
8 | Press: energy saving mode |
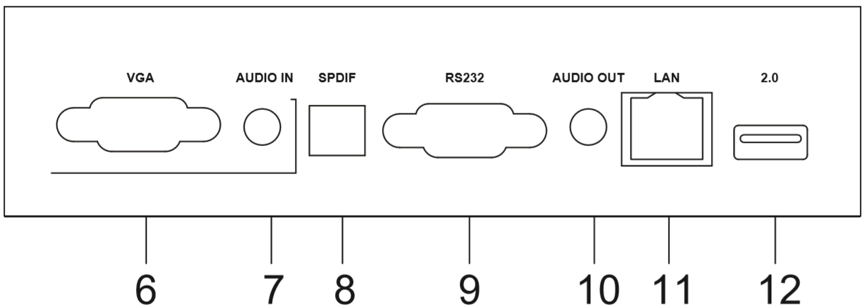
Terminal interface.
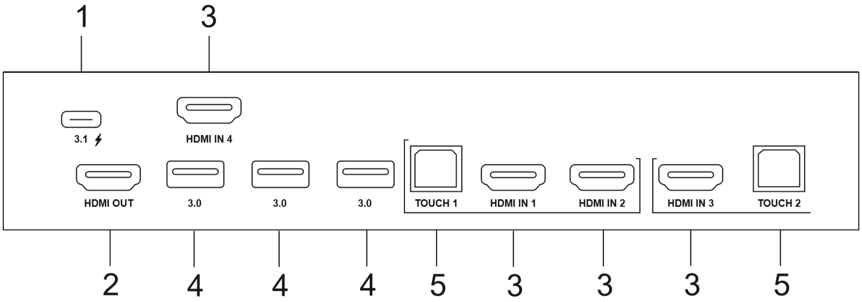
Function description |
| |
1 | USB 3.1 | Type-C. Supports charging, Data transmission, Audio and Video. |
2 | HDMI Out | Connect to another display with HDMI interface. |
3 | HDMI In | High-definition multimedia interface signal input, connect to devices with HDMI output interface (personal computer with HDMI output, set-top box, or another video device) |
4 | 3.0 | USB 3.0,connect USB devices such as mobile hard disk, USB drive, USB keyboard and/or mouse, etc. |
5 | Touch | Touch signal output to the external computer |
6 | VGA | External computer video input |
7 | Audio In | External computer audio input |
8 | SPDIF | Carry multichannel sound via optical signals. |
9 | RS232 | Serial interface, used for mutual transfer of data between devices |
10 | Audio Out | Audio output to the external speaker |
11 | LAN | Connect RJ45 terminals |
12 | 2.0 | USB 2.0. Connect USB devices such as mobile hard disk, USB drive, USB keyboard and/or mouse, etc. |
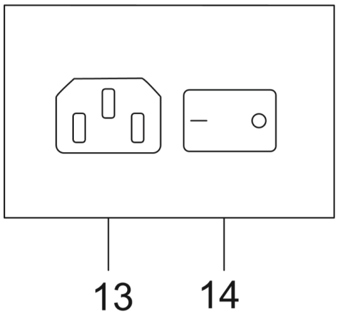
13 | AC In | AC power input, connect AC power supply |
14 | AC Switch | To open or shut down AC power supply. “I” means power on, “O” means power off |
Remote control.
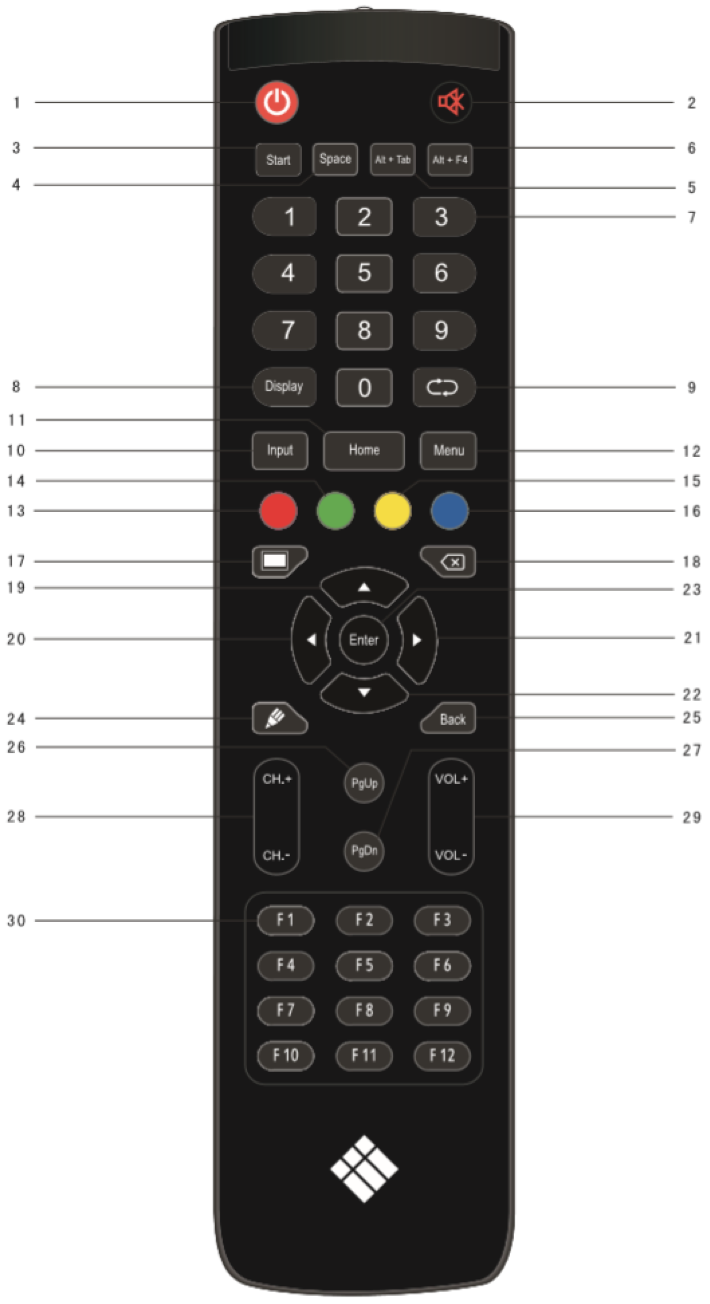
Function description |
| |
1 |  | Power on/off |
2 |  | Enter or exit mute mode. |
3 | Start | Windows Start Key (or Linux Super Key) |
4 | Space | PC's Space key |
5 | Alt+Tab | PC's Alt+Tab key (Windows or Linux) |
6 | Alt+F4 | PC's Alt+F4 key (Windows or Linux) |
7 | Numeric keys | Numeric input keys |
8 | Display | Display channel information |
9 |  | / |
10 | Input | / |
11 | Home | Return to android system main screen. |
12 | Menu | Open the settings application. |
13 | Red | Enable or disable Front keyboard and Touch. |
14 | Green | Enable or disable Front keyboard. |
15 | Yellow | Enable or disable Touch. |
16 | Blue | Screen Freeze application |
17 |  | Turn off or turn on the screen backlight. |
18 |  | PC's Backspace key |
19 |  | Navigate up (Android, Windows, Linux, MacOS) |
20 |  | Navigate left (Android, Windows, Linux, MacOS) |
21 |  | Navigate right (Android, Windows, Linux, MacOS) |
22 |  | Navigate down (Android, Windows, Linux, MacOS) |
23 | Enter | Confirmation key |
24 |  | Open i3NOTES whiteboarding application |
25 | Back | Return to the last previous page |
26 | PgUp | Page Up (Windows, Linux, MacOS) |
27 | PgDn | Page Down (Windows, Linux, MacOS) |
28 | CH.+/CH.- | / |
29 | VOL+/VOL- | Increase / reduce the volume |
30 | F1-F12 | PC's F1 - F12 function keys (Windows, Linux, MacOS) |
NOTE: All computer related function keys are available only when the computer is connected to the display via Touch USB connection.
Install batteries.
Open back cover of battery component on the back of remote control.
Install AAA type battery according to the corresponding electrode, make sure battery positive and
negative pole are correct ("+" to "+", "-" to "-"), please do not mix using old and new batteries.
After battery is installed, close the back cover of battery components, and make the following clip
buckled to the bottom.
Range of remote control.

Remote control can work with a maximum range of 8 meters distance, 30 degrees left and right from the remote-control receiver.
In order to protect environment, please dispose waste batteries into recycling box.
Warning: if the battery is replaced by an incorrect type, it may lead to explosion.
Connections
For the safety of you and the machine, please do not connect any power plug before connection.
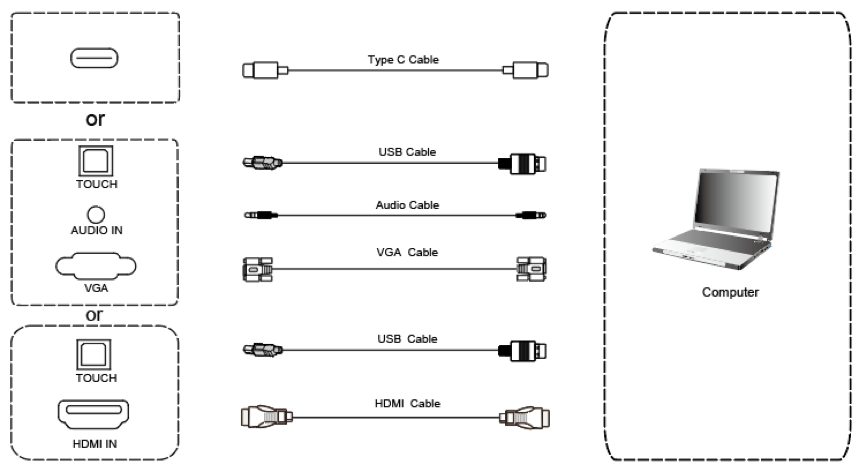
Use VGA cable to connect to VGA output port of external computer, and meanwhile use headphone audio cable to connect to external computer audio output interface. (Or use HDMI cable to connect to HDMI output port of external computer.) (Or use Type-C cable to connect to Type-C output port of external computer.)
Use USB cable to connect to external computer USB port. (Or use Type-C cable to connect to Type-C output port of external computer.)
After cable connection, plug in power cord, and switch power on.
Start external computer.
Press the power key, and the equipment is power on.
Press the INPUT key to switch to VGA/HDMI/ Type-C channel
NOTE: External computer input, equipment’s best resolution is 3840*2160 or 1920*1080.
Recommended computer configuration:
1 GB Available Hard Drive space
2.0 GHz Processor, 1GB RAM
More than 256 color display cards
VGA OUT / HDMI OUT, Audio-OUT, USB Interface
Supported Resolutions 800*600,1024*768,1920*1080,3840*2160
Audio and video equipment input.

Use HDMI cable to connect audio and video equipment with HDMI output.
After cable connection, plug in power cord, and switch power on.
Press the power button to turn equipment on.
Press INPUT key to switch to HDMI port.
USB Type C input.

Prefer to use USB Type C cable that has been included with your i3TOUCH. The proper operation and quality of third party USB cables can not be guaranteed.
The USB Type C specification specifies a maximum cable length of 2 meters. Longer USB Type C cables are unsupported.
Connect one connector of the USB Type C into the USB Type C port of the i3TOUCH.
Connect the other end of the USB Type C cable into a DisplayPort supported USB 3.1 Type C connector of your laptop / computer / video equipment.
Audio and video equipment output.

Use HDMI cable to connect audio and video equipment with HDMI input.
After cable connection, plug in power cord, and switch power on
Press the power button to turn equipment on
RS232 connection.

After using serial port cable to connect central control equipment and machine, certain function of the machine can be controlled via central control equipment, such as: machine ON/OFF, and adjustment of sound volume, etc.
The command sheet for RS232-C control can be accessed here: RS232-C Command Sheet
LAN connection.

USB connection.

Settings
When opening the settings menu, you get an overview of all the settings you can adjust.

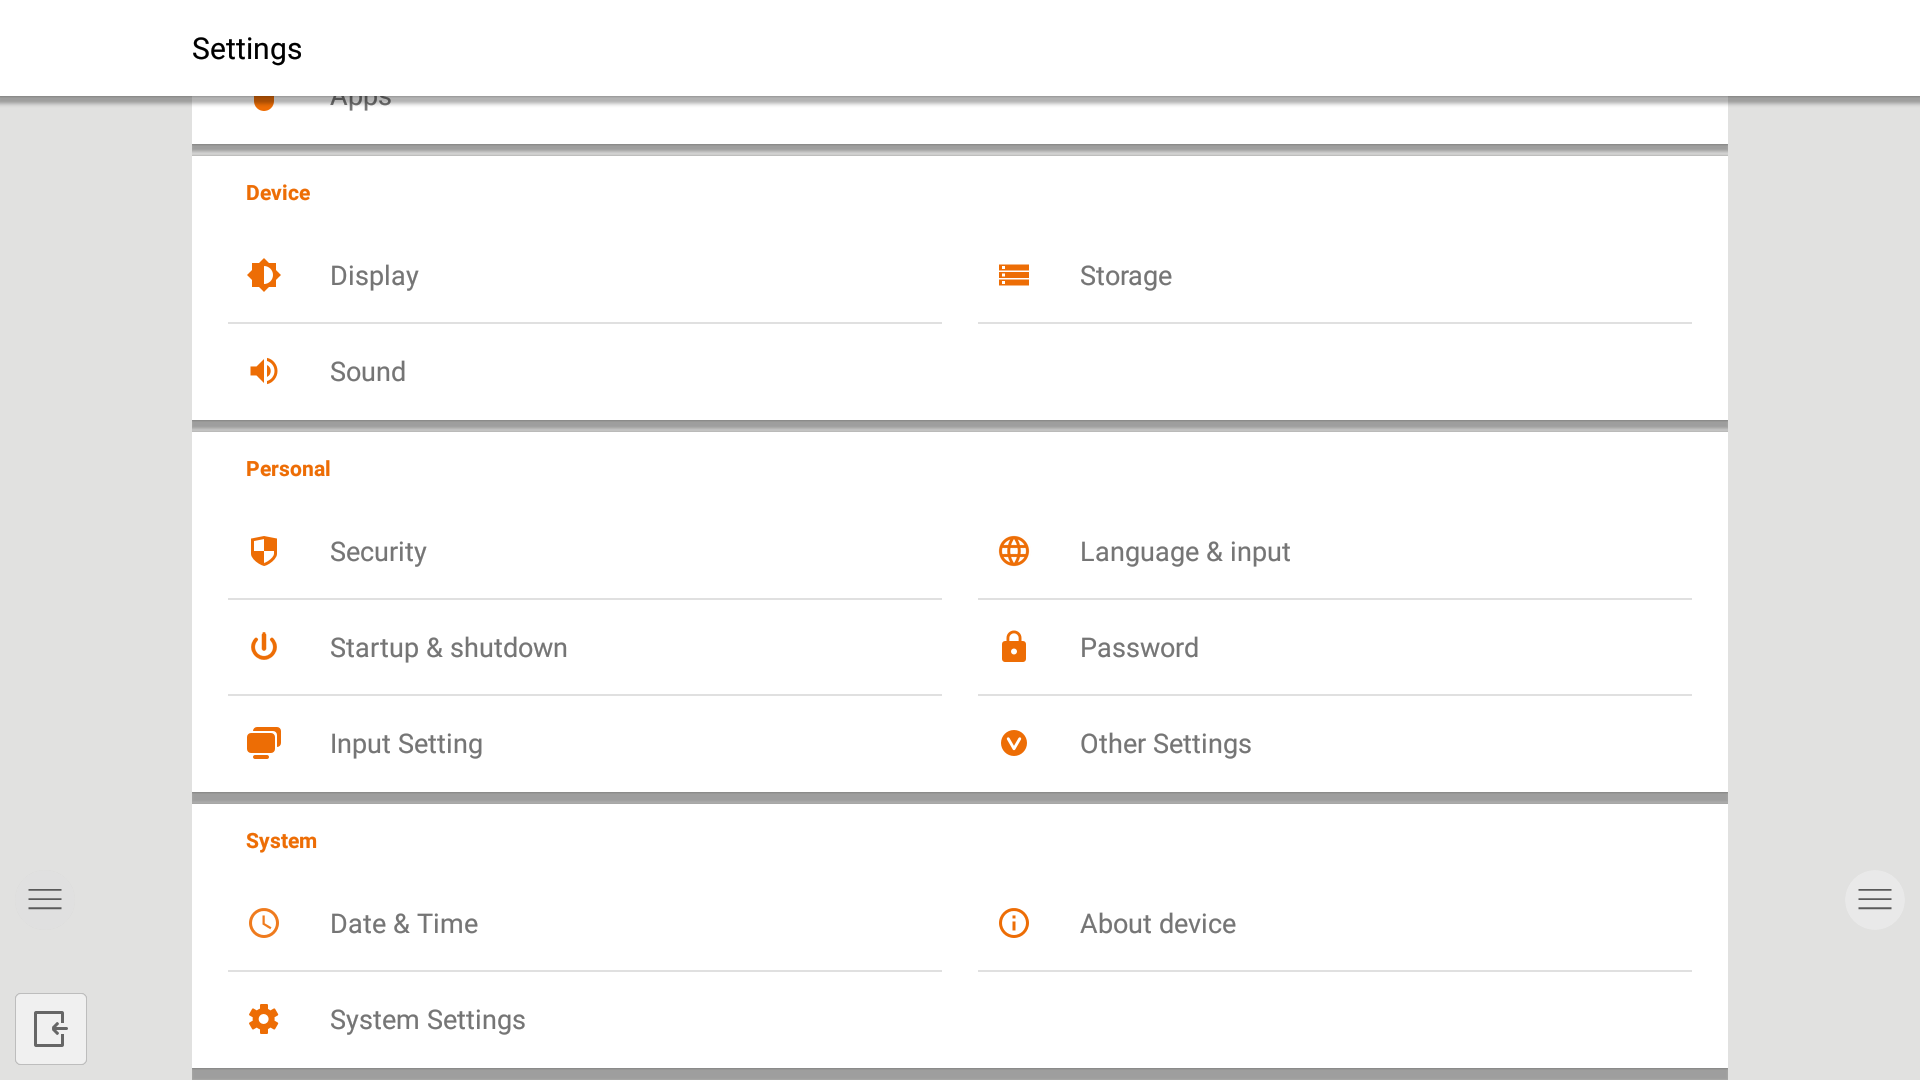
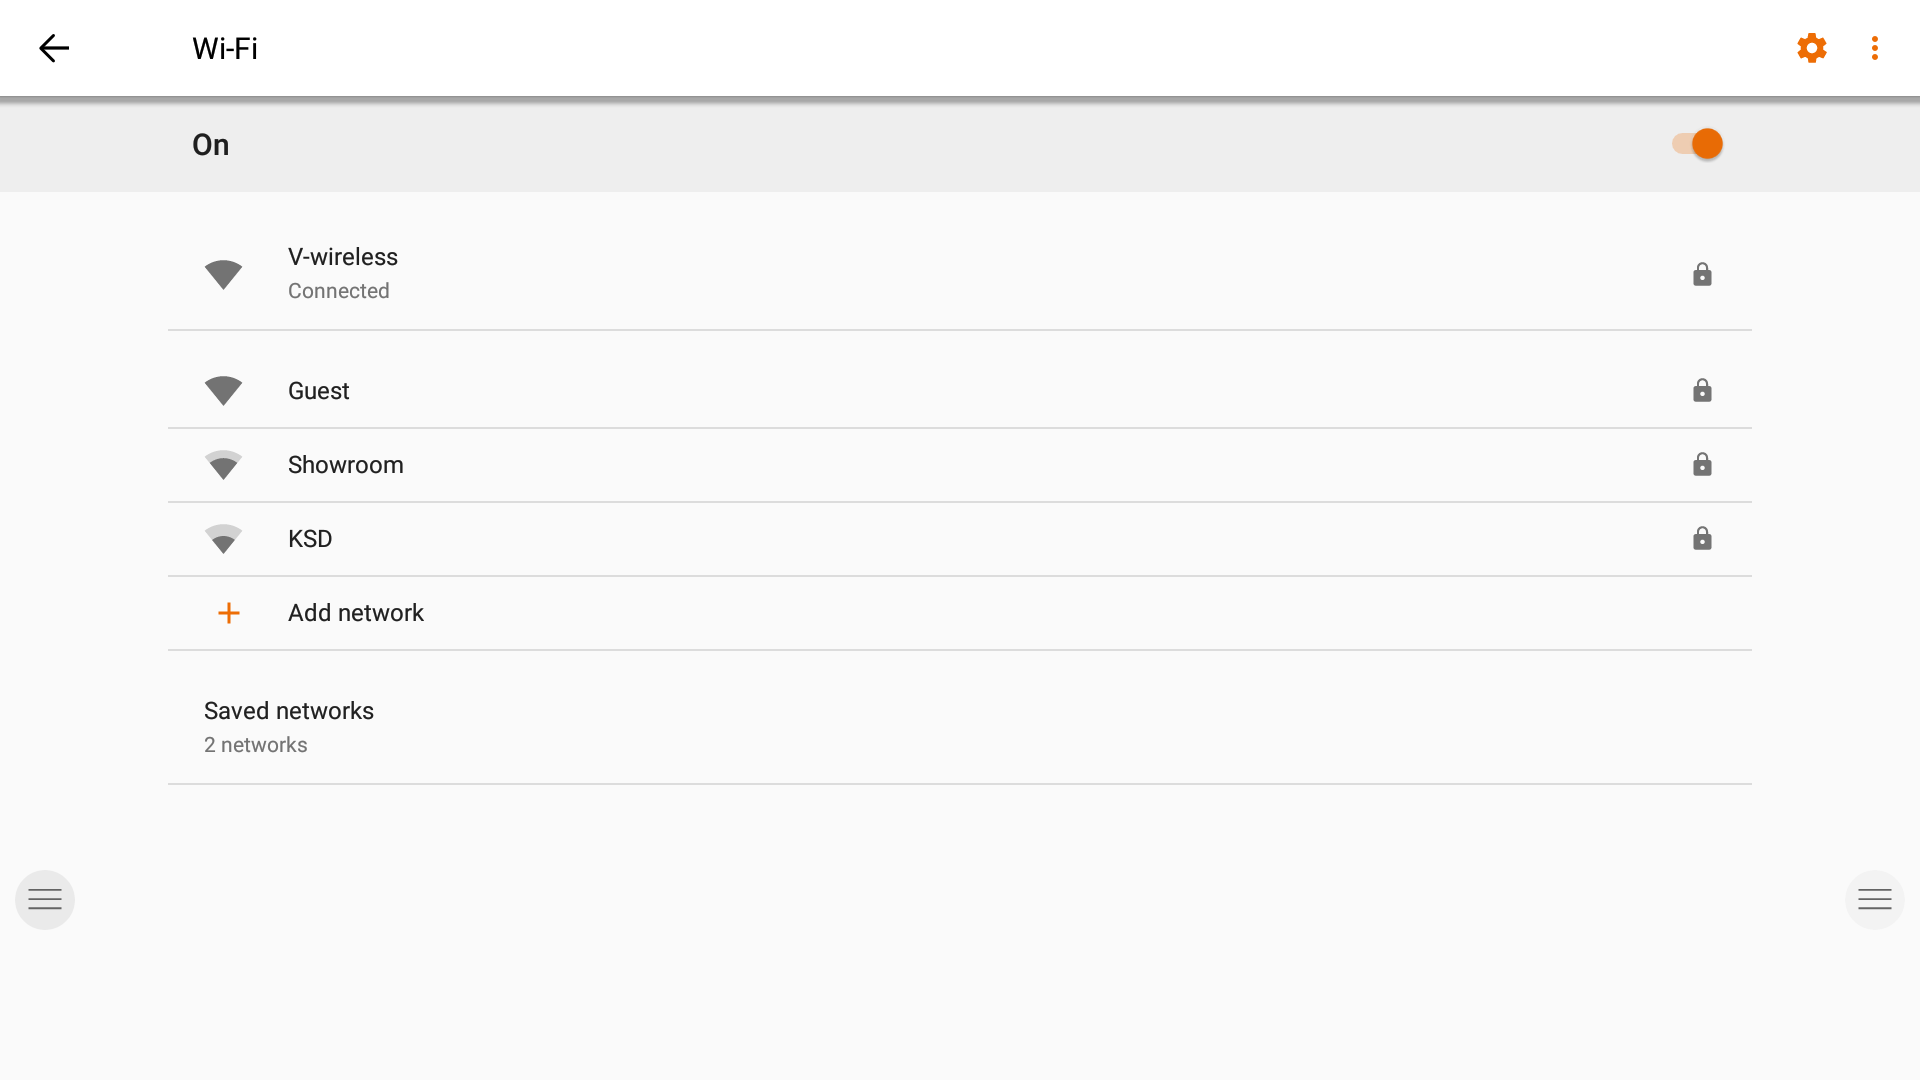
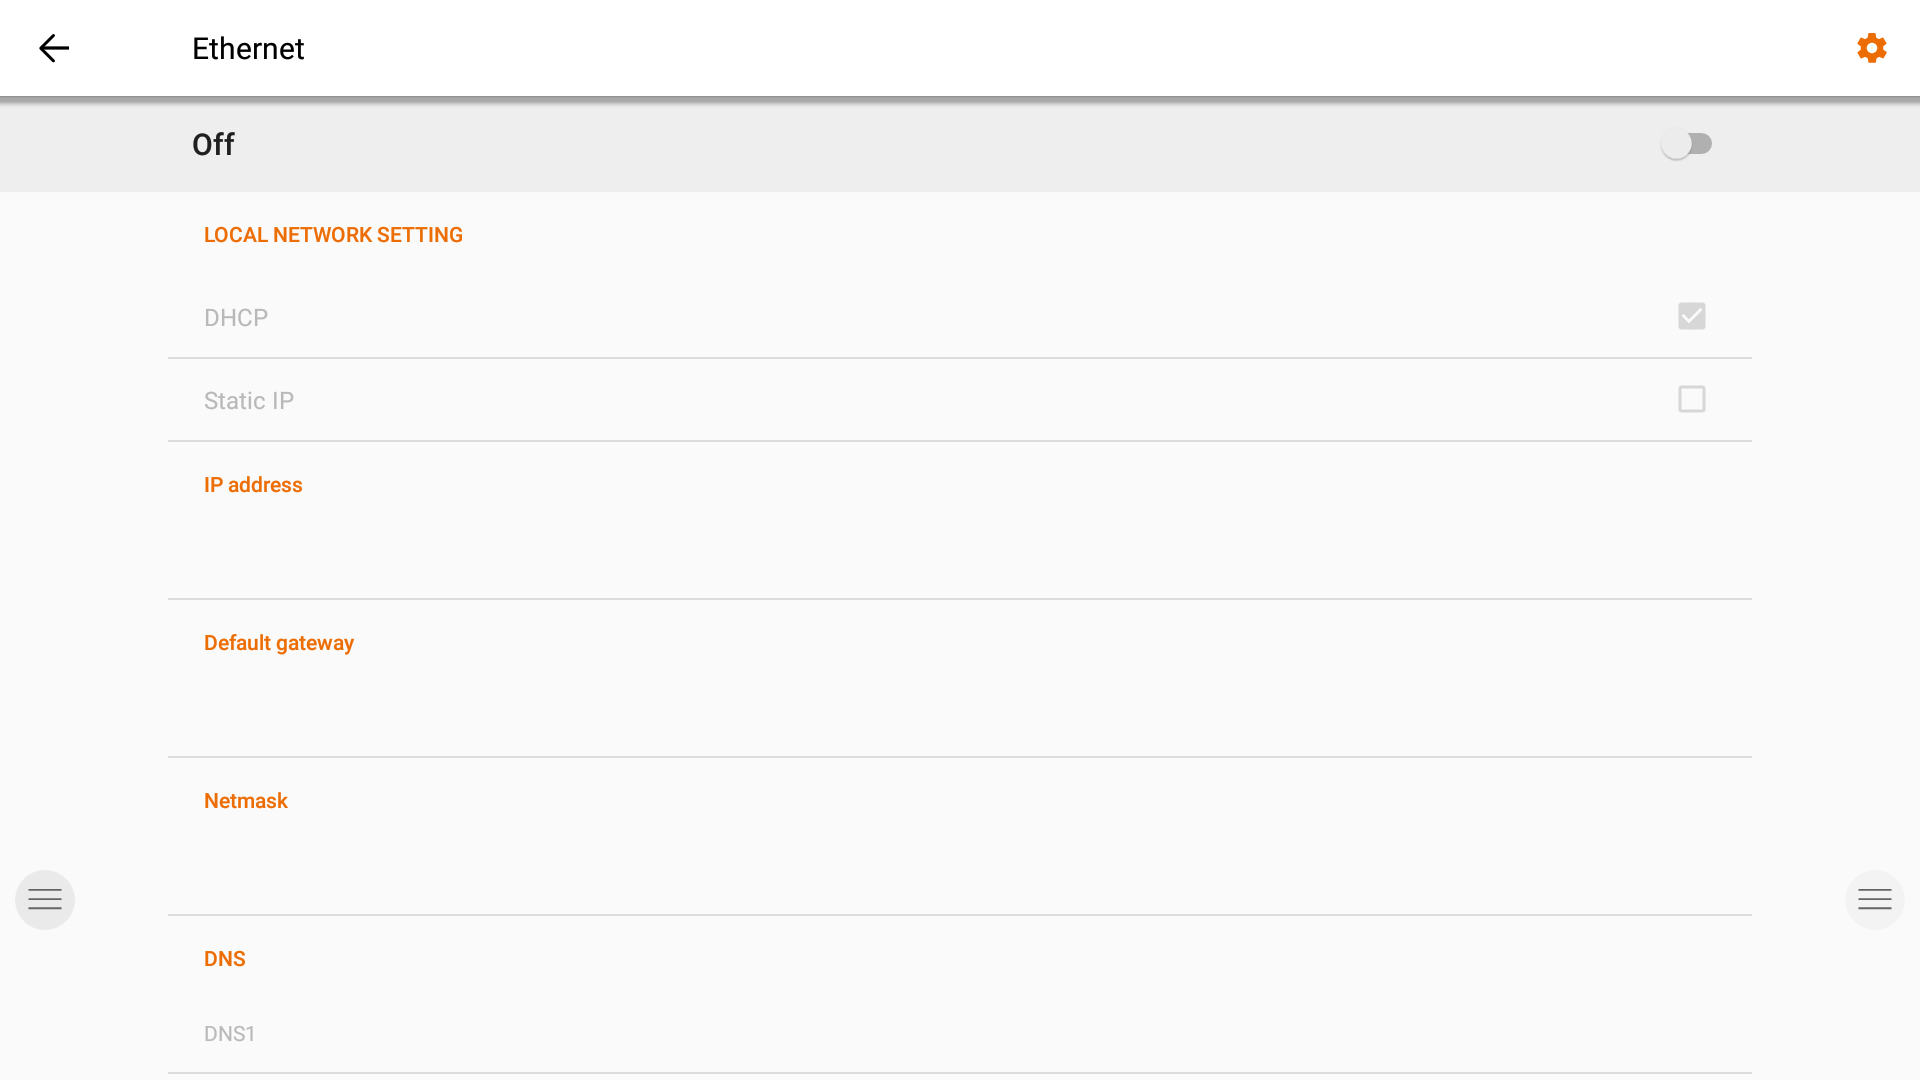
Connectivity settings.
Make a connection to your network and internet via Wi-Fi or Ethernet cable.
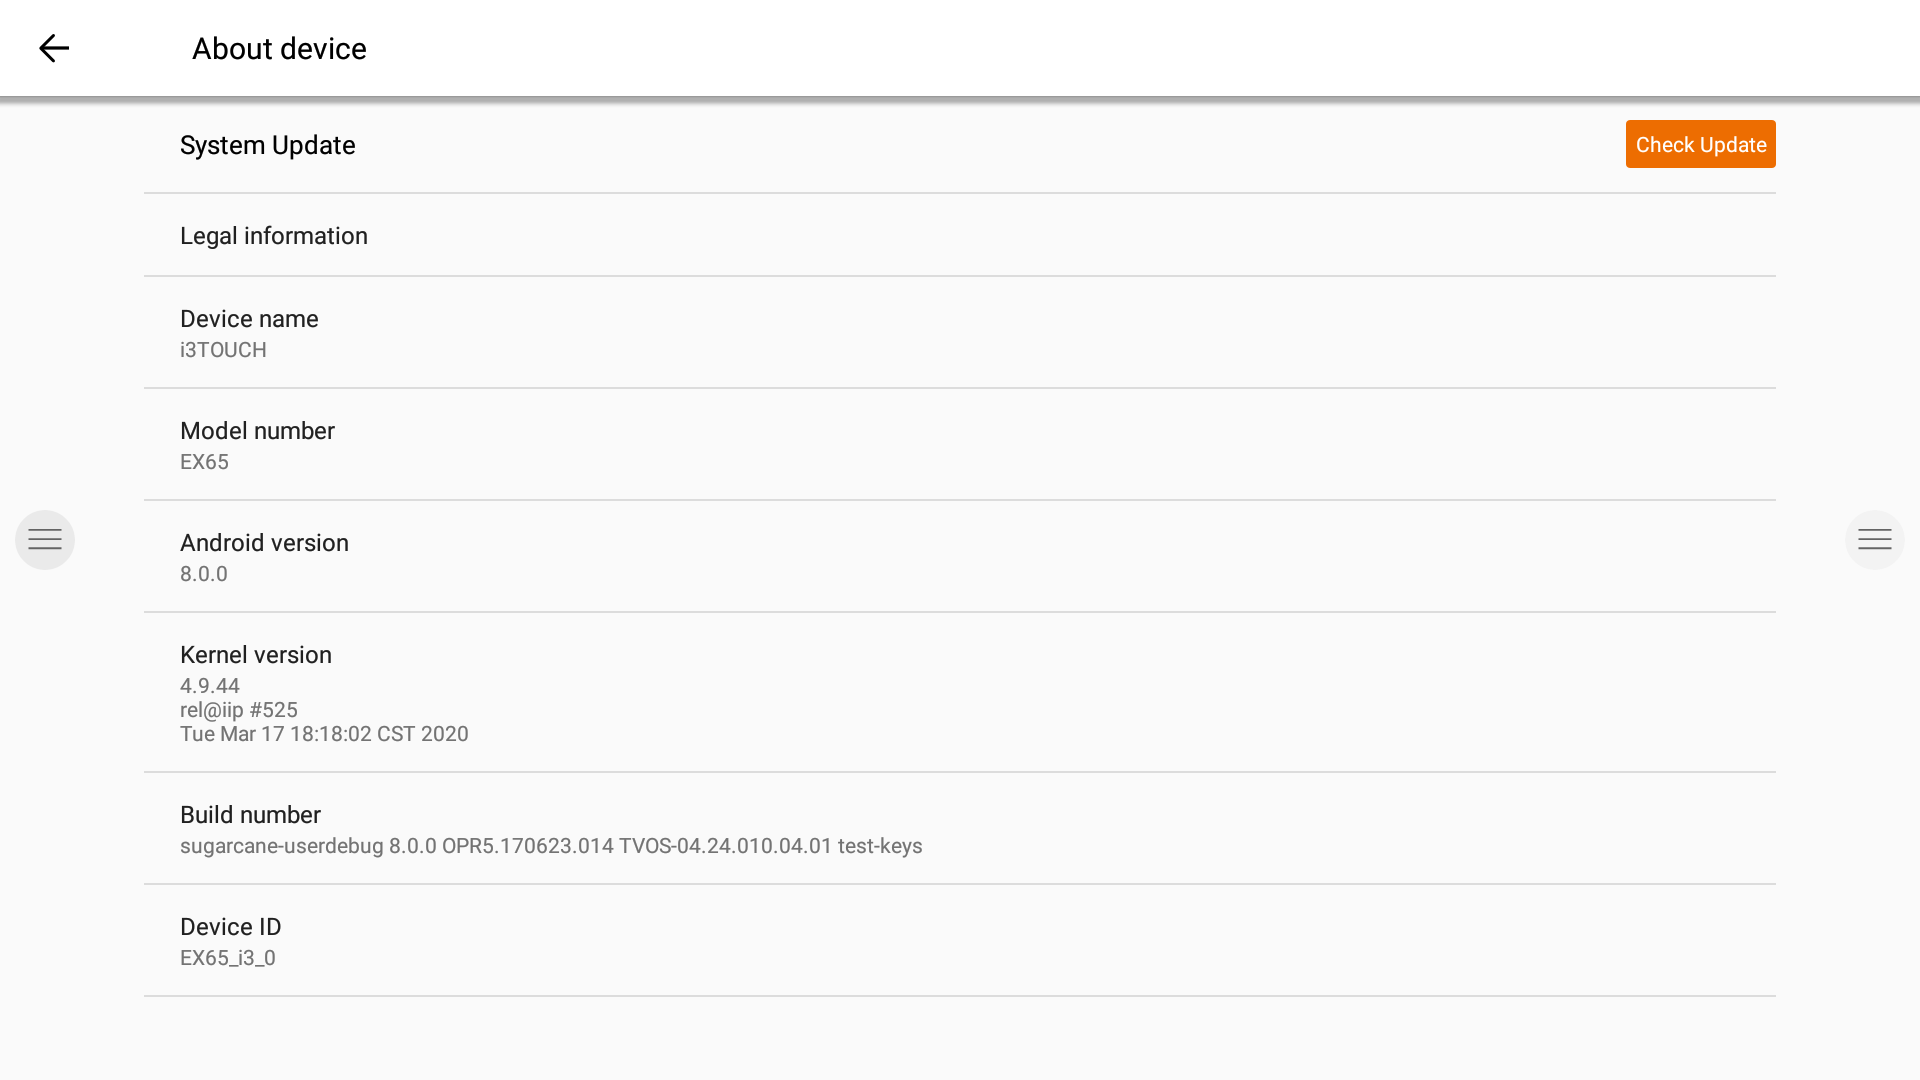
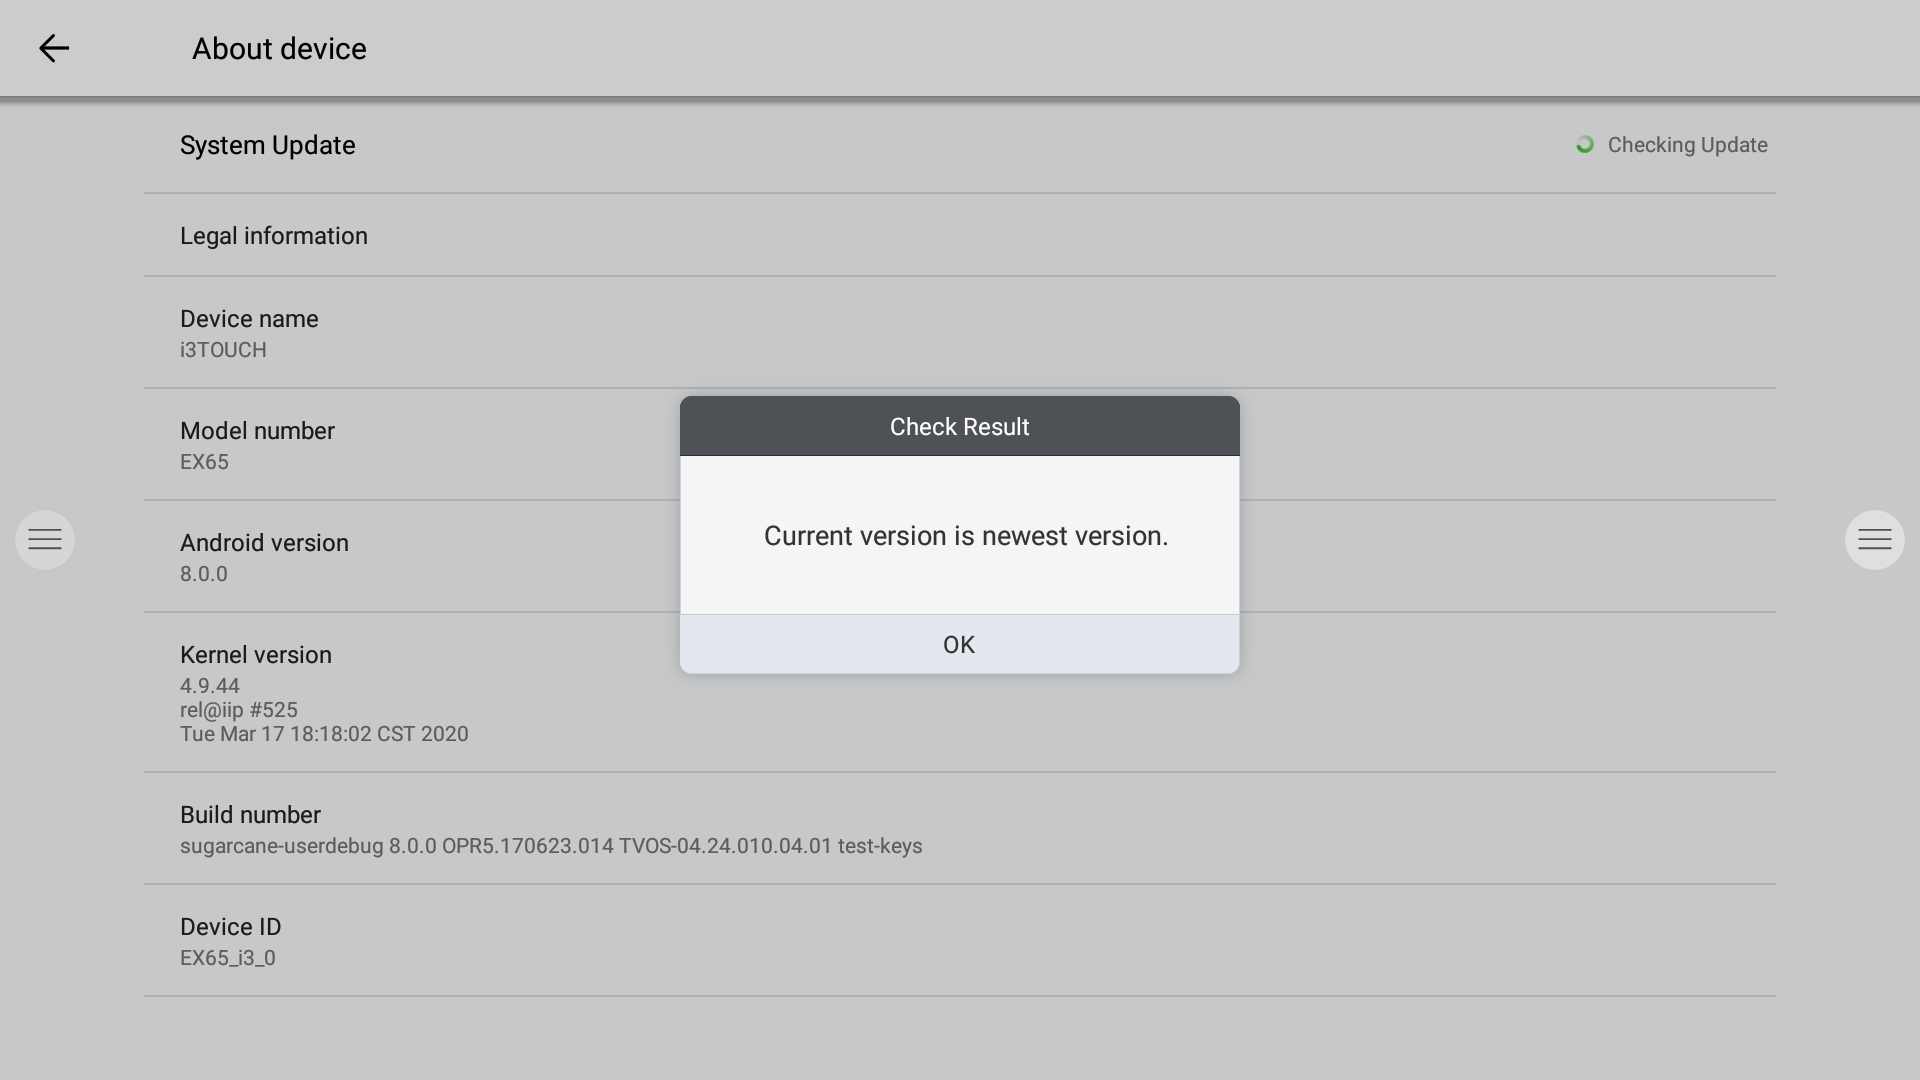
System firmware update.
After connecting to the internet, verify that your display is running the latest firmware.
In the settings application, press "About Device". Press the "Check Update" button to validate your firmware version online. If a newer version is available, this button will provide instruction to update your device.
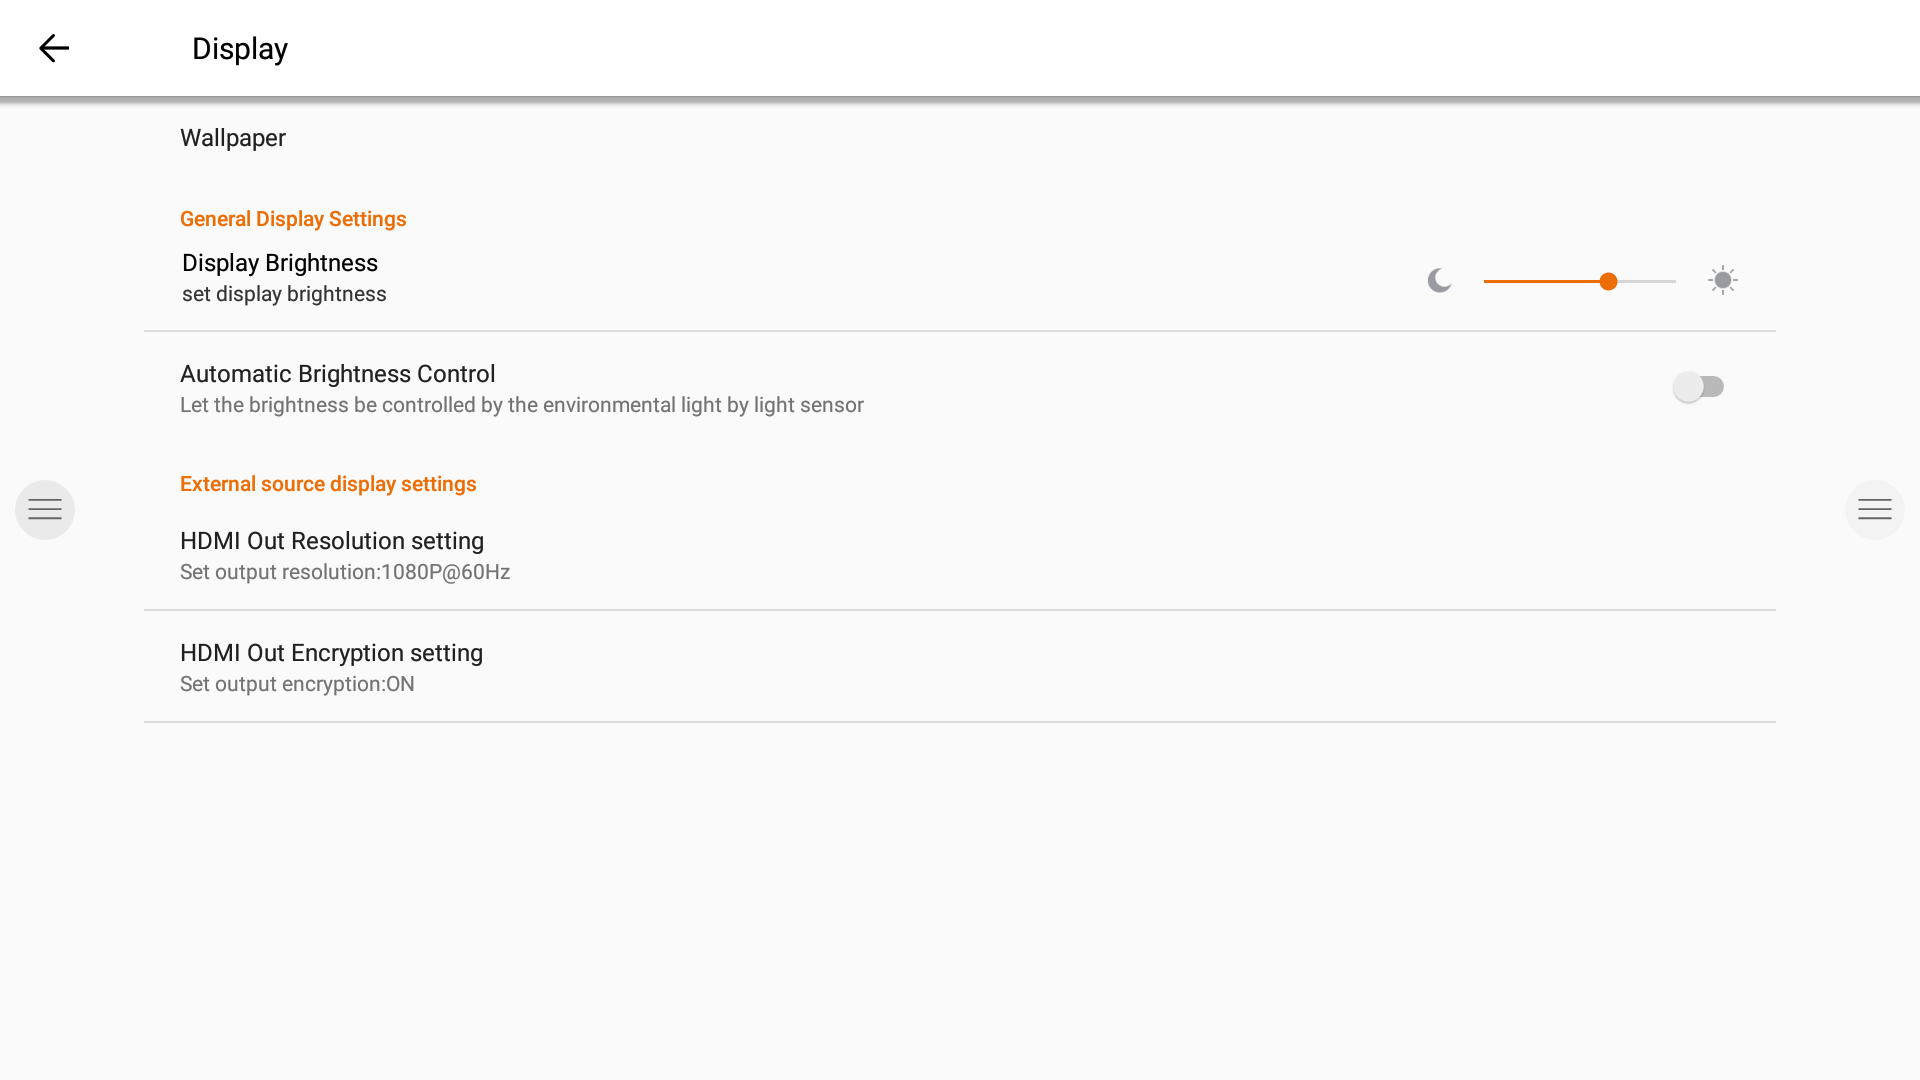
Display settings.
Control the brightness of the i3TOUCH display in the Display settings menu.
The i3TOUCH EX also features an environment light sensor to automatically adjust the brightness.
Turn "Automatic Brightness Control" on to activate this feature.
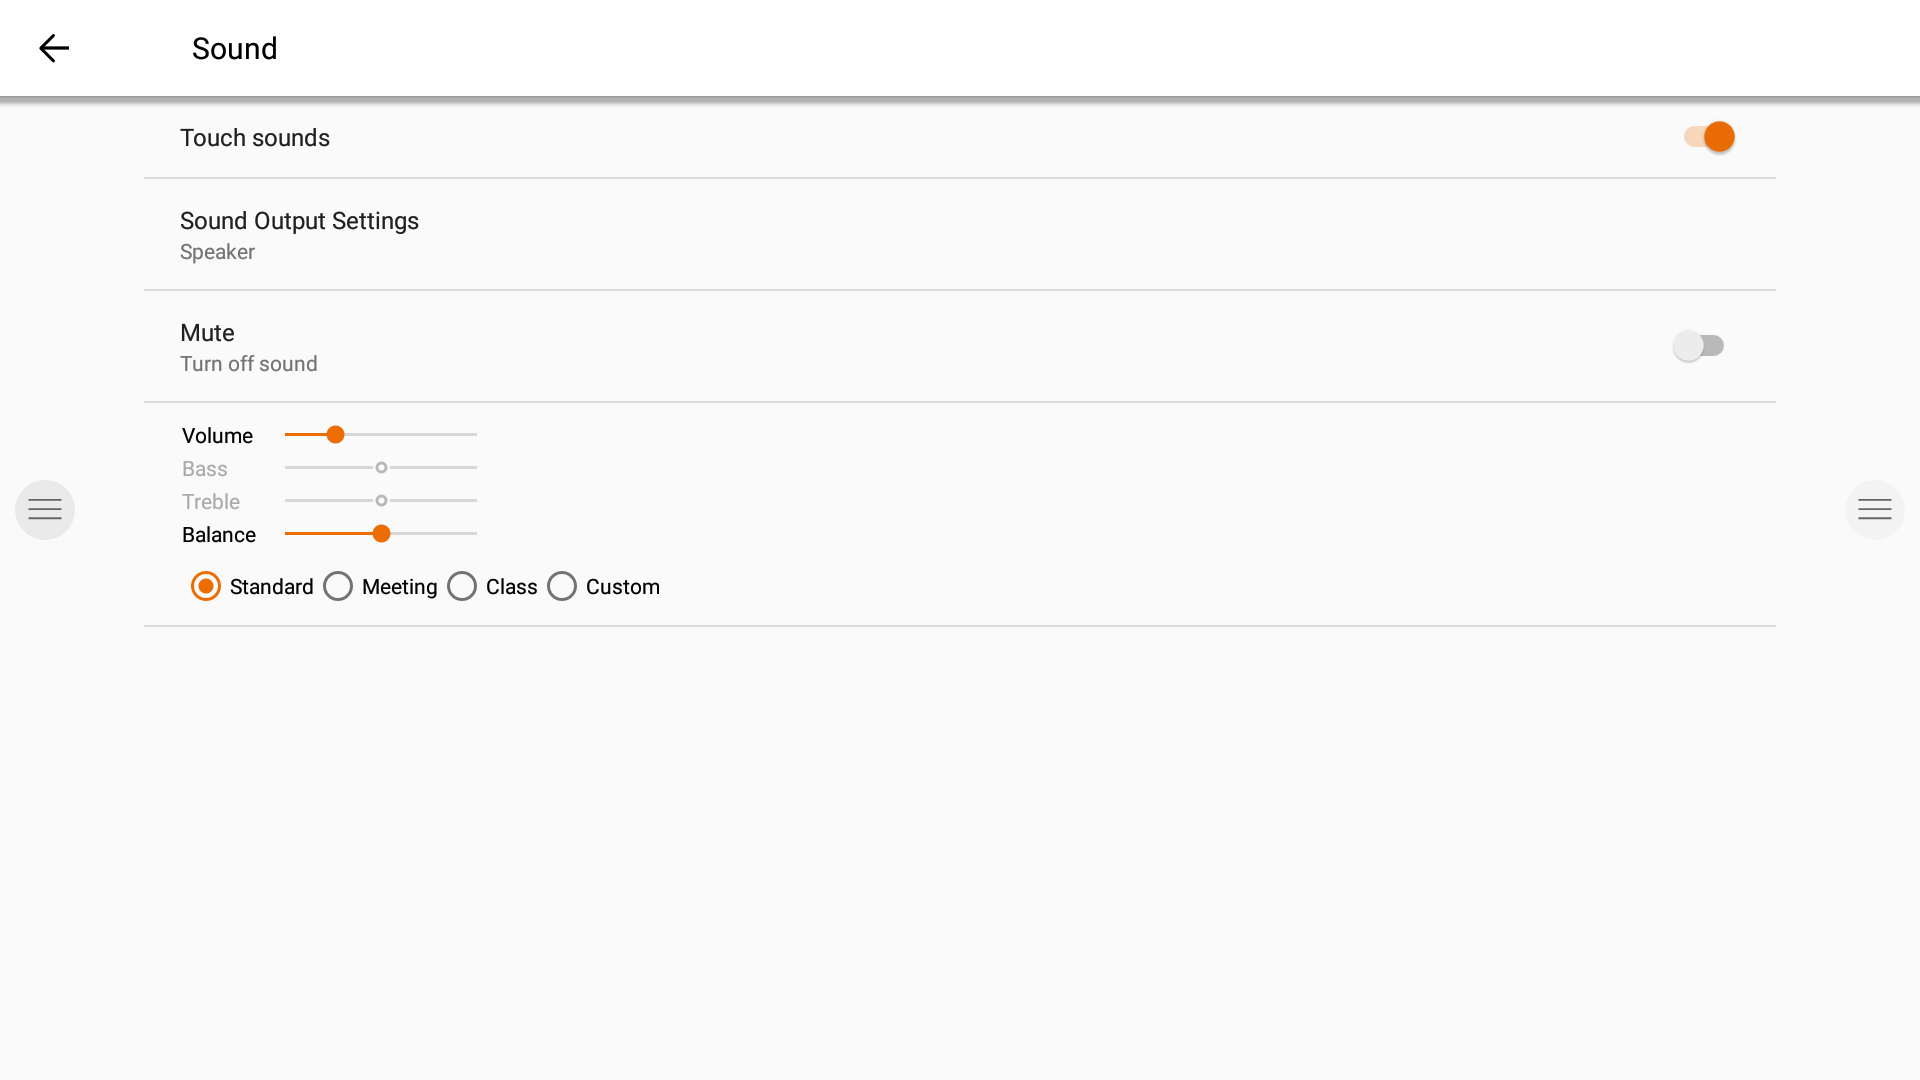
Audio settings.
Adjust the "Sound Output Settings" and pre-defined audio environment settings.
Startup and shutdown.
Adjust the display’s behavior during startup and shutdown.
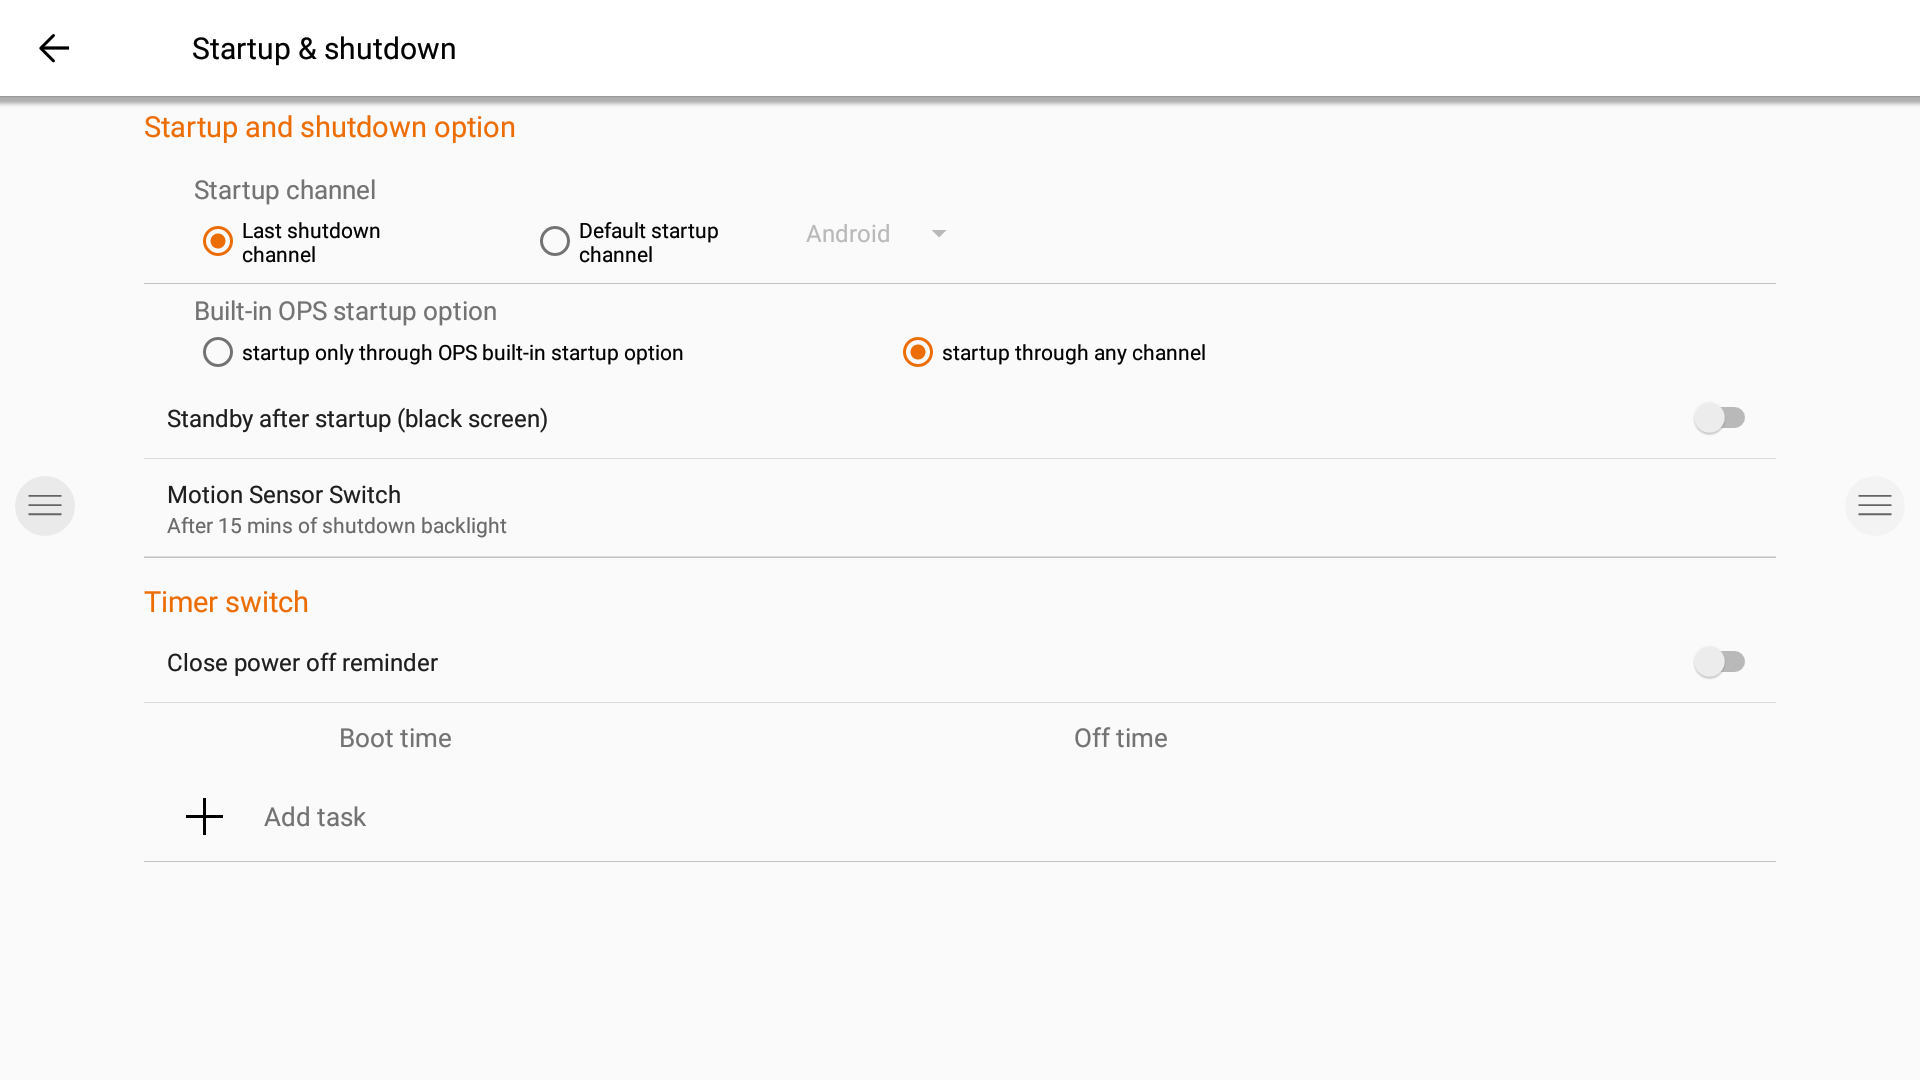
Define the active video channel after startup:
A. Last active video channel before shutdown.
B. Always startup on specific video channel (default: Android).
Define when the OPS Built-in computer should startup (if installed):
A. Only after switching to the video channel input.
B. Startup on any channel (startup together with display).
Enable / Disable the Motion Sensor.
If the motion sensor does not detect presence/movement in the room for 15 minutes, the display will automatically shut down.

Set an automatic time-based schedule for the device to start up and shut down. Up to 3 scheduling tasks can be defined. Example:
Automatically start up every weekday at 8:30 AM.
Automatically shut down every Monday, Tuesday, and Thursday at 5 PM.
Automatically shut down every Wednesday at 12:30 PM.
Automatically shut down every Friday at 4 PM.
Note: The display will provide a warning reminder before shutting down, to allow a user to manually cancel the task.
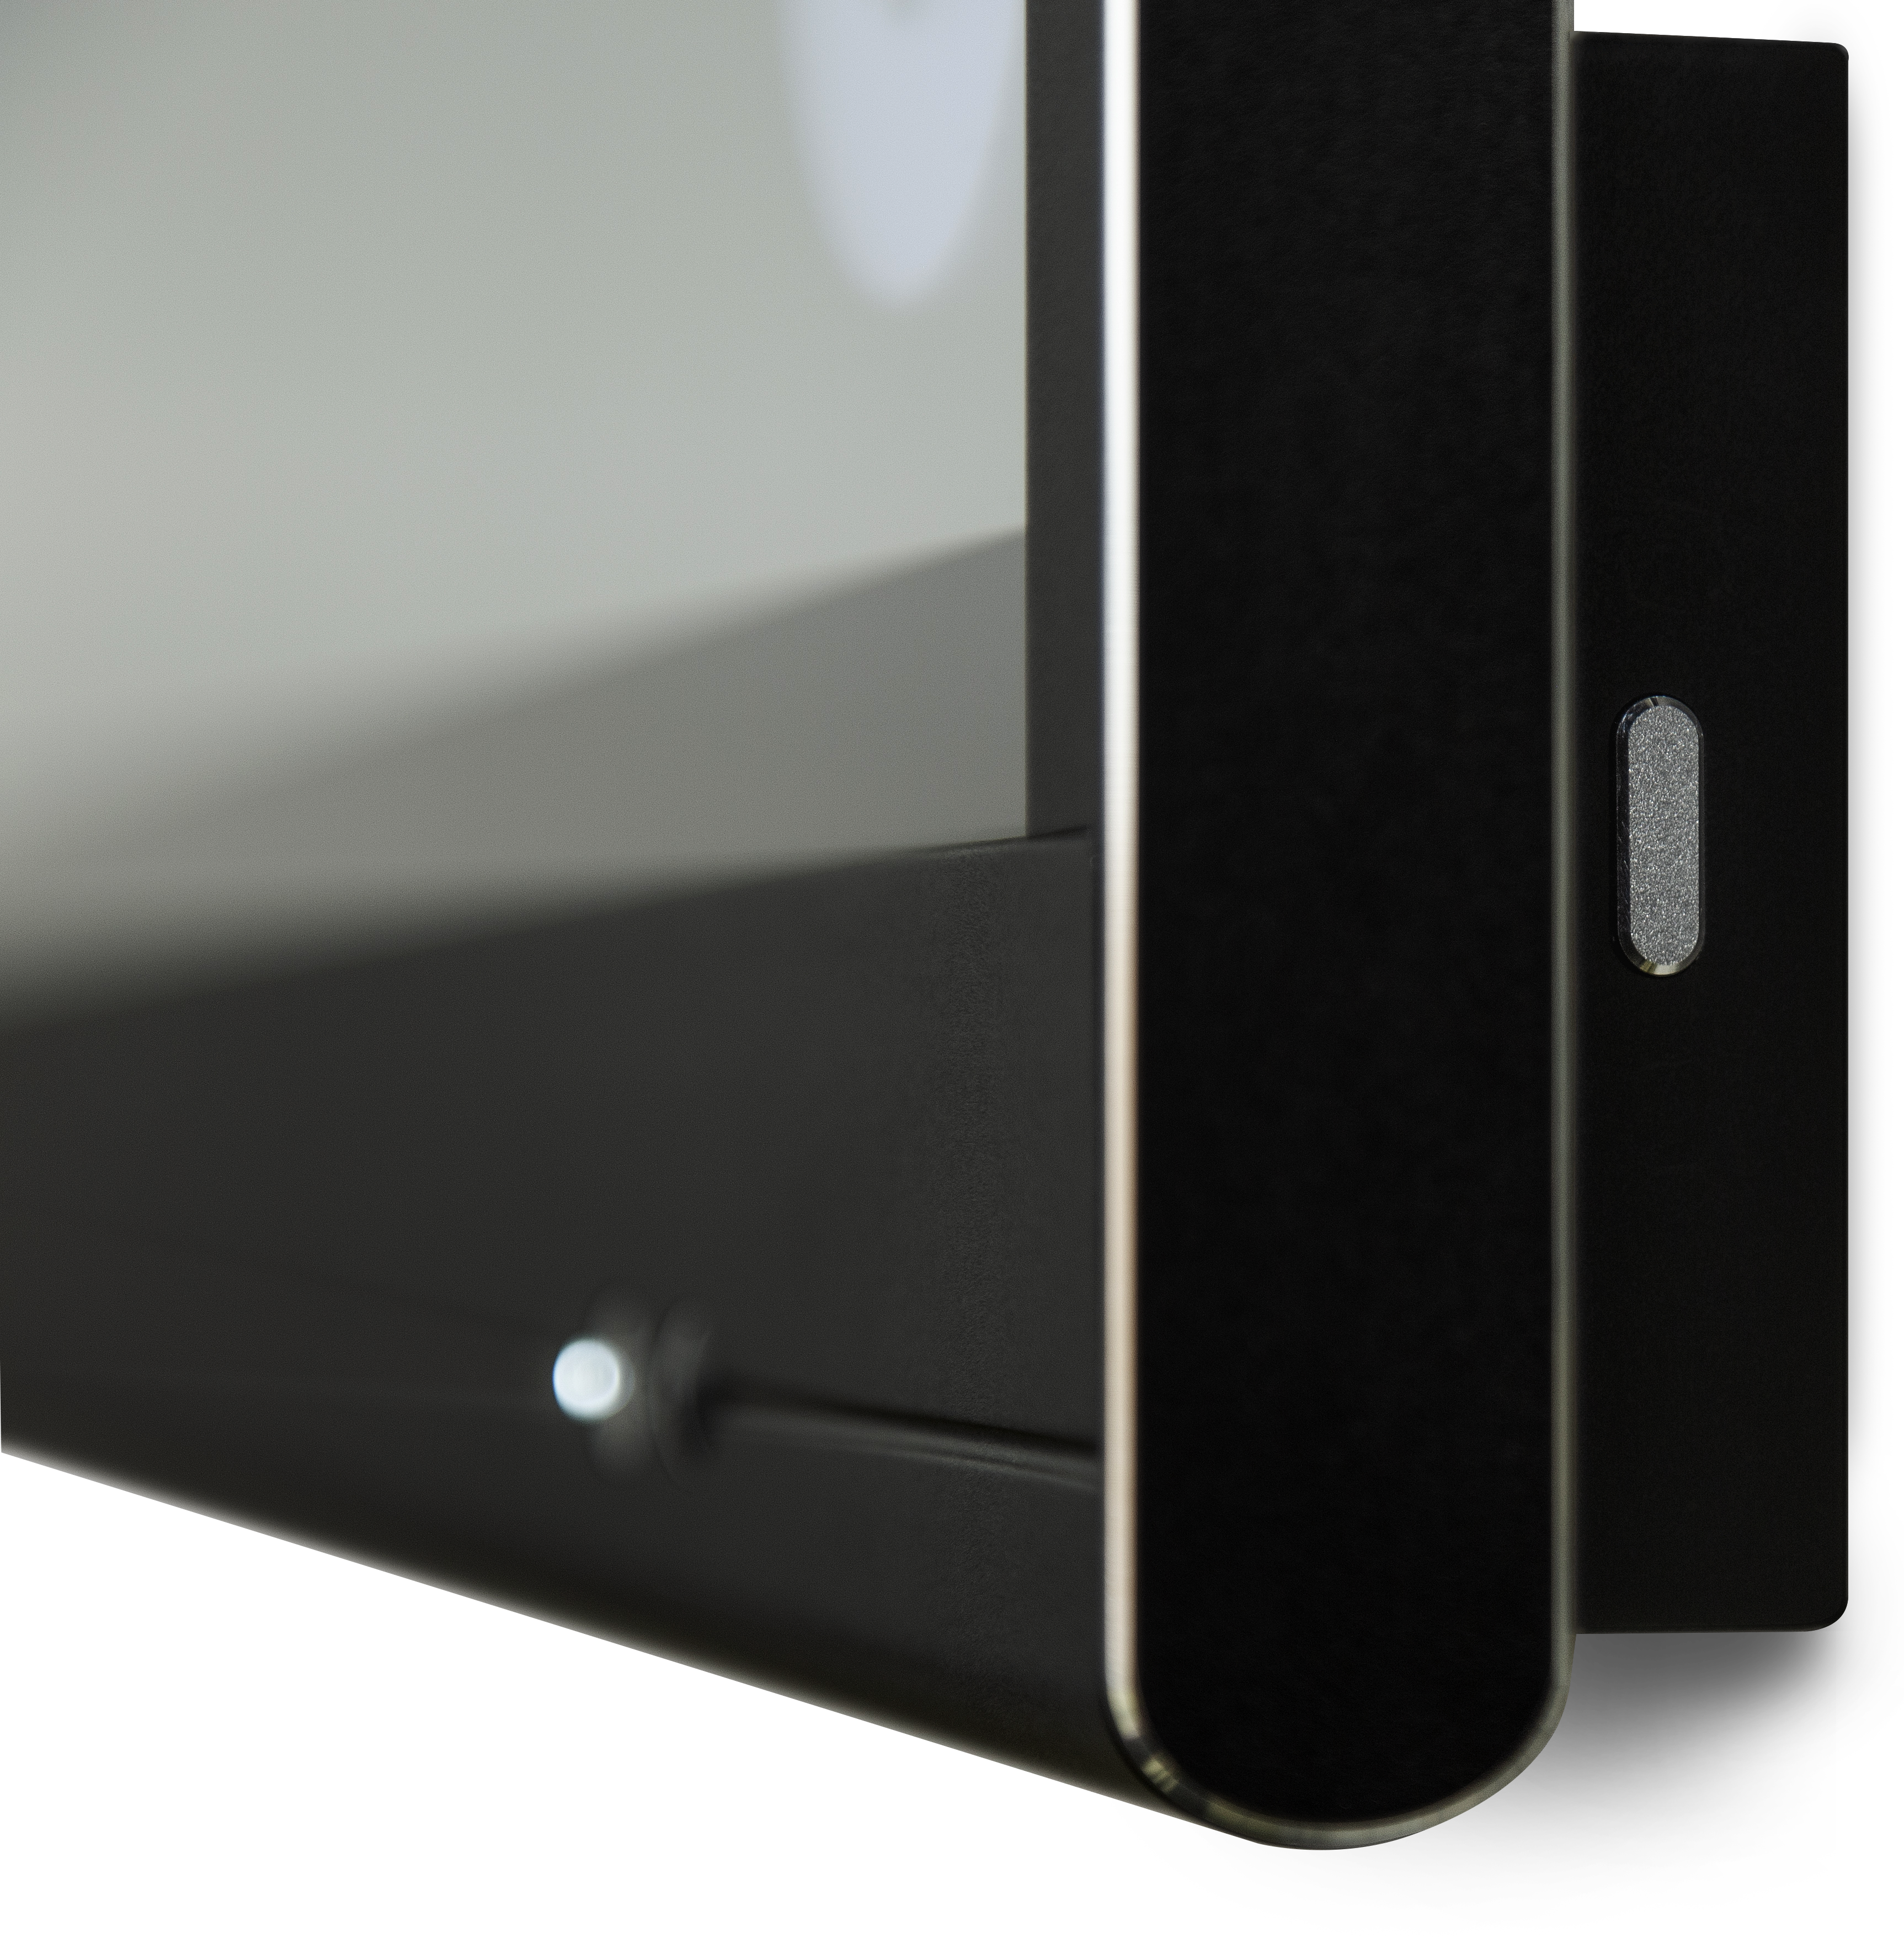
Multi-function button.
The multi-function button can be found on the rightside of the display. According to the settings you configure, this button will react accordingly.
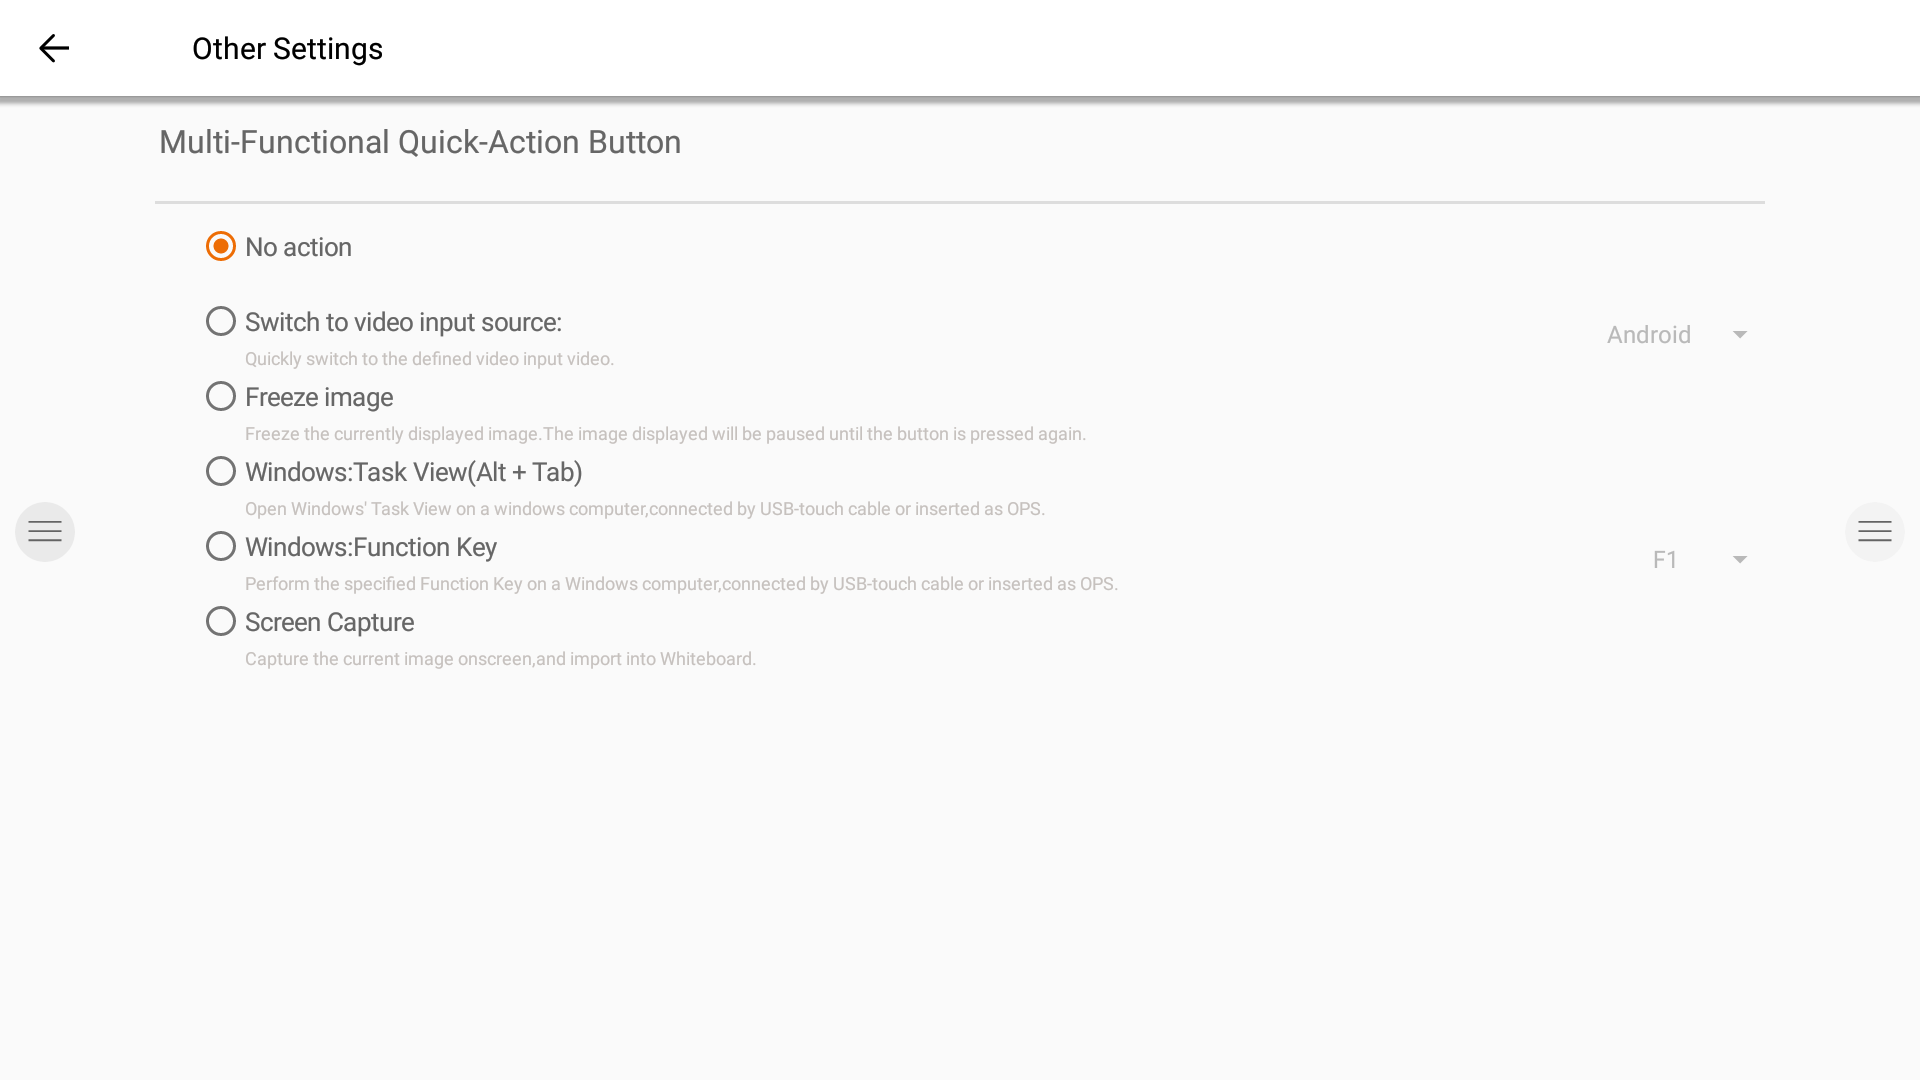
Possible configuration settings are:
Off
The multi-function button doesn’t perform any action.Input source
Quickly switch to the predefined video input source.Freeze image
Freeze the current displayed image. The image will be paused until you press the button again.Windows: Task view
Trigger the task view on a Windows computer connected with USB-C or inserted as OPS.Windows: Function key
Perform the predefined function key on a Windows computer connected with USB-C or inserted as OPS.Screen capture
Capture the current image on screen and import into the whiteboard application.
The action of the multi-function button can be defined in the Settings menu.
Note: The Task View and Function Key requires: A computer connected via USB, or the internal OPS computer. This computer needs to be the active video signal.

This manual is only for our EX, ES and PX i3TOUCH models.
For all other models, please see i3WHITEBOARD and i3ANNOTATE user manual
About i3Whiteboard
i3Whiteboard is our all-in-one whiteboarding app, focused on collaboration and included in i3STUDIO. Write with ease on the i3TOUCH display ( using a stylus or your fingers), use templates and include shapes and images. Save your files to your personal cloud or share the pdf with colleagues or classmates.
About i3Annotate
i3ANNOTATE allows you to annotate over other apps and take screen captures. These screen captures can then be sent to the i3WHITEBOARD.
Table of Contents
Browsing
For browsing the web, the i3TOUCH provides the Google Chrome application.
Usage instructions for the Google Chrome browser can be found at https://support.google.com/chrome.
Present
Meeting attendees often bring their own devices to the meeting room. Laptops, smartphones, tablets, etc.
The i3TOUCH display provides multiple tools for streaming to and from other devices.
The i3TOUCH display provides the i3ALLSYNC Wireless Presenting application to quickly and easily stream the screen content of any mobile device to the display.
Download transmitting client software...
i3ALLSYNC is our client software, available for most operating systems and devices, and can be downloaded from https://i3-allsync.com. The software is available for Windows OS, MacOS, and Android OS. iOS and MacOS can also use their integrated AirPlay function to connect with i3ALLSYNC without any software.
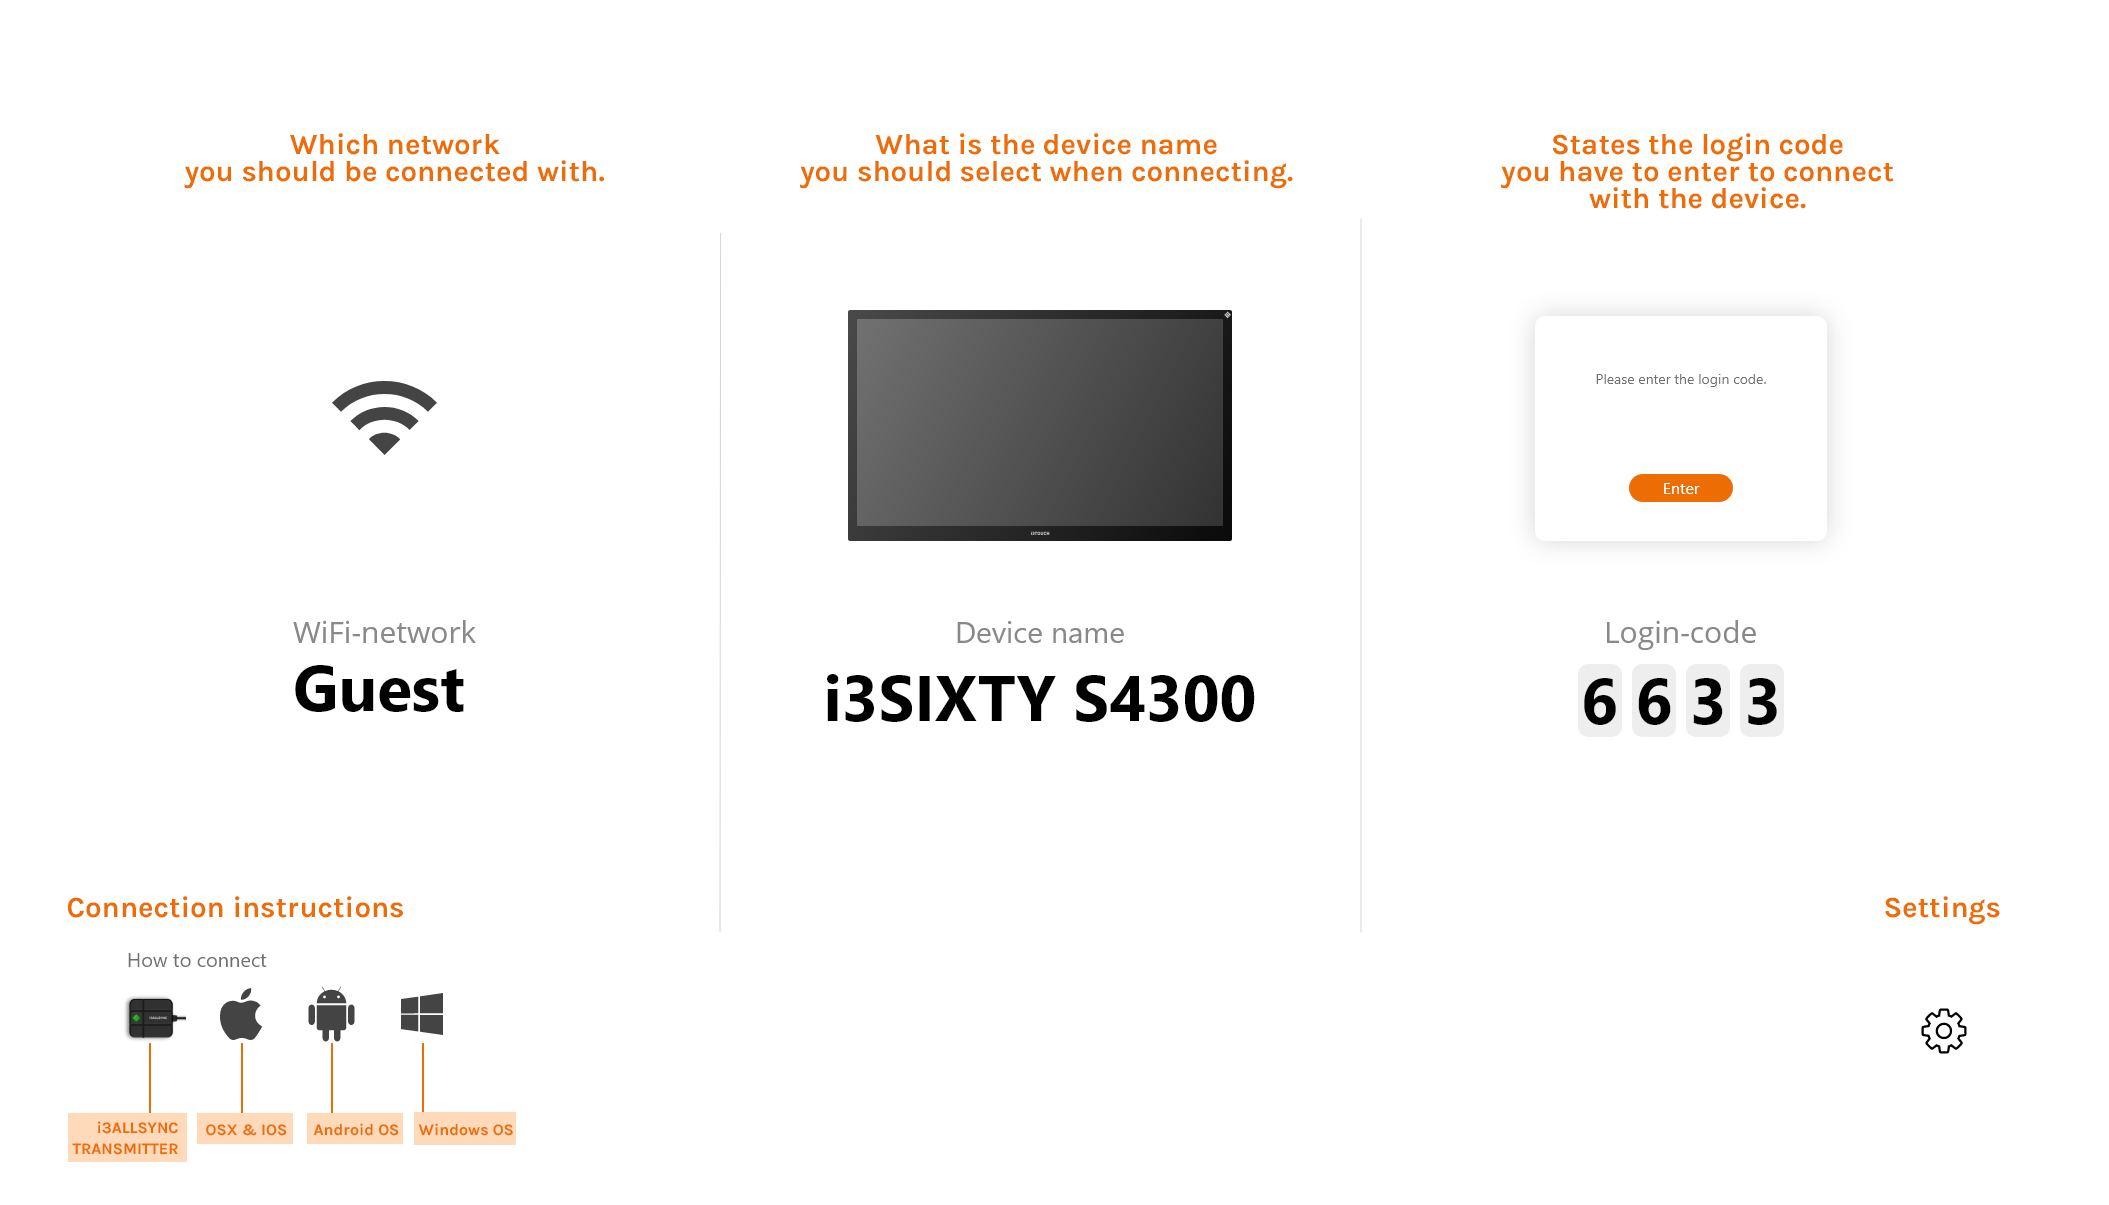
... and connect to the i3TOUCH with i3ALLSYNC transmitter software
Open the transmitting client i3ALLSYNC application on your device, and follow the instruction on-screen to insert the i3TOUCH credentials and cast your screen content.
i3ALLSYNC Menu and Settings
When opening the present feature, this is the interface you will see.
Once you’ve set up your connection the i3TOUCH display will show a widget at the bottom of the screen containing several settings


Stop video stream
Press this button to stop the shared content from all connections.
Start annotating
Press this button to start the annotating function of the i3TOUCH. (This button behaves exactly as the Annotate button in the hamburger menu).
List all connections
Available only in the CLOSED Meeting Mode. Press this button to display a list with previews of the connected users that are standby to share their screen content. Press the play button on the preview to display the screen content.
Enable / disable touch
Allow or deny the touch input on the screen of the i3TOUCH to control the connected computer.
NOTE: Touch functionality only works via the i3ALLSYNC Transmitting clients on Windows and MacOS.
Use the i3ALLSYNC HDMI transmitter (optional accessory)
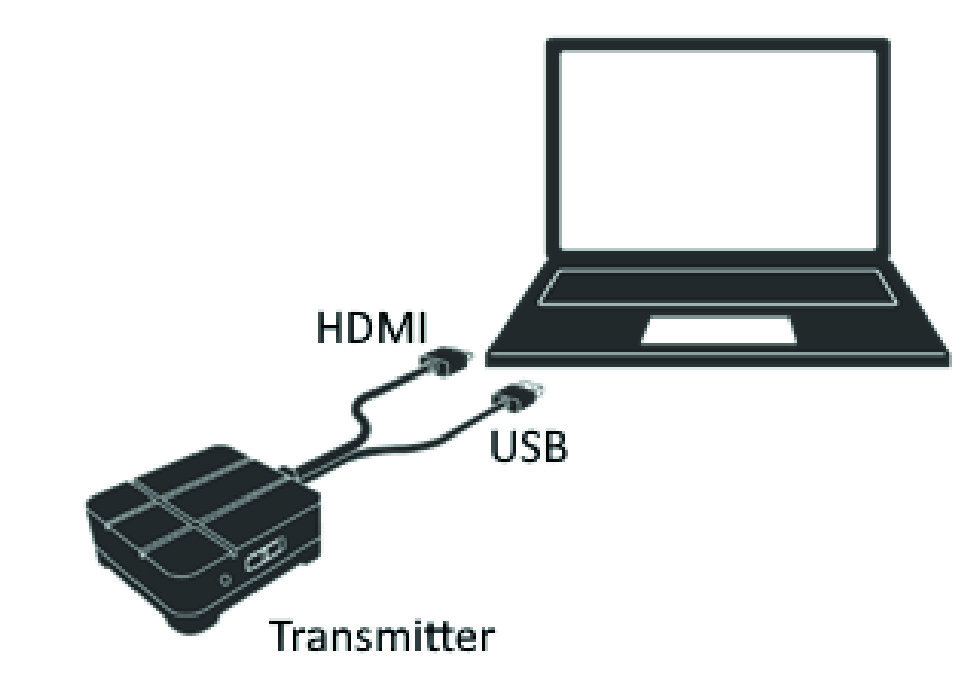
i3-Technologies also offers the i3ALLSYNC HDMI Transmitter (purchased separately) for meeting attendees (guests) that can’t or won’t install the client software. Once the i3ALLSYNC HDMI Transmitter is paired only once with the display, you only need to plug in the HDMI and USB cable and press the button to immediately share the HDMI content on-screen.
Connect to i3TOUCH EX with i3ALLSYNC HDMI transmitter (device not included)
If using the i3ALLSYNC HDMI Transmitter device, just connect and screensharing will start with the press of a button. The i3ALLSYNC interface provides useful instructions for each operating system to start the presentation.
Quick Troubleshooting
Device fails to work normally | |
Remote control failure | Check whether there are other objects between remote control and equipment control receiving window, thus leading to failure of remote control. |
Check whether the battery electrode in the remote control is correct. | |
Check whether the batteries of the remote-control needs to be replaced. | |
Machine has automatically shut down
| Verify sleep settings in the settings app. |
Check whether there is sudden power outage. | |
The system will automatically shut down if the interactive external video channel has no signal for 5 minutes. Please check the input and connection of the video signal and/or modify sleep settings of the external device. | |
PC mode | |
Image lack of color, color is incorrect | Check whether the VGA connector is well connected or has broken pins. |
Verify the correct operation of the VGA cable. (replace) | |
Touch operation | |
Touch function is not working | Verify that the USB cable is properly connected to the computer. And that the length of the USB cable does not exceed 5 meter without USB amplifier / hub. |
Verify that the computer hardware and operating system supports touch screen operation. (Windows 7 or earlier does not support HID touch screens). (Some MacBooks do not support HID touch screens). (Older Linux kernels do not support HID touch screens). | |
Video signal problems | |
No picture and no sound | Check whether the machine has started. |
Check whether signal wire is well plugged, whether INPUT is corresponding to it. | |
If in internal computer mode, check whether internal computer is started. | |
With horizontal or vertical stripes or image dithering | Check whether signal wire is well connected. |
Check whether other electronic equipment or power tools are placed around the machine. | |
No color, color is weak, or image is weak | Adjust chromatic and brightness or contrast in menu. |
Check whether signal wire is well connected. | |
Audio problems | |
Image but no sound | Check whether mute button is pressed for mute. |
Press VOL + / - to adjust volume. | |
Check whether audio line is connected correctly. | |
Only one speaker has sound | Adjust sound balance in menu. |
Check whether computer sound control panel only sets up one sound channel. | |
Check whether audio line is connected correctly. | |
HDMI output without sound | Check whether the external device is connected correctly. |
Maintenance
Proper maintenance can avoid many early faults and regular careful cleaning can make machine brand new. Please unplug power plug before cleaning and maintenance, to prevent electric shock.
Clean screen
Please use a soft cloth to be completely soaked in the mixture.
Please take out cloth and twist to half dry state to wipe machine screen.
Repeat for several times, pay attention not to squeeze water flow into machine when wiping machine.
Clean face frame
Please use dry, soft, lint-free cloth to wipe front frame.
No use of machine for a long time
In case of no use of machine for a long time, such as holiday, please make sure to unplug the plug to prevent any possible dangers caused by power supply ripple from lightning.
NOTE:The terms HDMI and HDMI High-Definition Multimedia Interface, and the HDMI Logo are trademarks or registered trademarks of HDMI Licensing LLC in the United States and other countries.