
Manual - i3TOUCH PXr
Manual
General Safety Precautions
Thanks for purchasing this product. Please read the instructions carefully before using this product.
Please keep this manual for future reference. This manual is a general manual, the pictures are for reference only, please refer to the real product.
Recycling.
This product should not be placed in municipal waste. Instead, dispose of waste equipment by taking it to a designated collection point for electrical and electronic equipment recycling.
Safety Instruction.
For your safety, please read the following instruction before operating the product. Serious injury or property damage may be caused by improper operation. Do not try to repair the product by your own.
 | Disconnect the product from power supply immediately if major failures occur. Major failures include the following:
In the preceding scenarios, do not continue to use the product. Disconnect power supply immediately and contact professional staff for troubleshooting. |
 | Do not drop liquid, metal or anything combustible into the product.
|
Put the product on a stable surface. An unstable surface includes and does not limited to an inclined plane, a shaky stand, desk or platform, which might cause turnover and damage. | |
 | Do not open the cover or change the product on your own. High voltage components are installed in the product. When you open the cover, high voltage, electric shock, or other dangerous situations may occur. If inspection, adjustment, or maintenance is required, contact the local distributor for help. |
 | Use the specified power supply.
|
Clean the power plug regularly.
| |
 | Do not put items on the top of the product.
|
 | Do not install the product in an improper place
|
 | Pull out the power supply during thunderstorms.
|
 | Do not touch the power cable with wet hands. |
Caution
 | Do not install the product in high temperature environments.
|
| When transporting the product:
|
 | Do not cover or block up any vents on the product.
|
| Keep the product away from the radio. The product complies with the international EMI standard to pervent radio interference. However, interference may still exists and causes noise in the radio. If noise occurs in the radio, try the following solutions.
|
Do not damage the power cable.
| |
Use the battery correctly.
| |
Additional advice:
| |
Special remarks:
|
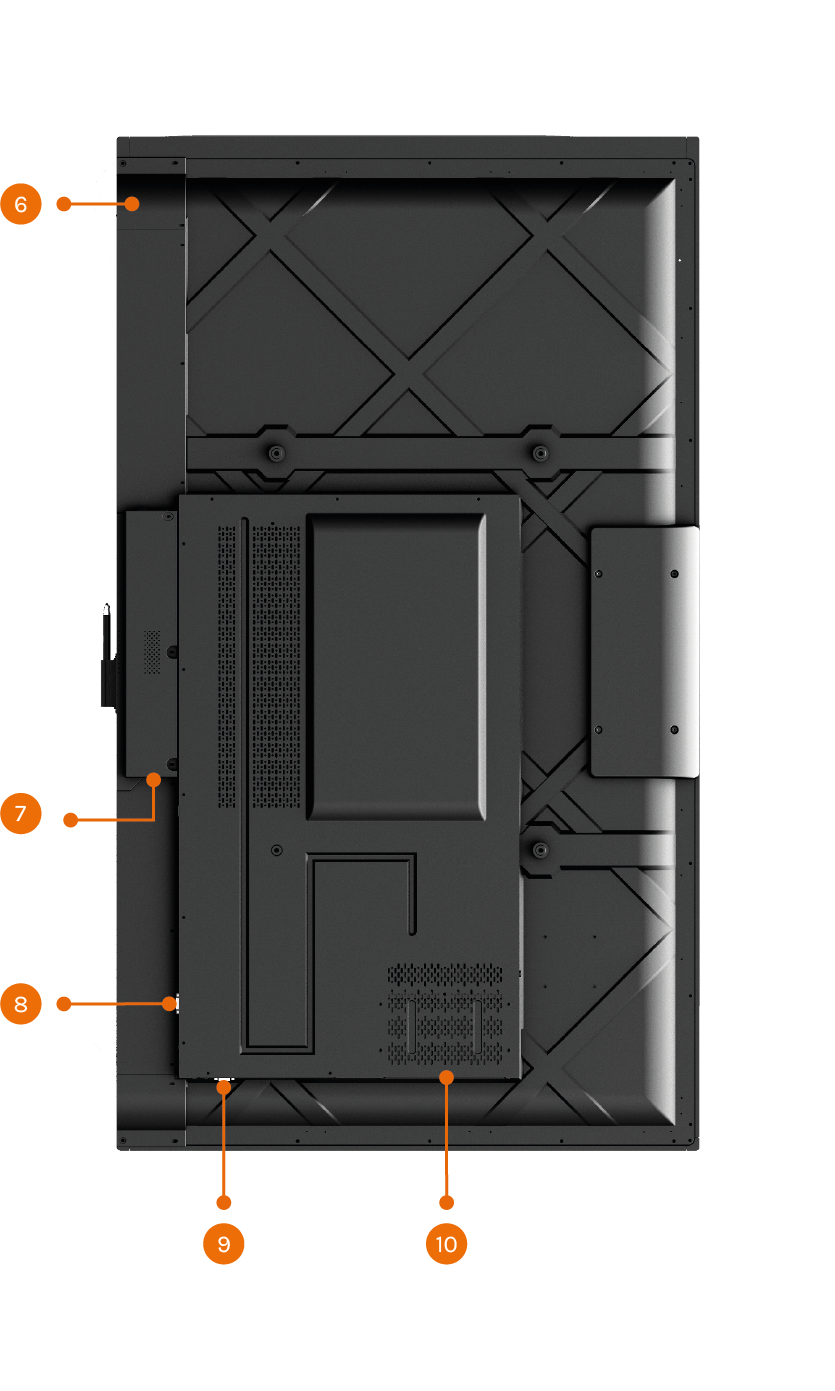
Product Appearance
Parts.
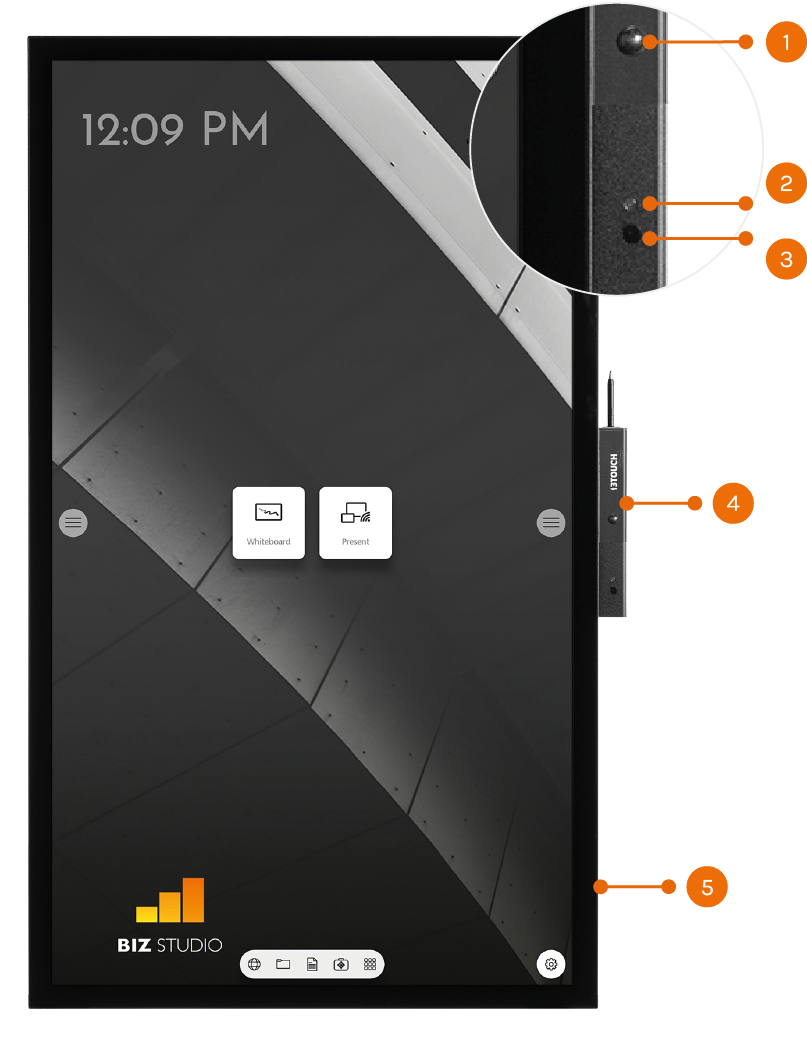
Front | |
1 | Proximity Sensor |
2 | Light Sensor |
3 | IR Receiver |
4 | Stylus Pen box |
5 | Speakers |
Back | |
6 | Power Button |
7 | Power Port & Switch |
8 | Rear Port 1 |
9 | Rear Port 2 |
10 | Computer Port (OPS) |
Rear Ports.
Warning! The voltage/current of the rear power output port is 5 V/2 A (maximum). Purchase the power code/AC adapter according to customer needs. Please do not connect any products with different power requirement. Otherwise it may cause the damage to products or fire.
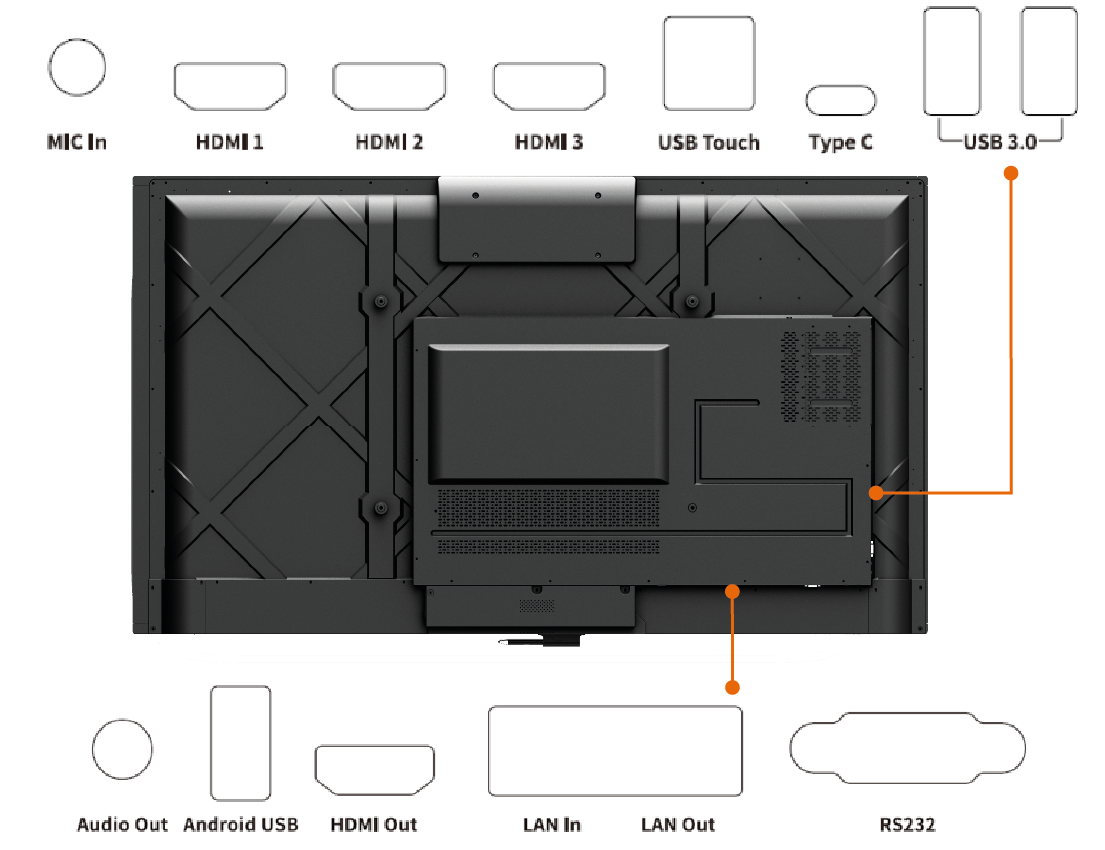
Port | Function |
MIC IN | Microphone input port. |
HDMI 1 | HD signal input port 1. Use with “USB Touch”,to achieve the touch mode of PC operation. |
HDMI 2 | HD signal input port 2. Use with “USB Touch”,to achieve the touch mode of PC operation. |
HDMI 3 | HD signal input port 3. Use with “USB Touch”,to achieve the touch mode of PC operation. |
USB Touch | Connect to the PC's touch port. |
Type C | Connect to devices with Type C interface, such as USB flash drive, MAC, PC, or mobile phone with OTG function. Output up to 45W power source. Supports data, audio, video, and power charging. |
USB3.0 | System upgrade, local play. |
Audio Out | Connect the audio output device. Such as headphones, speakers or other equipment. |
Android USB | Connect the USB device. Such as mobile hard disk, U disk, USB keyboard, mouse. When the display screen is on android, the device on USB is used by android. When switching to OPS channel, the USB device is connected to OPS. |
HDMI Out | Connect electronic video device with HDMI input. |
LAN IN | Connect to the router. |
LAN out | Connect to the RJ45 Port |
RS232 | Serial port signal input interface. |
Remote control.
To avoid probable faults, please read the following instructions and use the remote controller properly:
Do not drop or beat the remote controller.
Do not spill water or other liquid on the remote controller.
Do not put the remote controller on wet items.
Do not expose the remote controller under sunlight or put it near overheated source.
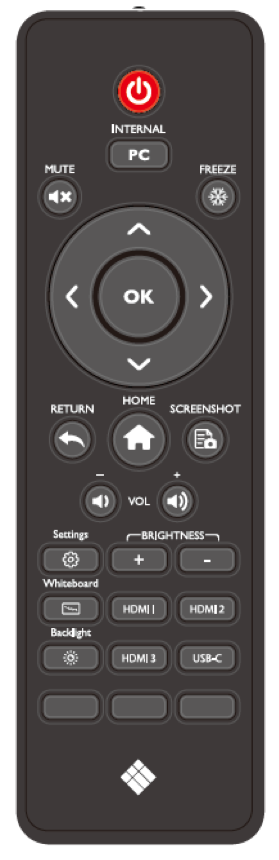
| Button | Function |
 | Power on/off. | |
PC | Switch to the internal PC source. | |
 | Mute or unmute. | |
 | Freeze the Current Screen Click Again to Exit Freeze Function | |
 | Up/Down/Left/Right selection button. | |
OK | Confirm button. | |
 | Return to Previous/Exit | |
 | Return to homepage | |
 | Take a screenshot. | |
 | Decrease the volume | |
 | Increase the volume | |
 | Enter the Settings application | |
+ | Increase the brightness | |
- | Decrease the brightness | |
 | Press to enter the i3NOTES whiteboard application | |
 | Toggle Display Backlight Mode | |
HDMI 1/2/3 | Switch to HDMI 1/2/3 video signal source | |
USB-C | Switch to USB-C video signal source |
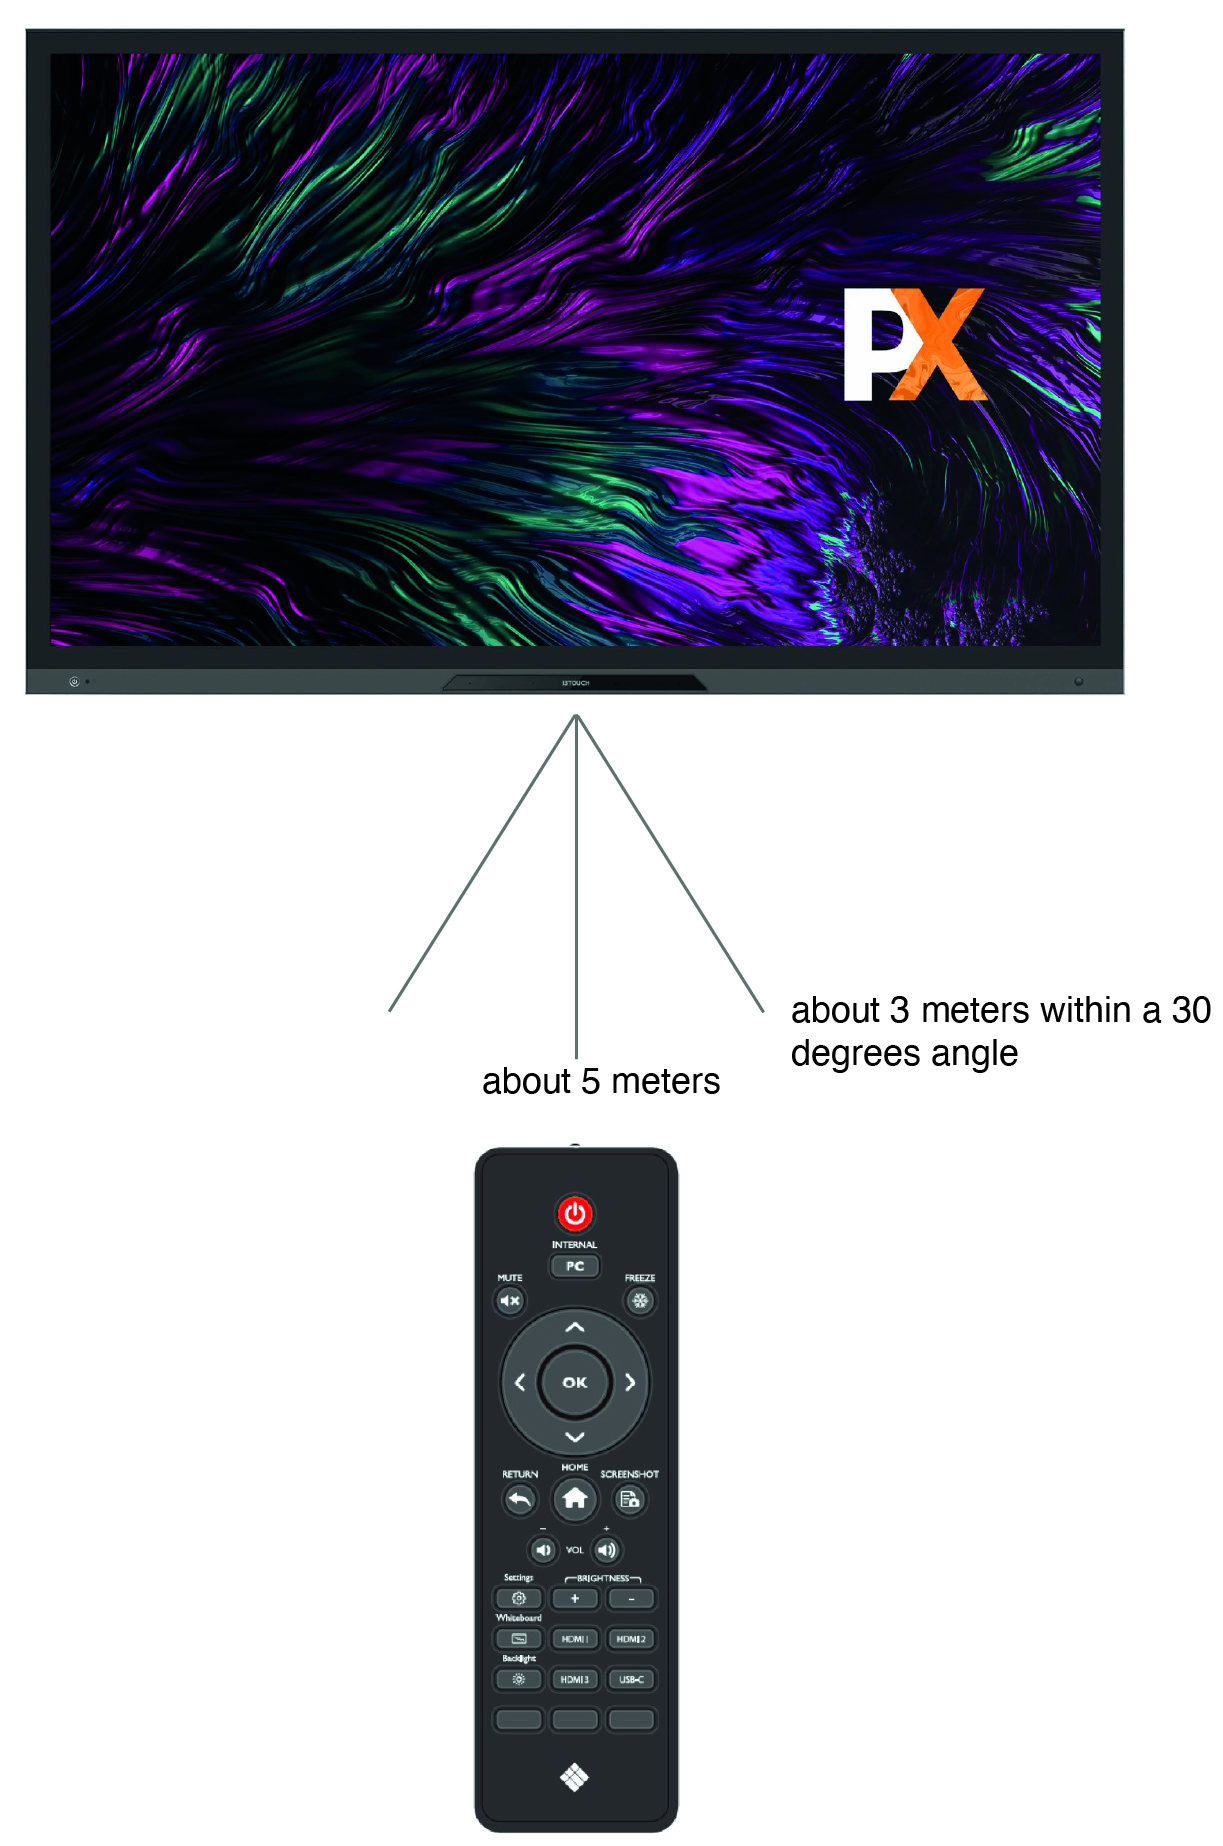
Range of Remote control.
Use the remote control within a range of about 5 meters in front of the remote control receiver of this
product and about 30 degrees on both sides.
Installation Guide
Safety Precautions.
Installation Environment

Installation Direction
Installation Precautions.
Weight Loading
When using a mobile stand, ensure that the weight of the product is less than the loading capacity of the mobile stand.
When using the wall-mount bracket, ensure that the wall can support the weight of the product. We recommend that the wall surface be reinforced and have a loading capacity 4 times of the weight of the product. Consult a professional installer for wall-mount installation.
The company does not undertake relevant legal responsibility for any problems caused by improper operation if the third party mobile stand, or wall-mount bracket is beyond the scope of the product.
Do not install the product where it might be hit by an opening or closing door.
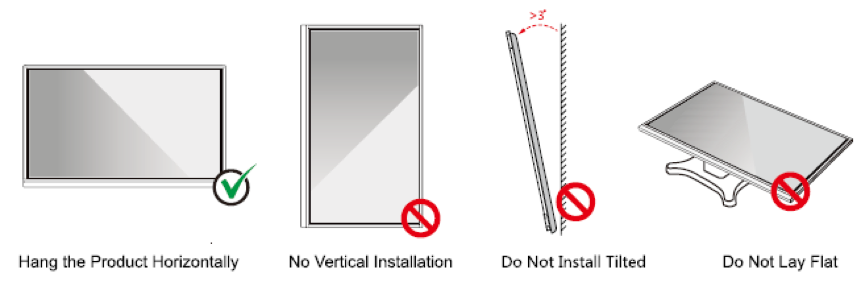
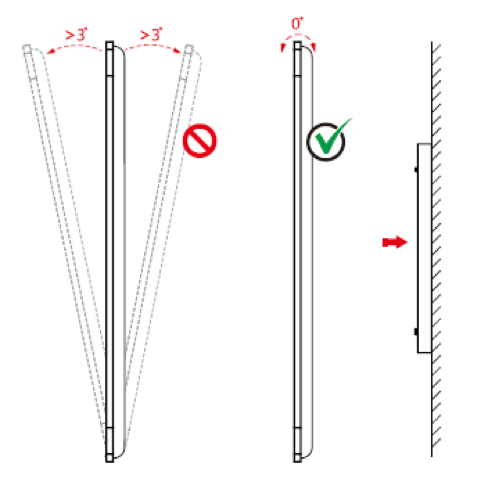
Vertical Installation
When installing, try to keep the product vertical. An excessive tilt angle may cause the screen glass to fall off or the product to collapse.
In case of broken glass, all personnel must stand 3 meters away from the product to ensure safety.
Do not install or disassemble the product if the glass is broken.
For any problem, please contact our support desk. Our company is not responsible for any damage or losses incurred by users if the users fails to follow the instructions.
Ventilation
Ensure adequate ventilation and/or an air conditioned environment. We recommend keeping certain distances from the side of the product to the wall or panels. Ventilation requirements are shown in following figure:
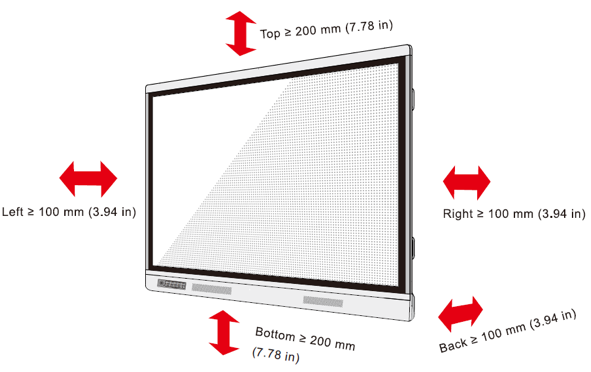
* Refer to CAS 132-2006 standard
Installing the Built-in OPS Computer (Optional).
The built-in computer does not support hot plugging. Therefore, you must insert or remove the built-in computer when the display is powered off. Otherwise, the display or built-in computer may be damaged.
The built-in computer is not configured by default. You will need to purchase the built-in computer separately. Perform the following steps to install the built-in computer.
Step 1
Unscrew the screws by hand to remove the built-in computer shielding cover.
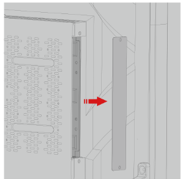
This step is optional and applies to models with shielding cover.
Step 2

Push the built-in computer into the port at the rear of the machine from right to left.
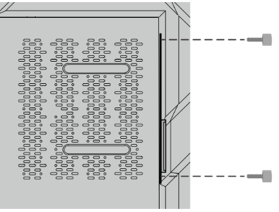
Step 3
Secure the built-in computer to the machine by using the screws.
If the screen fuzzes, flashes or if no signal is received from the built-in computer channel after turning on the power, it means that the built-in computer has not been properly installed. Please check it and re-install.
Turning On/Off
Power On.
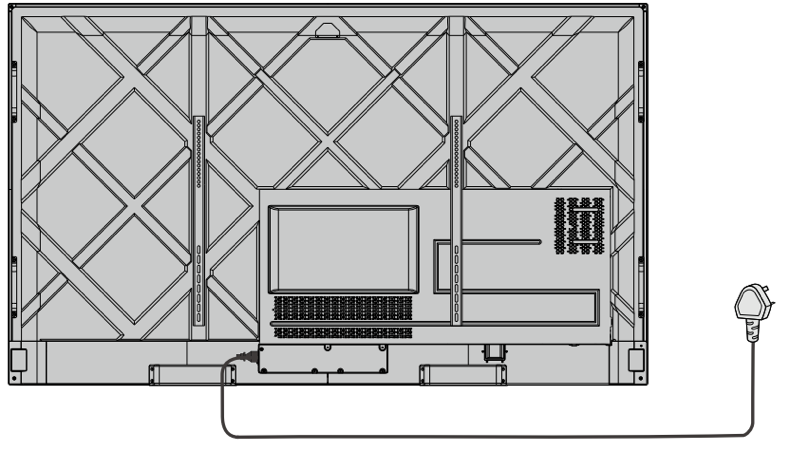
Step 1
Use AC power (100V~240V, 50Hz/60Hz) as the machine power source. Make sure the power plug fully
inserted and that the ground wire of the outlet is properly connected.
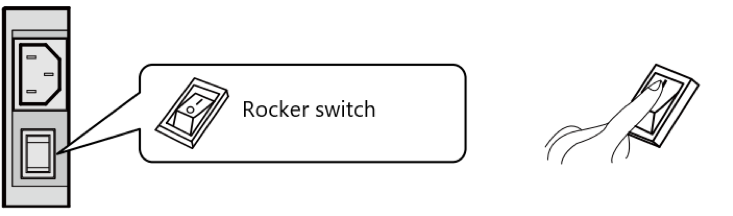
Step 2
Turn on the rocker switch (on the rear side of the machine, next to the power socket) after a power source has been connected. The power indicator should be red.inserted and that the ground wire of the outlet is properly connected.
Step 3
Press the Power button on the display or the power button on the remote control to start the machine.
The indicator light turns green.
Power Off.
Step 1
Press the Power button on the remote control or long press the Power button to turn the machine power off. The indicator light turns red.
Step 2
If you want to completely turn off the machine, turn off the rocker switch on the rear of the machine (next to the power socket) and unplug the power cord.
When the machine enters sleep mode or is turned off, the system will first detect whether the built-in computer is turned off. If not, it first turns off the computer and then enters the sleep mode or shutdown.
Please shut down the machine before disconnecting the power source, or it may damage the machine. Accidental power failure may damage to the machine.
Do not repeatedly turn the power on & off in a short period of time as it may cause malfunction.
Indicator Status.
Indicator | Machine Status |
Off | Shut down or power disconnected |
Red | Shut down |
Green | Normal working state |
When the machine is turned on, short press the power button to enter sleep mode; short press the power button again, or press any button on the remote control or tap the screen twice to wake up the screen.
When the machine is turned on, hold the screen for more than 3 seconds with 3 fingers to turn screen off; short press the power button, or press any button on the remote control or tap the screen to turn screen on.
Welcome to i3STUDIO
Welcome to i3STUDIO, designed to bring you a best-in-class experience on your i3TOUCH display.
i3STUDIO is packed with integrated features to help you get the most out of your display:
Intuitive and easy-to-use interface
Integrated productivity applications such as whiteboarding, annotating, wireless presenting, conferencing, and more
Automatic updates
Personalize i3STUDIO to your needs
Remote display management (i3RDM)
Let’s get started by setting up your i3TOUCH display.
Settings
When opening the settings menu, you get an overview of all the settings you can adjust.
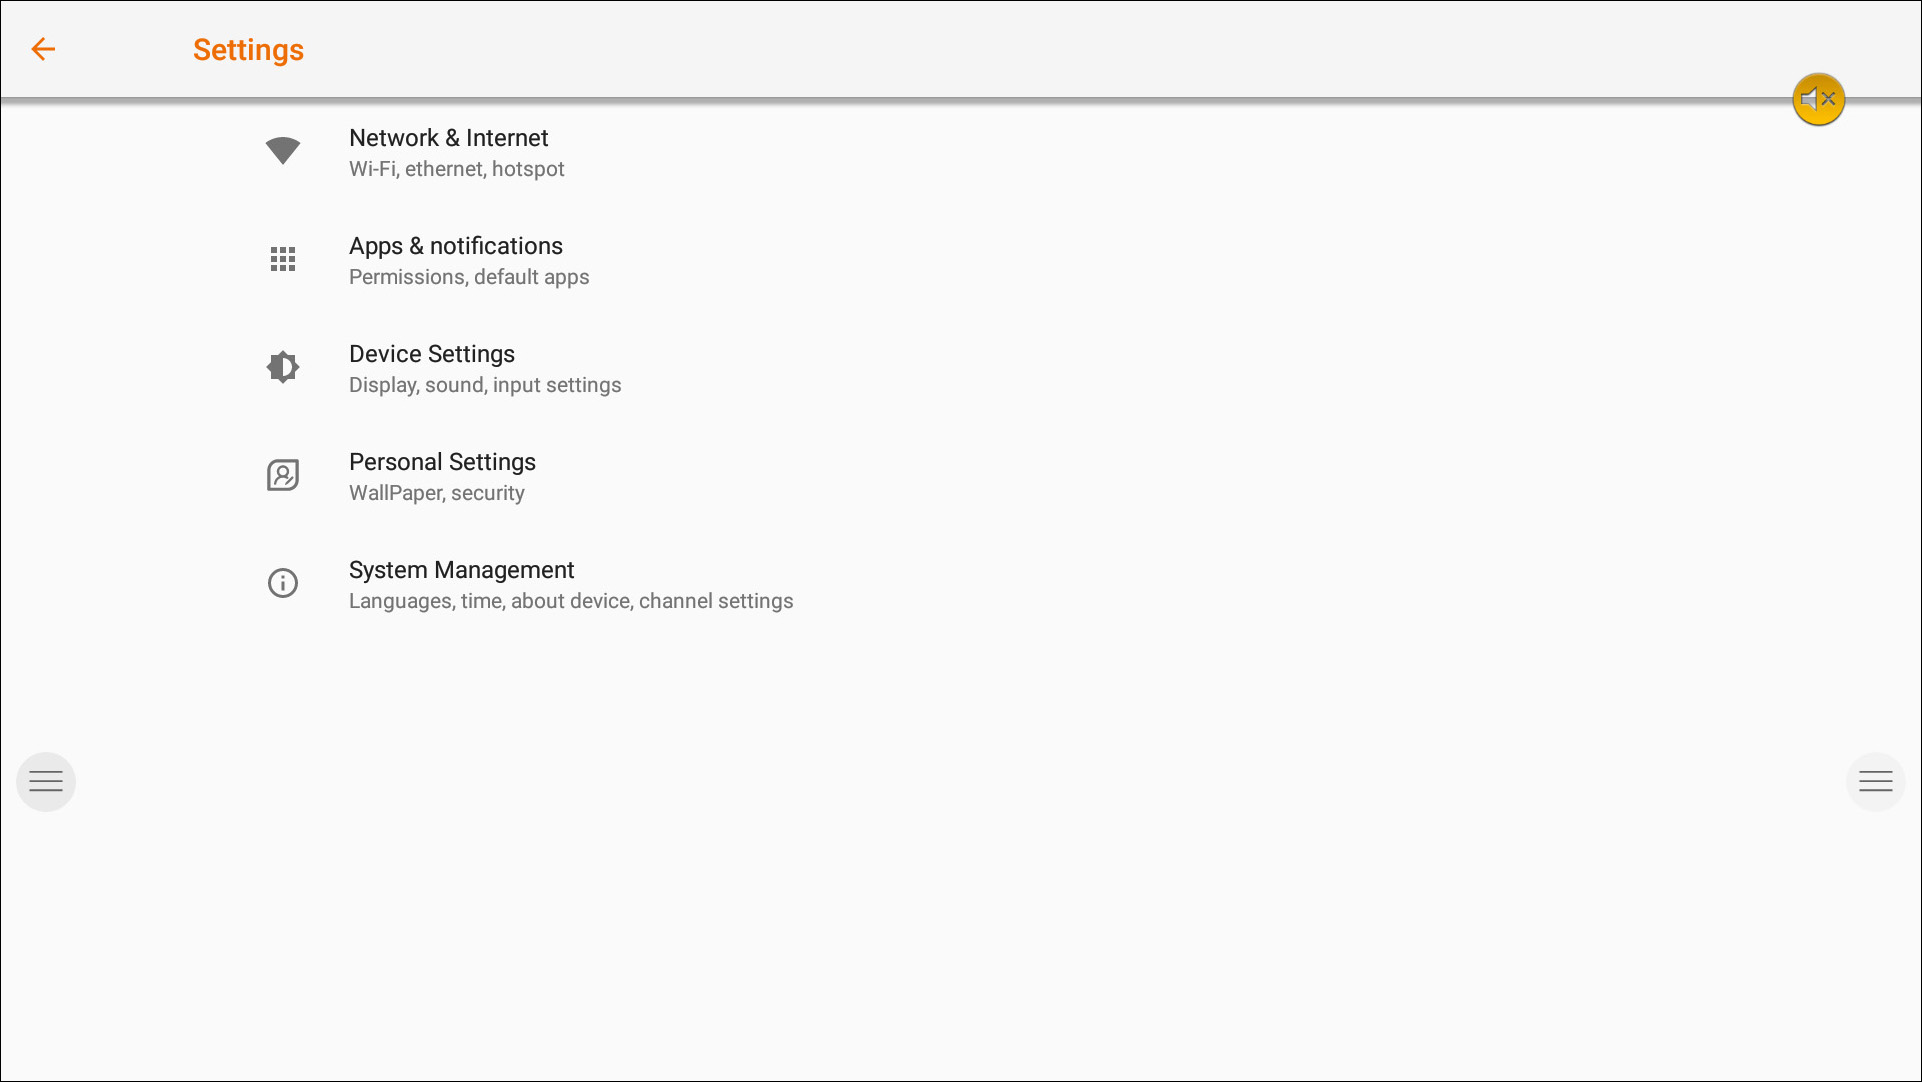
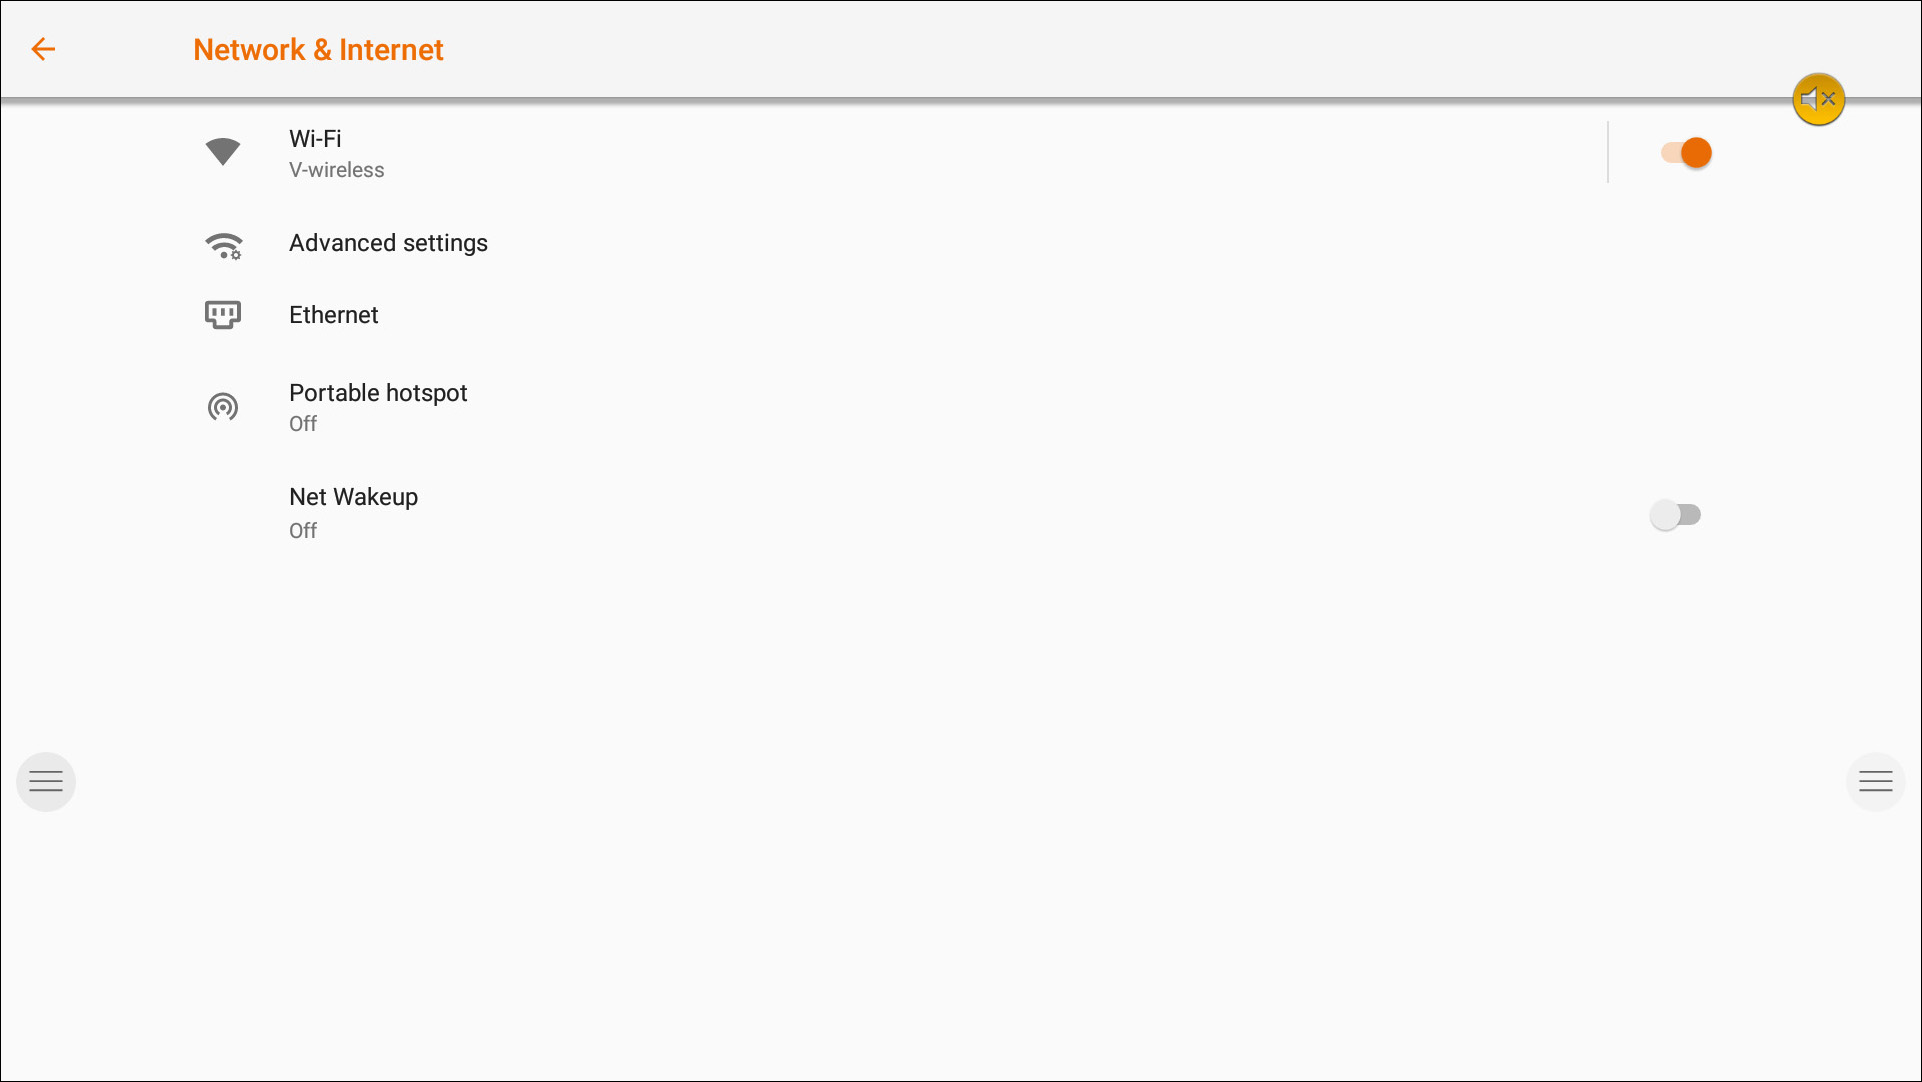
Network & Internet Settings.
Make a connection to your network and internet via Wi-Fi or Ethernet cable.
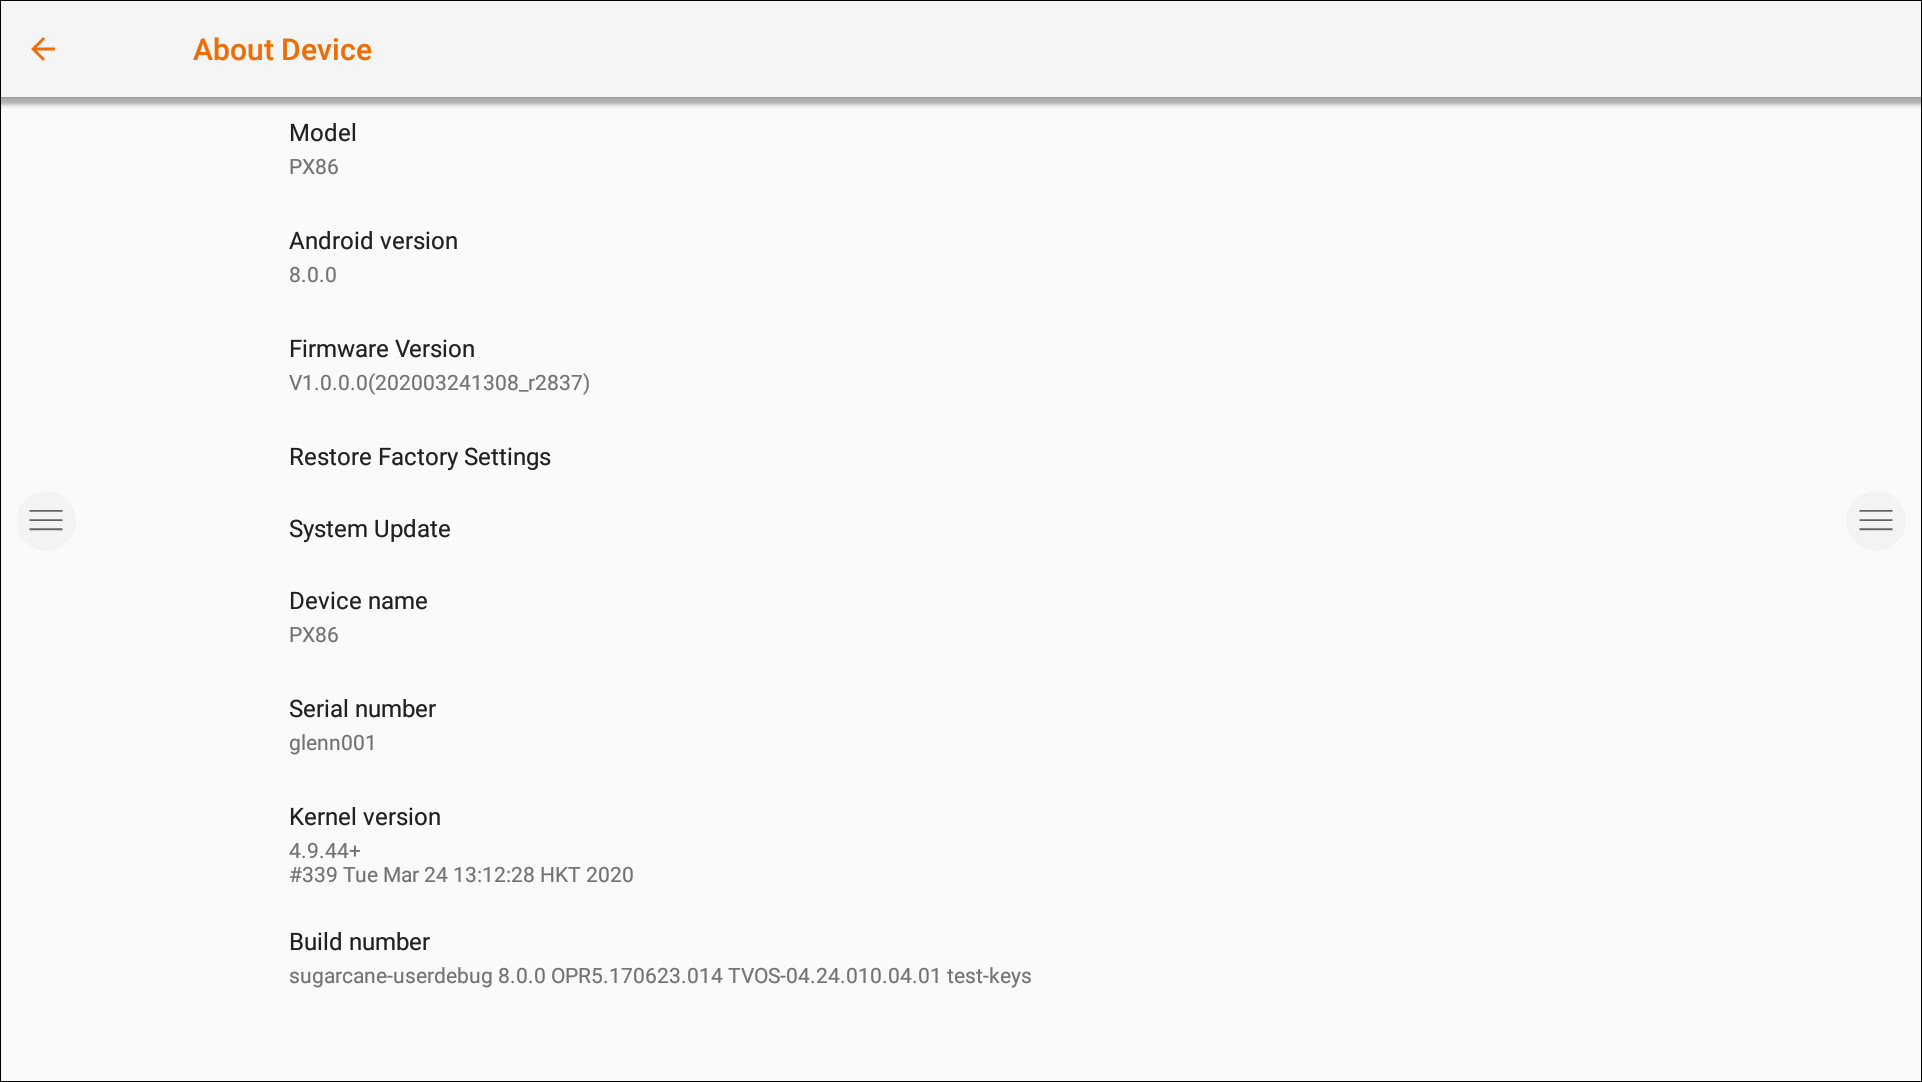
System Firmware Update.
After connecting to the internet, verify that your display is running the latest firmware.
In the settings application, press System Management, and About Device. Press the System Update
button to validate your firmware version online (OTA). If a newer system version is available, this button will provide instructions to update your device.
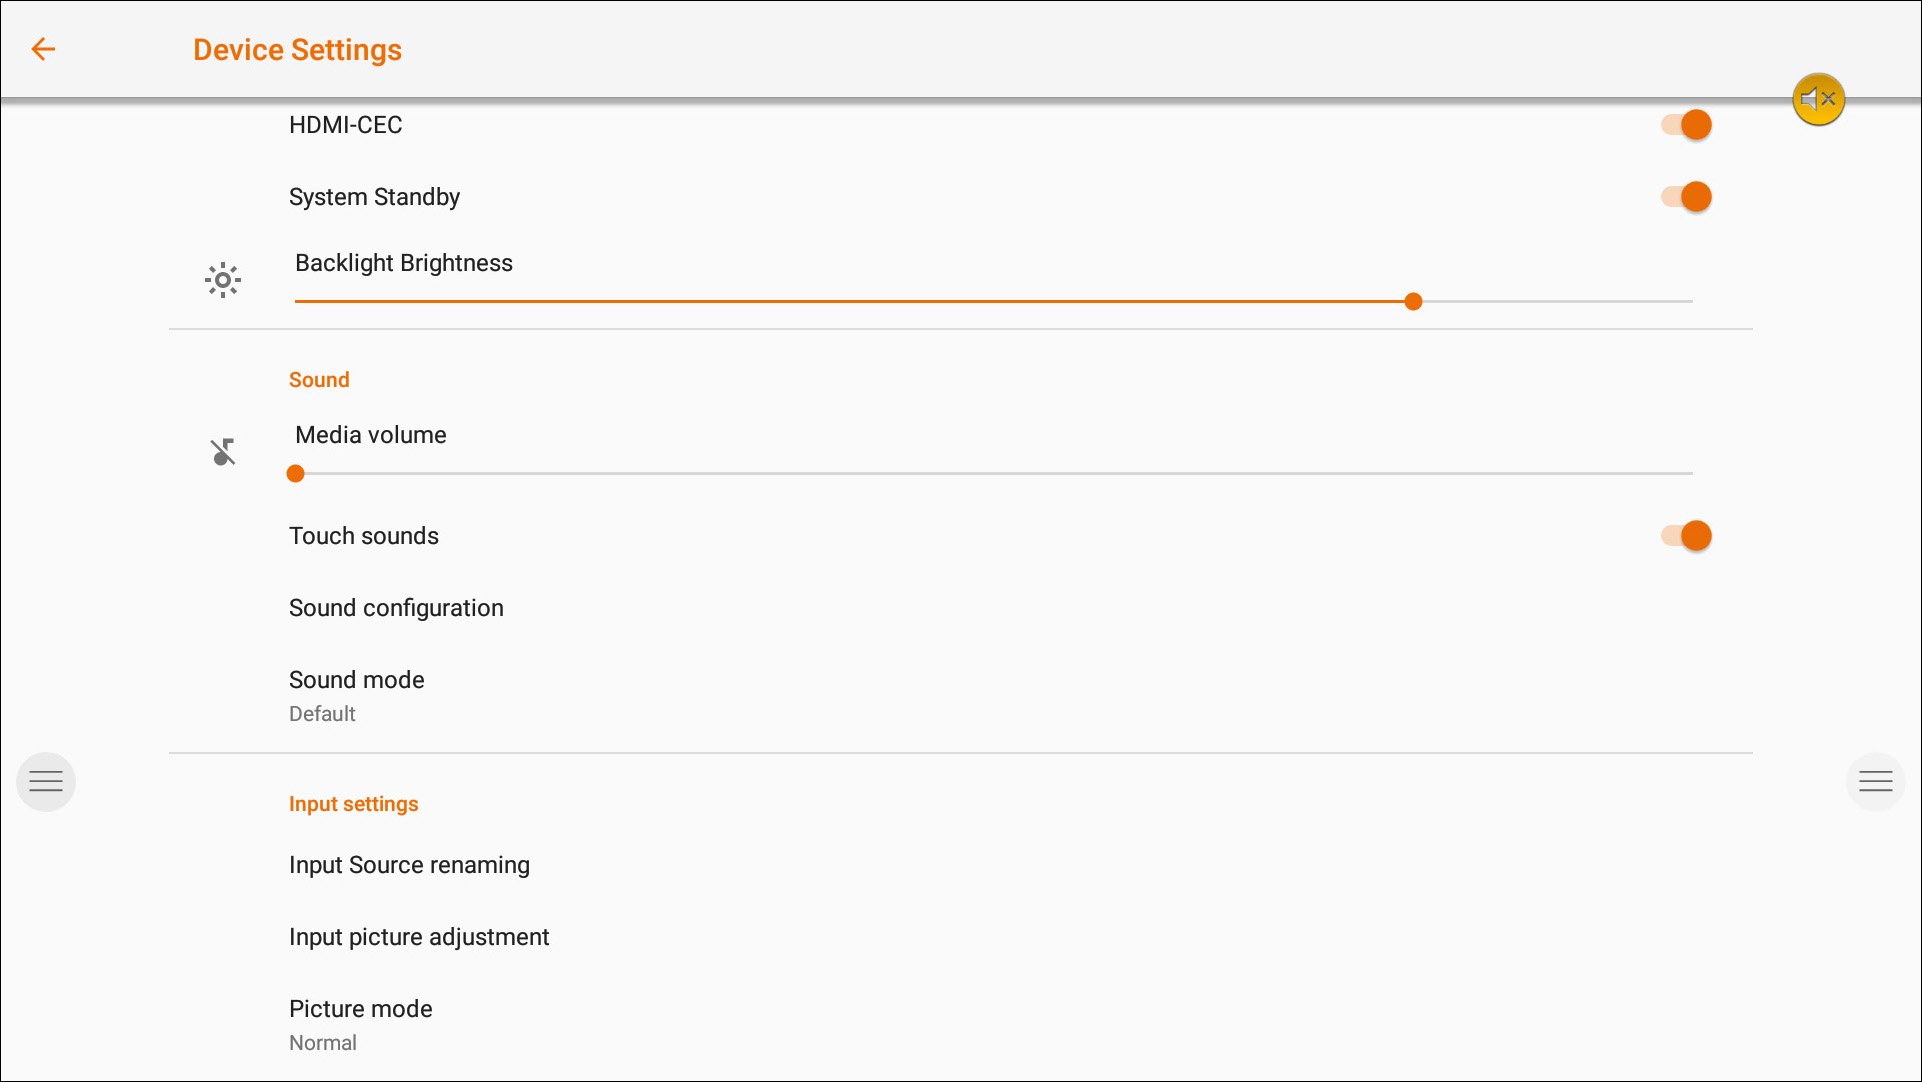
Display Settings.
Control the brightness of the i3TOUCH display in the Display settings menu.
The i3TOUCH PX also features an environment light sensor to automatically adjust the brightness. Turn Automatic Brightness Control on to activate this feature.

Audio Settings.
Adjust the audio settings in Device Settings and pre-define the audio environments.
System Management.

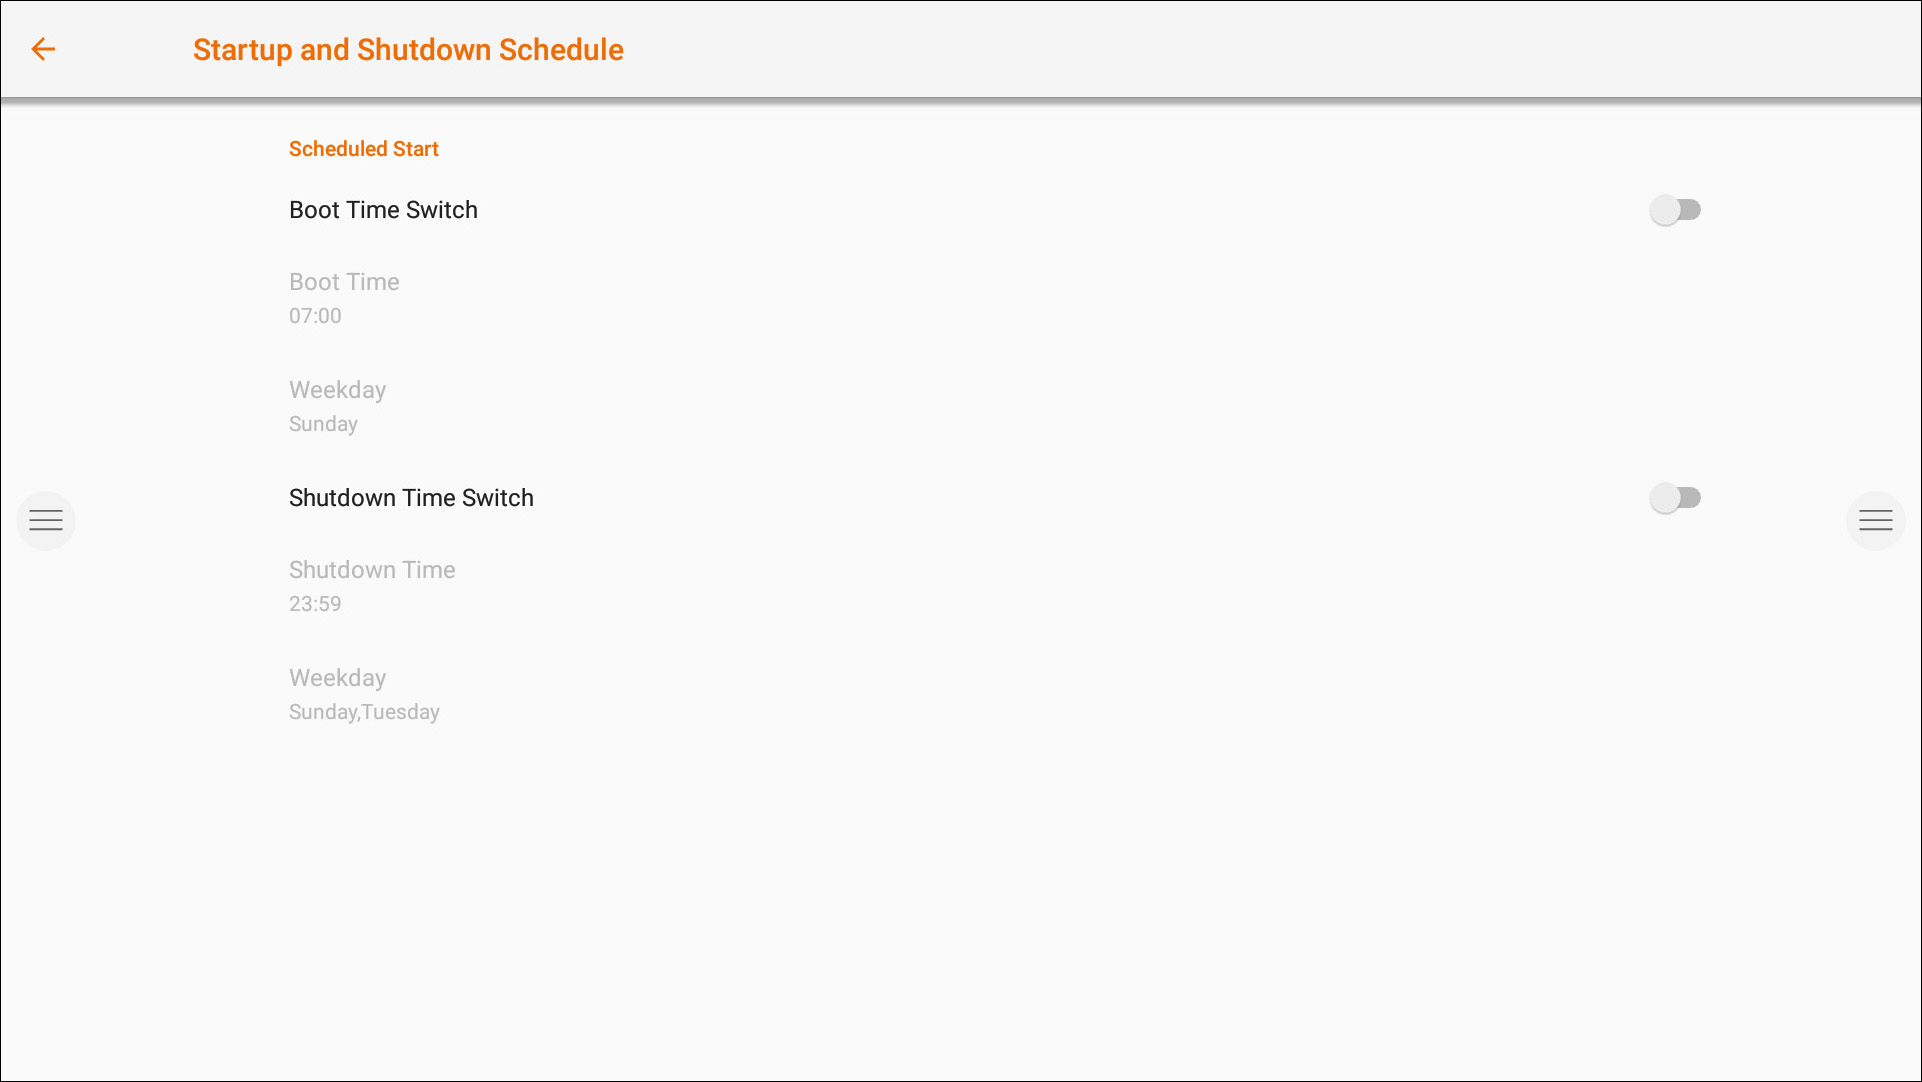
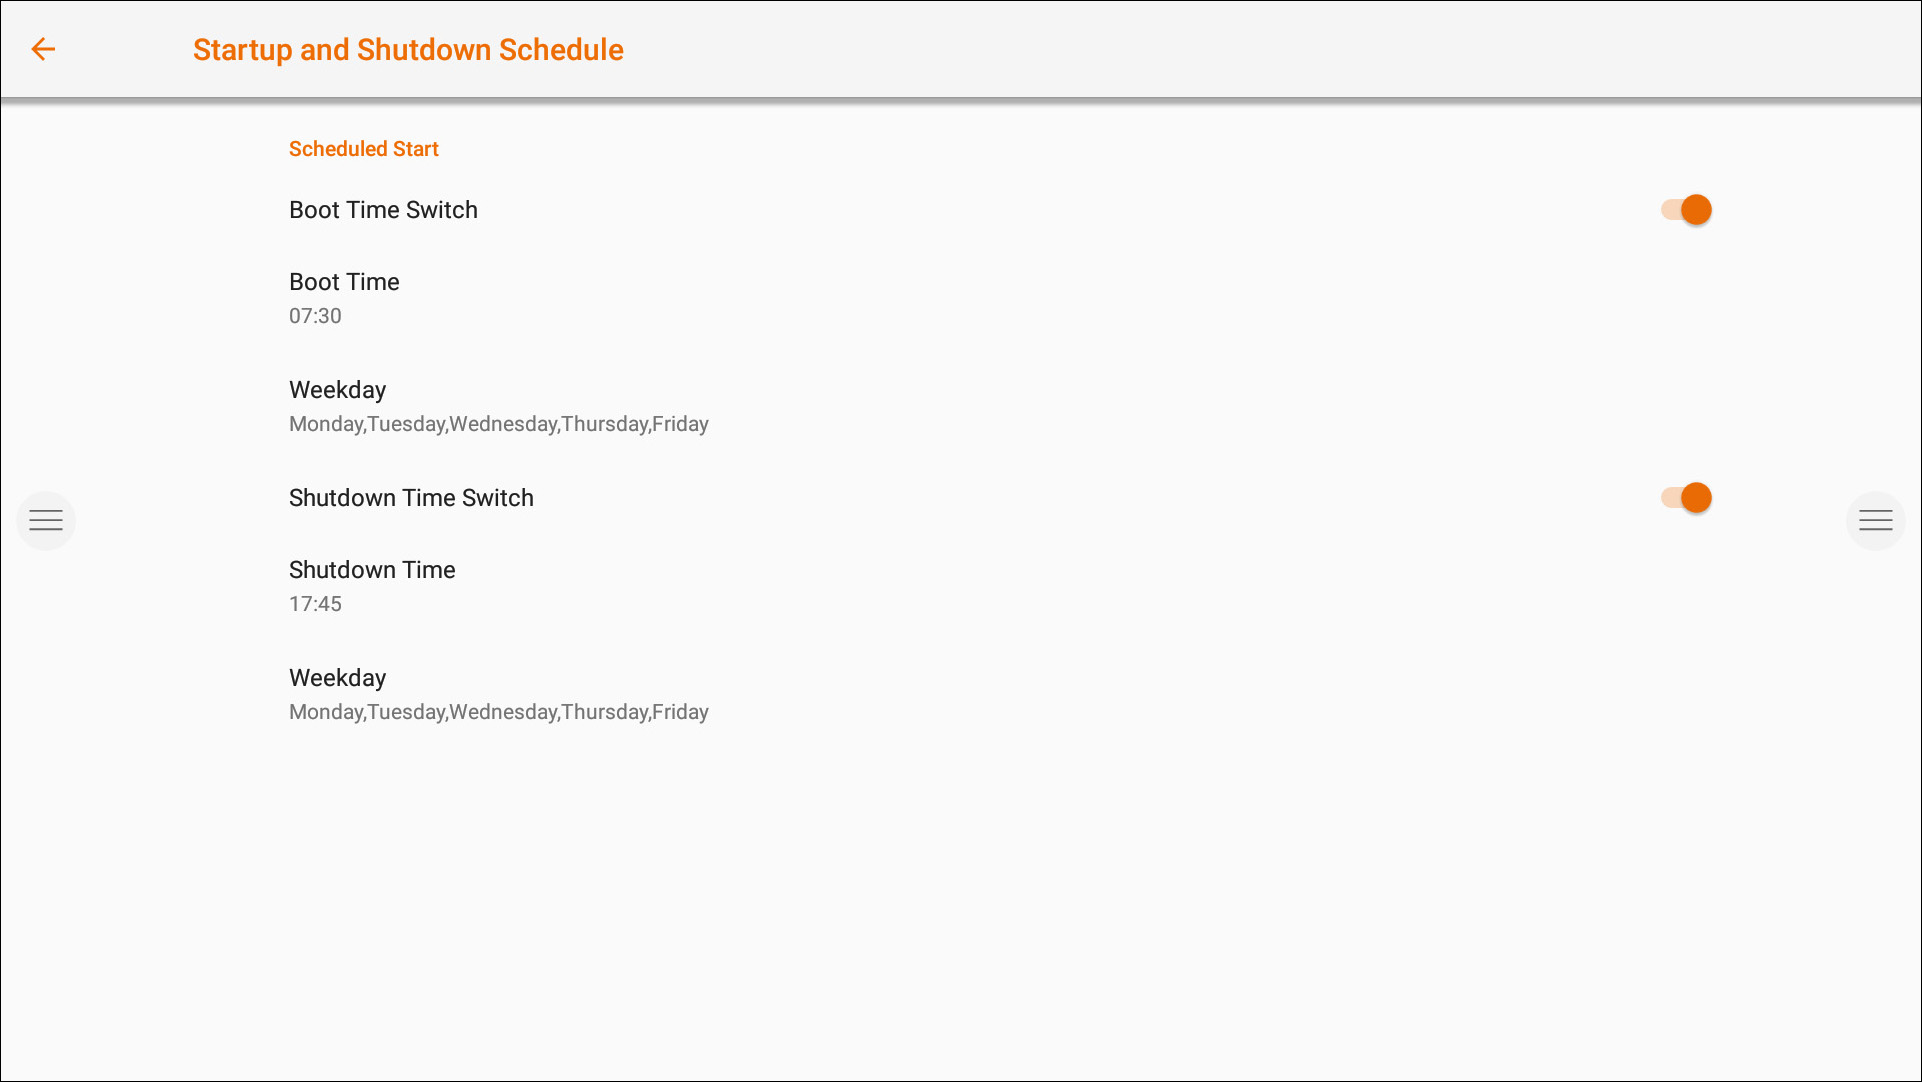
Startup and Shutdown Options
Define the active video channel after startup:
Define when the OPS Built-in computer should startup (if installed):
A. Only after switching to the video channel input.
B. Startup together with display.
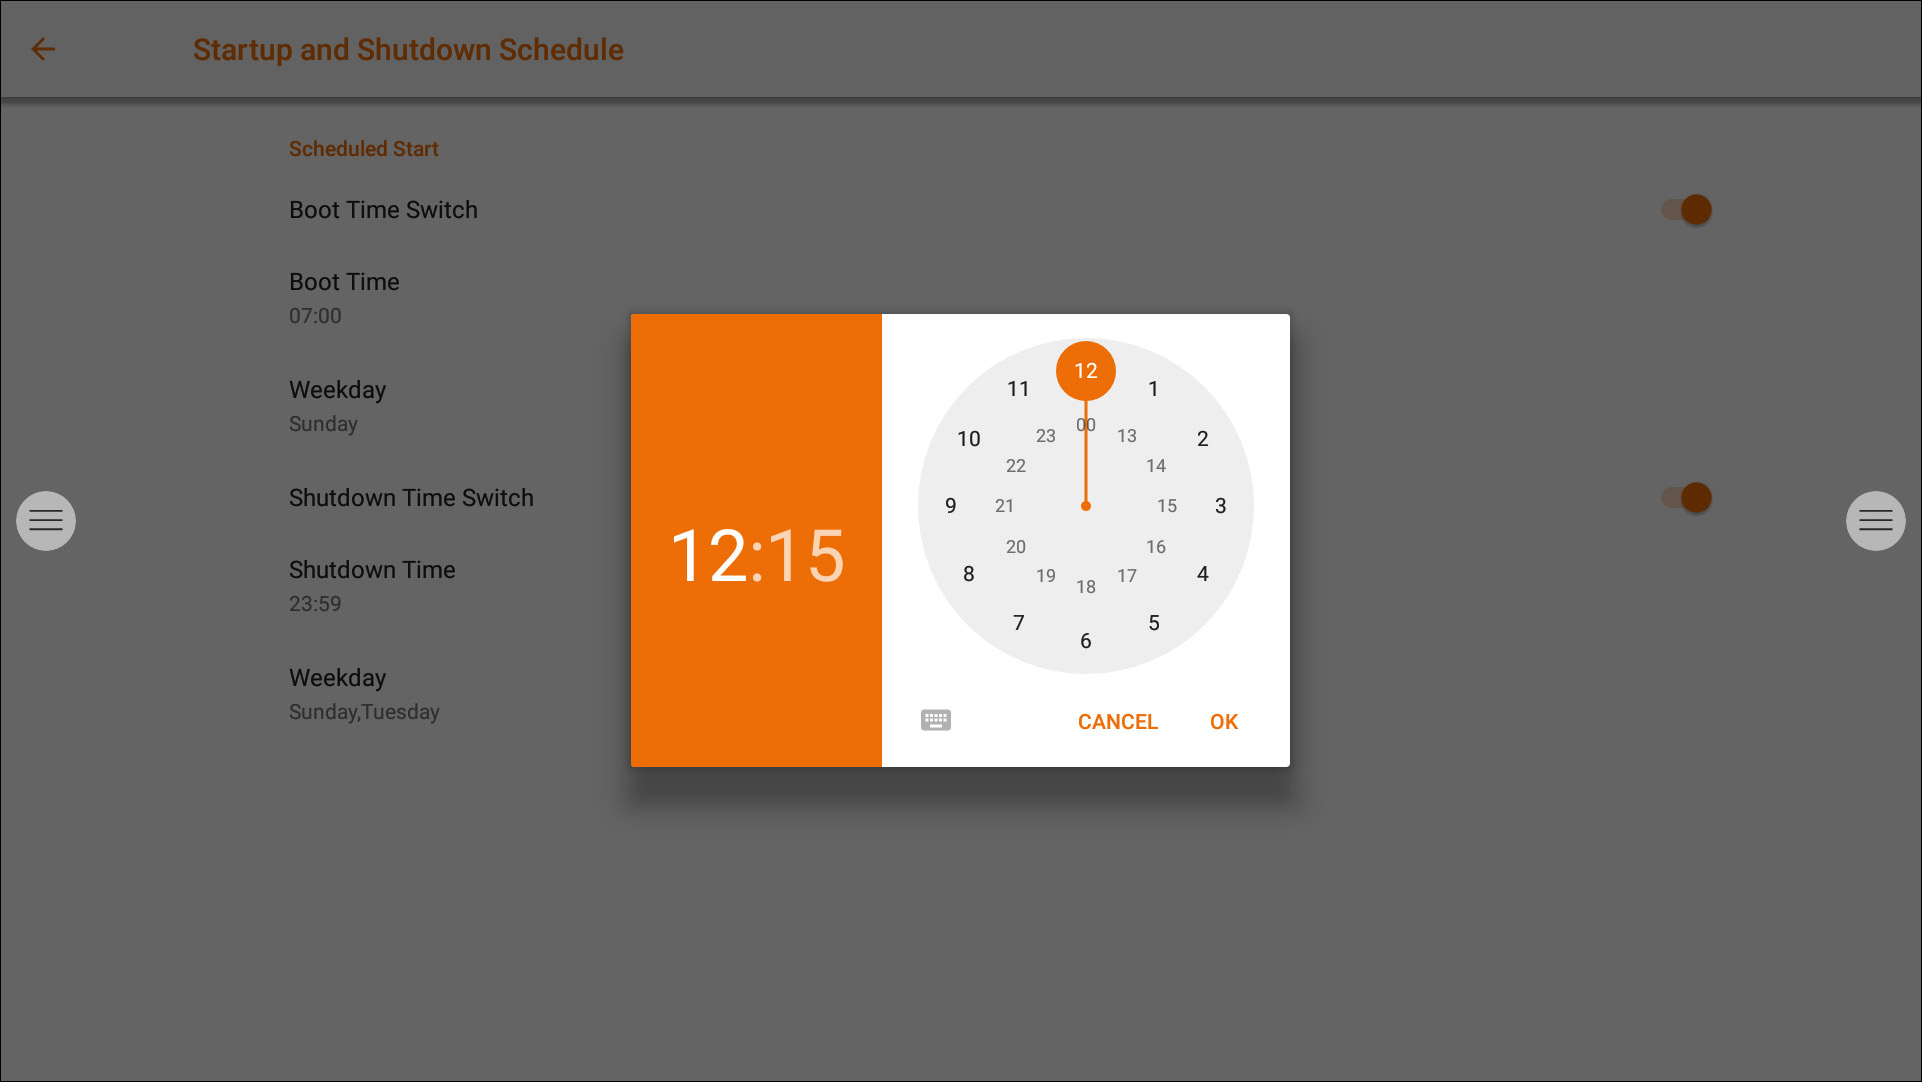
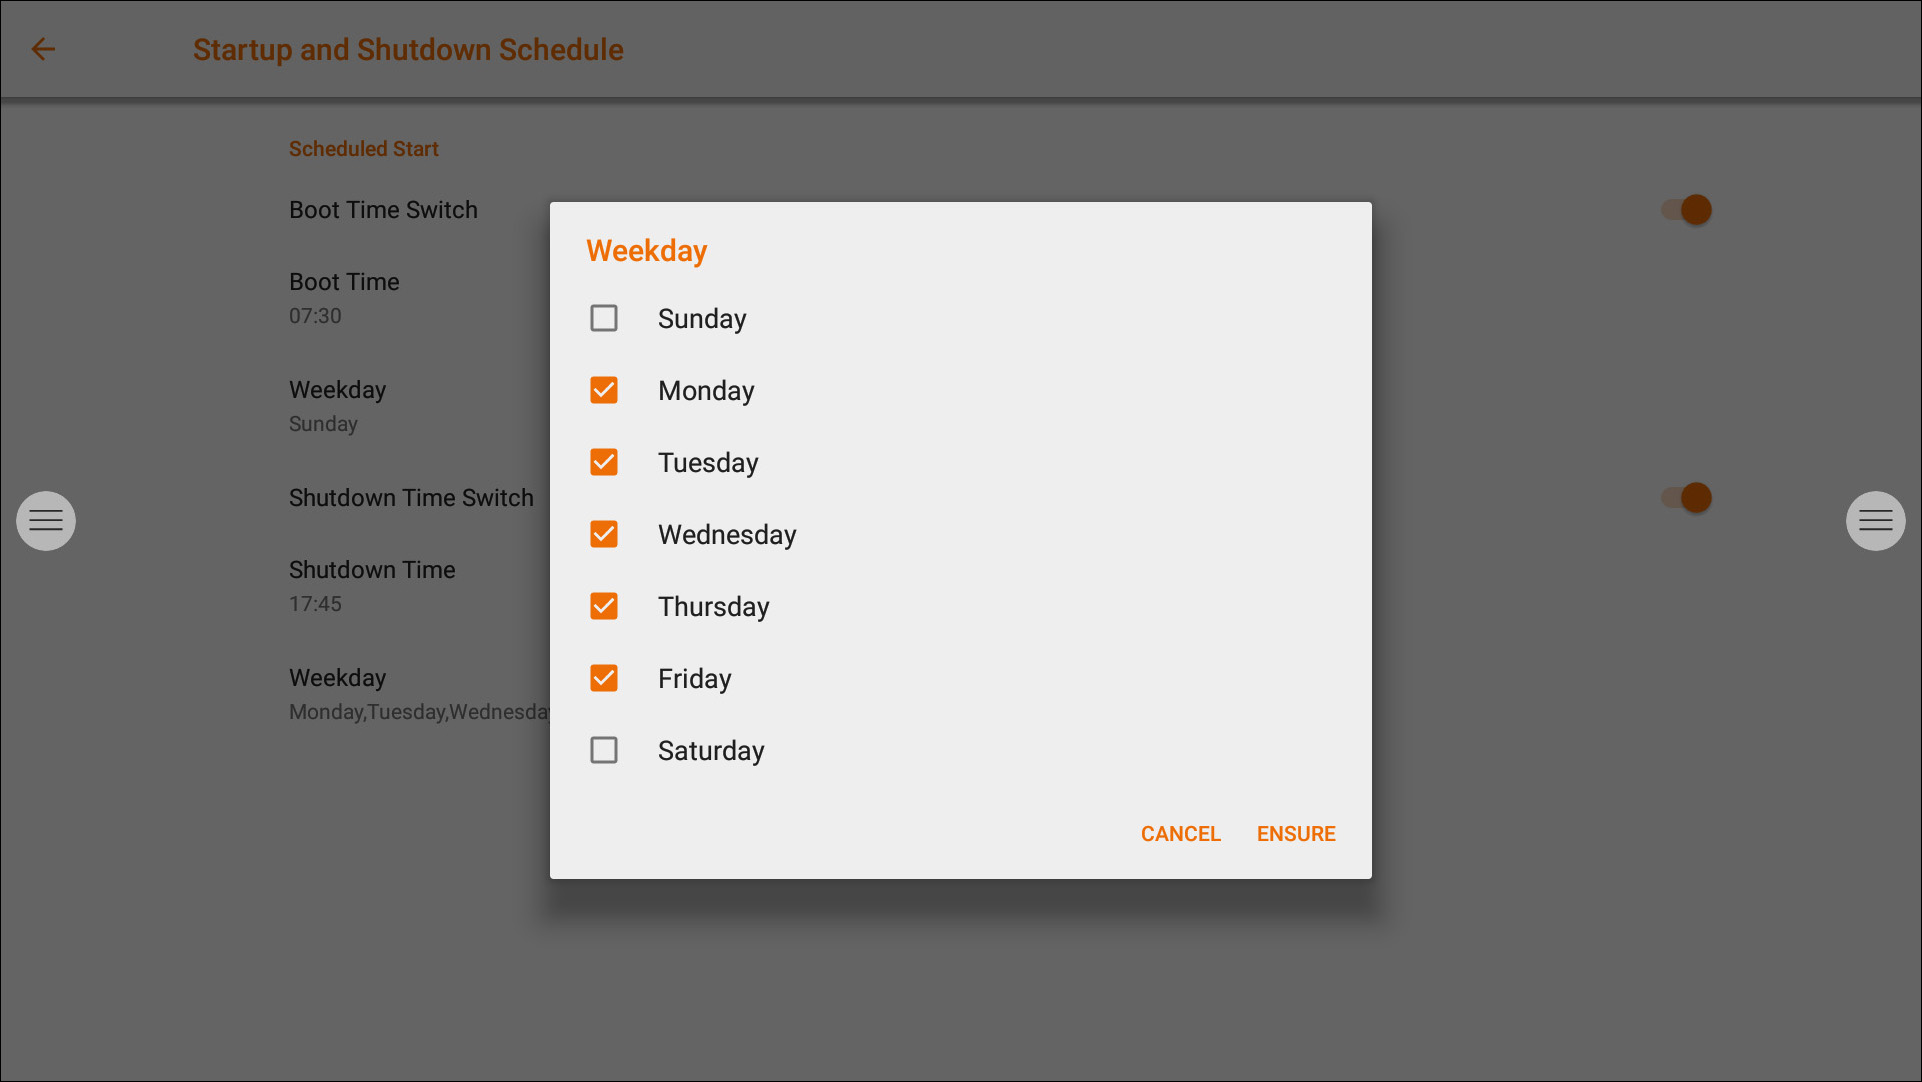
Schedule an automatically startup and shutdown schedule.
Set the inactivity timer of the display. Turn the display off if there is no video signal for a defined time.
Enable / Disable the Motion Sensor. If the motion sensor does not detect presence/movement in the room for 15 minutes, the display will automatically shut down.
Rotation Settings
Disable or Enable the automatic rotation of the screen, upon rotation of the display.
This manual is only for our EX, ES and PX i3TOUCH models.
For all other models, please see i3WHITEBOARD and i3ANNOTATE user manual
About i3Whiteboard
i3Whiteboard is our all-in-one whiteboarding app, focused on collaboration and included in i3STUDIO. Write with ease on the i3TOUCH display ( using a stylus or your fingers), use templates and include shapes and images. Save your files to your personal cloud or share the pdf with colleagues or classmates.
About i3Annotate
i3ANNOTATE allows you to annotate over other apps and take screen captures. These screen captures can then be sent to the i3WHITEBOARD.
Table of Contents
Browsing
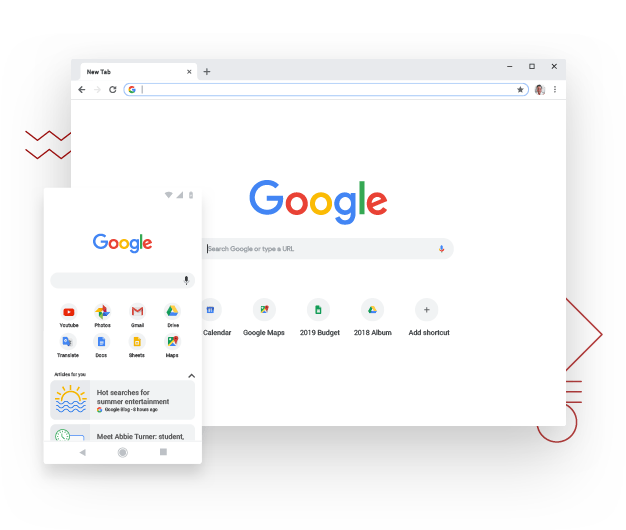
For browsing the web, the i3TOUCH provides the Google Chrome application.
Usage instructions for the Google Chrome browser can be found at https://support.google.com/chrome.
Present
There is a tutorial video available on our YouTube channel about how to use the present feature:
Meeting attendees often bring their own devices to the meeting room. Laptops, smartphones, tablets, etc.
The i3TOUCH display provides multiple tools for streaming to and from other devices.
The i3TOUCH display provides the i3ALLSYNC Wireless Presenting application to quickly and easily stream the screen content of any mobile device to the display.
Download transmitting client software...
i3ALLSYNC is our client software, available for most operating systems and devices, and can be downloaded from https://i3-allsync.com. The software is available for Windows OS, MacOS, and Android OS. iOS and MacOS can also use their integrated AirPlay function to connect with i3ALLSYNC without any software.
... and connect to the i3TOUCH with i3ALLSYNC transmitter software
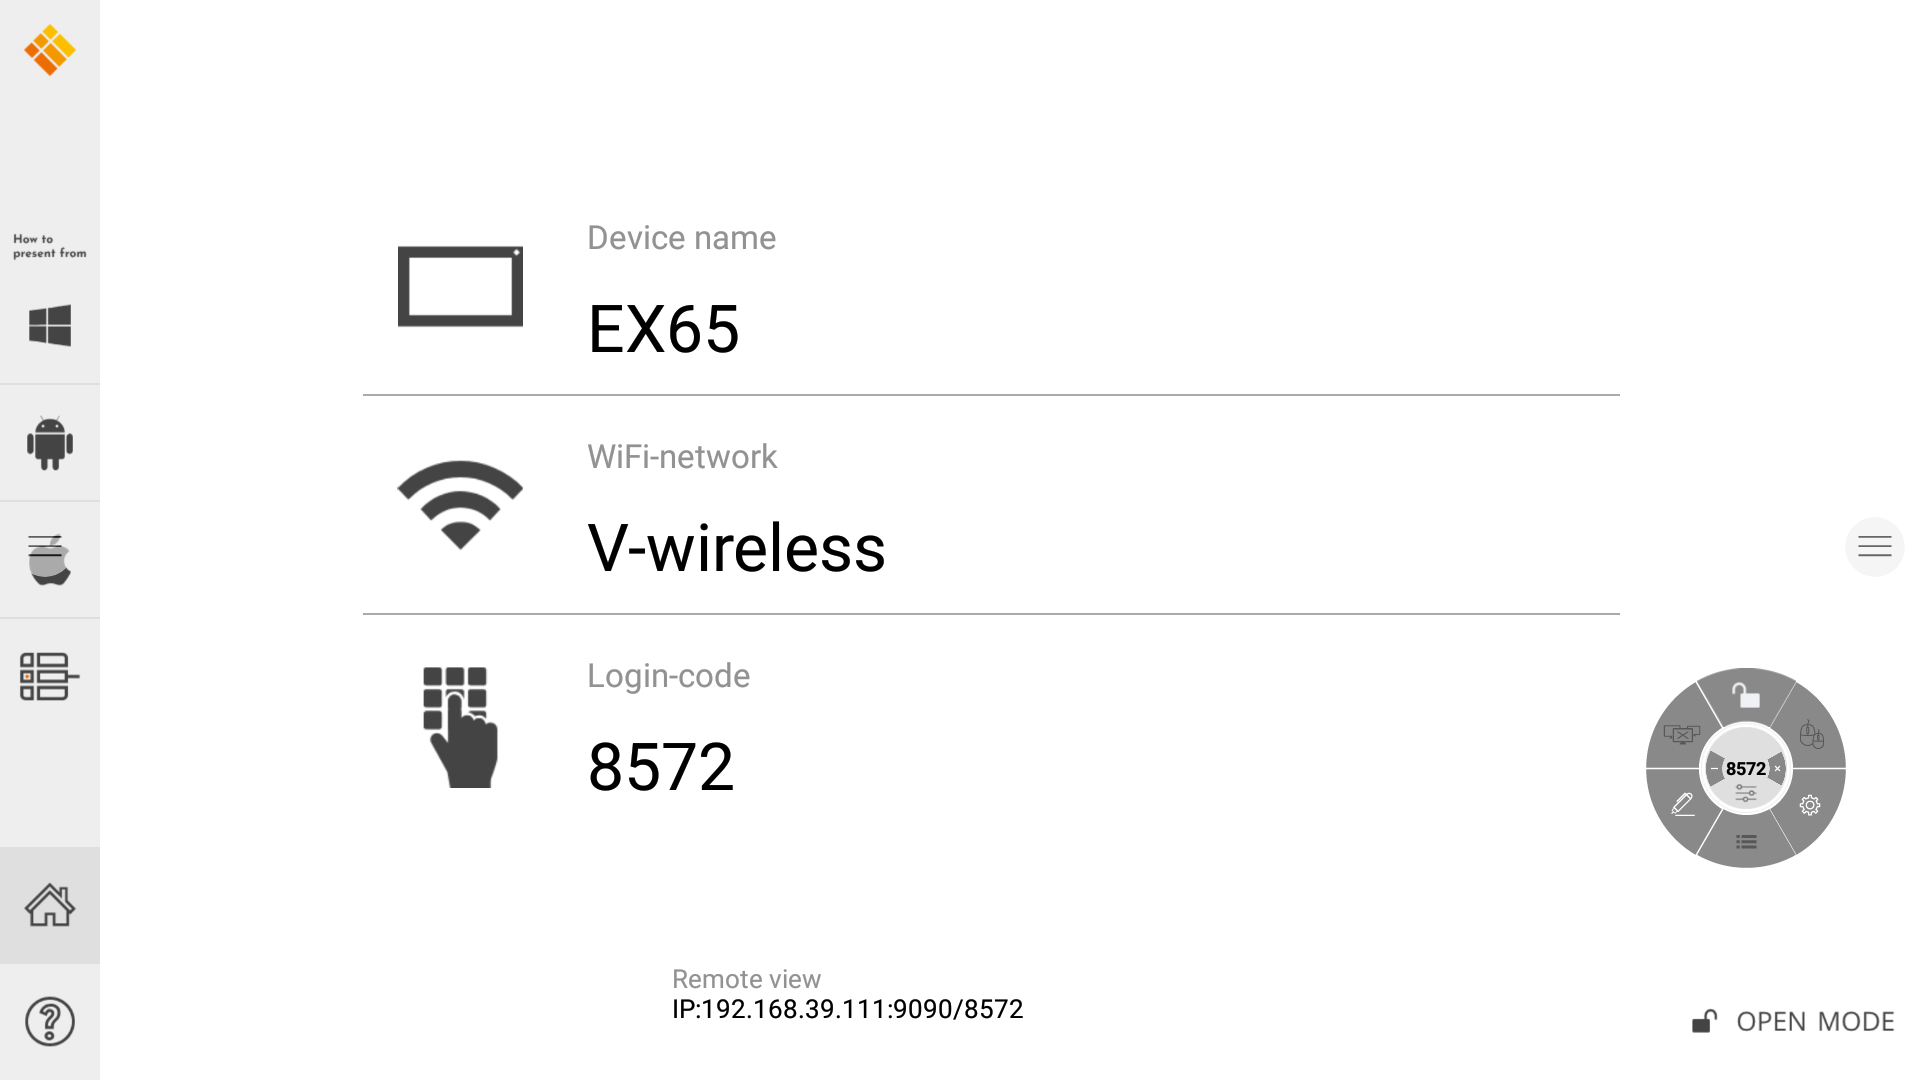
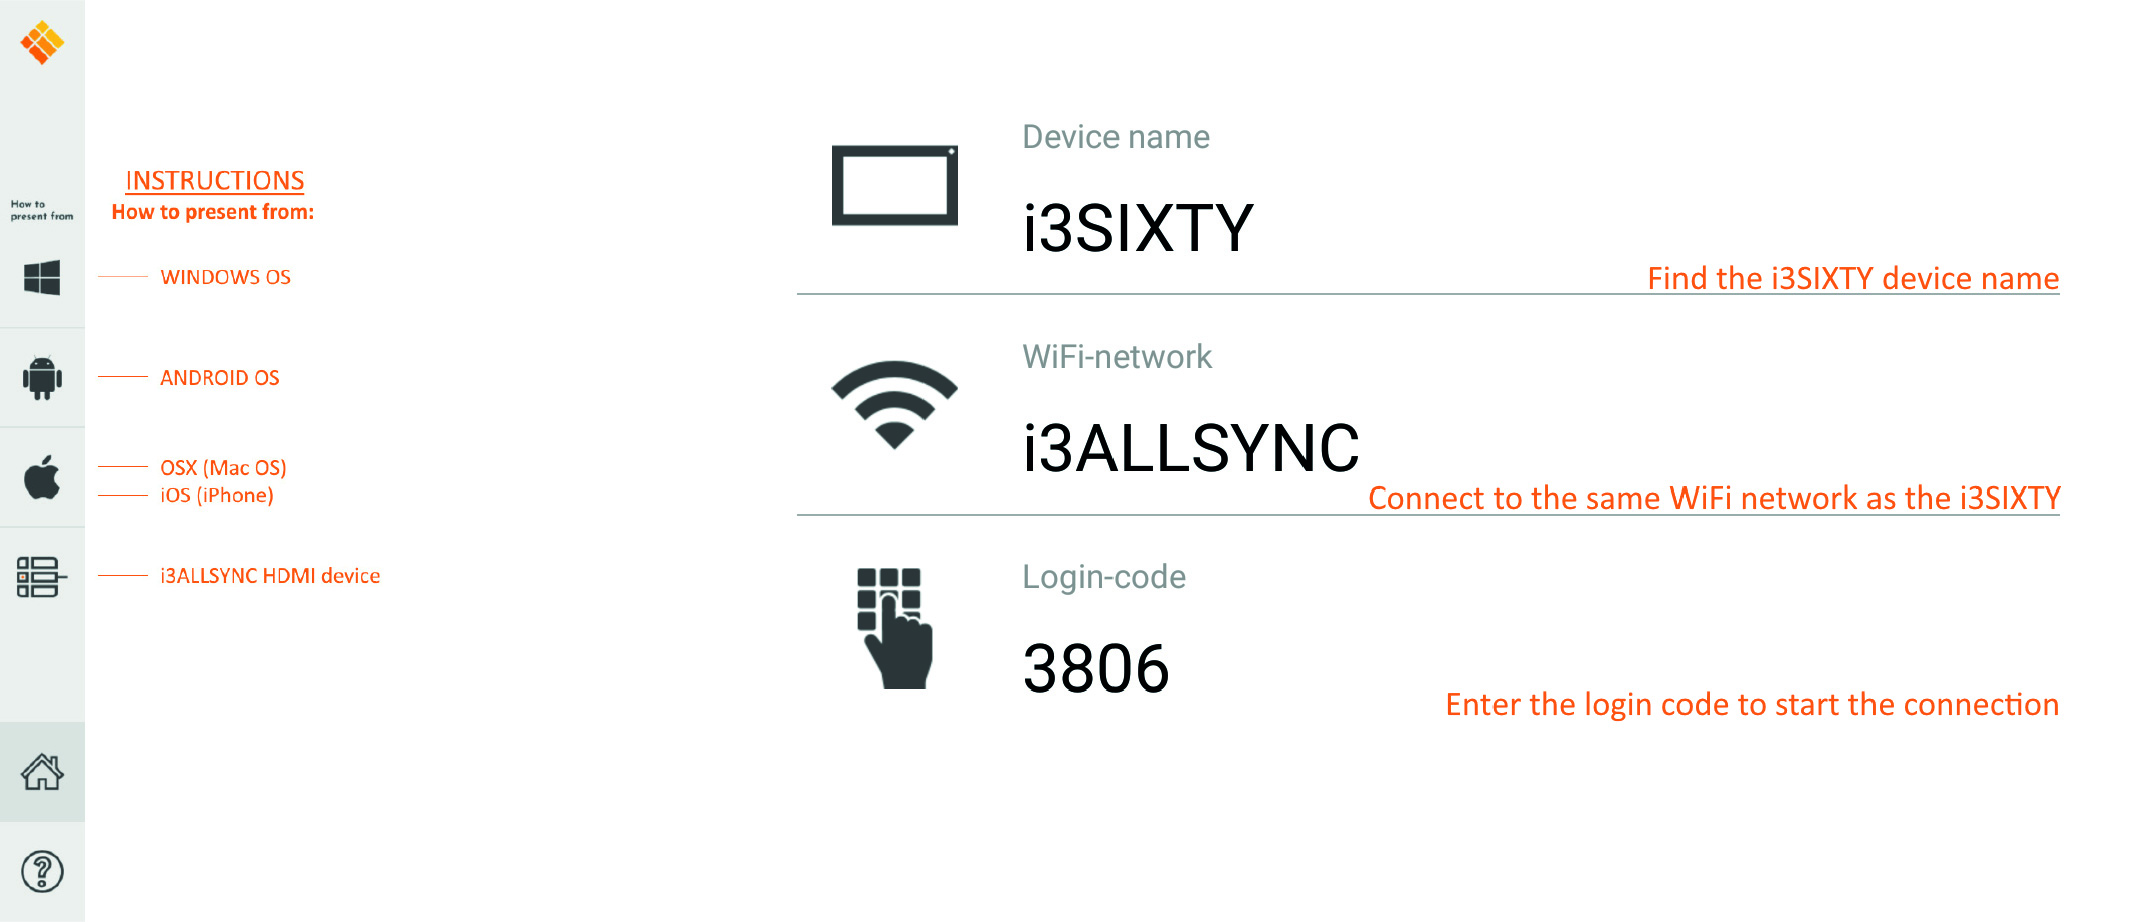
Open the transmitting client i3ALLSYNC application on your device, and follow the instruction on-screen to insert the i3TOUCH credentials and cast your screen content.

i3ALLSYNC Menu and Settings
When opening the present feature, this is the interface you will see.
The i3ALLSYNC application offers some settings and tools in the floating circular menu.
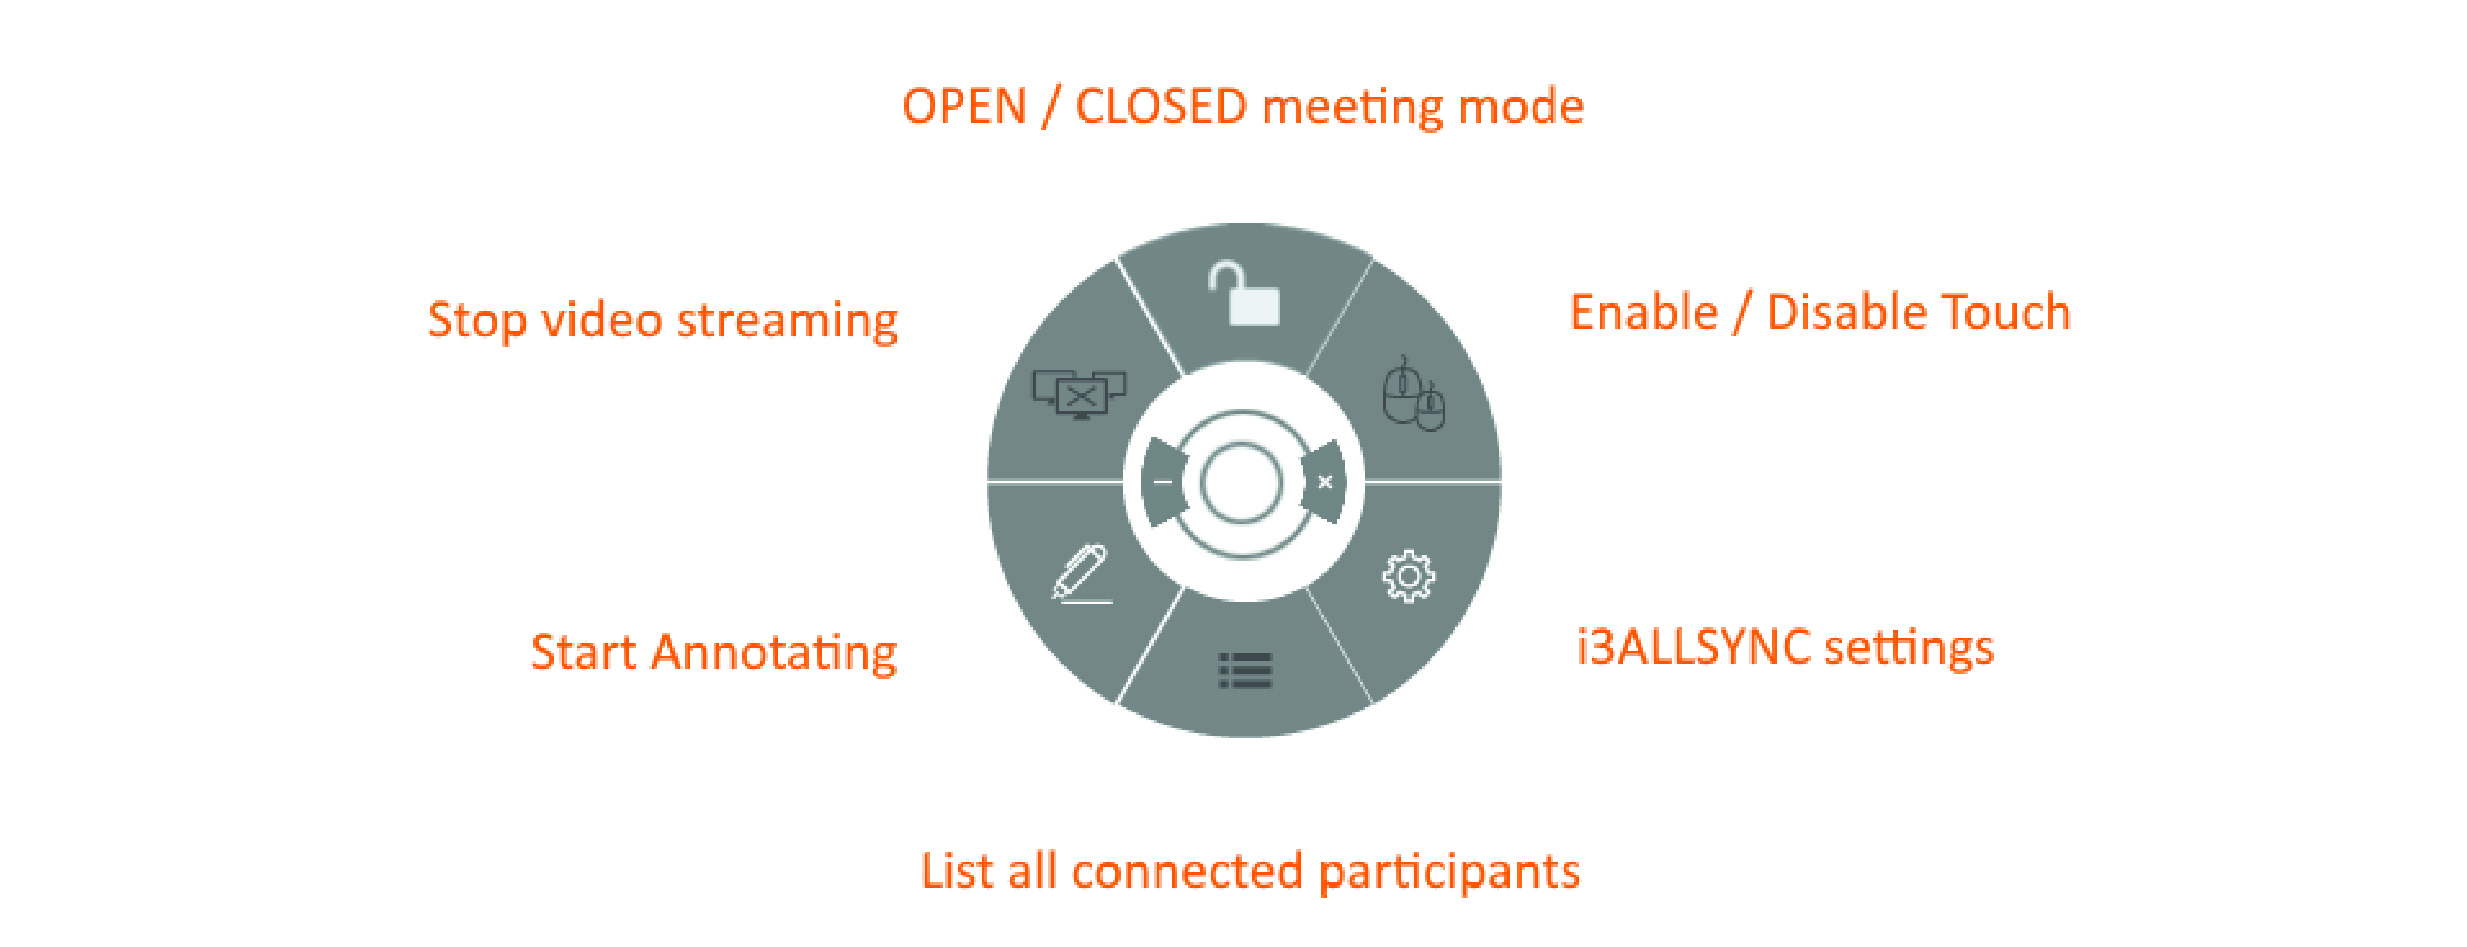
Stop video stream
Press this button to stop the shared content from all connections.
Start annotating
Press this button to start the annotating function of the i3TOUCH. (This button behaves exactly as the Annotate button in the hamburger menu).
List all connections
Available only in the CLOSED Meeting Mode. Press this button to display a list with previews of the connected users that are standby to share their screen content. Press the play button on the preview to display the screen content.
Open / closed meeting mode
Use the Meeting Mode button to change the meeting dynamic according to the type of your meeting.

OPEN: Allows anyone to connect and immediately show the screen content. Everyone can video stream freely.
CLOSED: Allows anyone to connect, however, the controls to display the screen content are on the i3TOUCH display. A connected user is standby in the background, until the screen content is activated through the List button. The presenter starts each video stream.

Closed Mode is best suited for a presentation-type meeting (or part of the meeting). The person standing at the display is the operator and switches between the screen content.
Open Mode is better suited for a conference-type meeting (or part of the meeting) where every connected user can take over and show their screen content.
Enable / disable touch
Allow or deny the touch input on the screen of the i3TOUCH to control the connected computer.
NOTE: Touch functionality only works via the i3ALLSYNC Transmitting clients on Windows and MacOS.
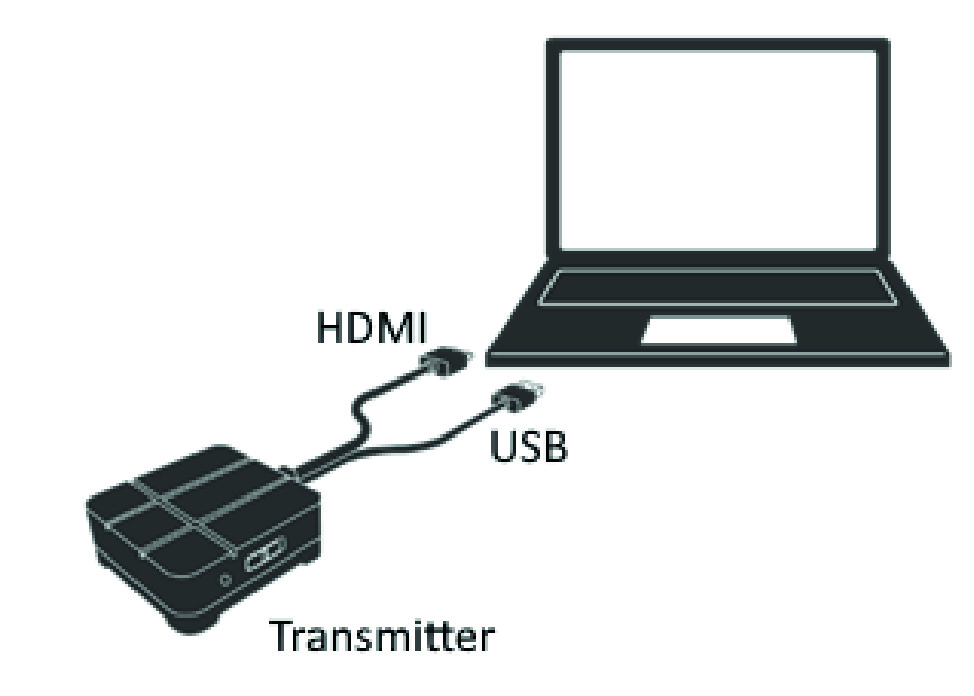
Use the i3ALLSYNC HDMI transmitter (optional accessory)
i3-Technologies also offers the i3ALLSYNC HDMI Transmitter (purchased separately) for meeting attendees (guests) that can’t or won’t install the client software. Once the i3ALLSYNC HDMI Transmitter is paired only once with the display, you only need to plug in the HDMI and USB cable and press the button to immediately share the HDMI content on-screen.
Connect to i3TOUCH EX with i3ALLSYNC HDMI transmitter (device not included)
If using the i3ALLSYNC HDMI Transmitter device, just connect and screensharing will start with the press of a button. The i3ALLSYNC interface provides useful instructions for each operating system to start the presentation.
Quick Troubleshooting
Device fails to work normally | |
Remote control failure | Check whether there are other objects between remote control and equipment control receiving window, thus leading to failure of remote control. |
Check whether the battery electrode in the remote control is correct. | |
Check whether the batteries of the remote-control needs to be replaced. | |
Machine has automatically shut down
| Verify sleep settings in the settings app. |
Check whether there is sudden power outage. | |
The system will automatically shut down if the interactive external video channel has no signal for 5 minutes. Please check the input and connection of the video signal and/or modify sleep settings of the external device. | |
PC mode | |
Image lack of color, color is incorrect | Check whether the VGA connector is well connected or has broken pins. |
Verify the correct operation of the VGA cable. (replace) | |
Image is not rotating in Windows | https://i3group.atlassian.net/servicedesk/customer/kb/view/828243987 |
Touch operation | |
Touch function is not working | Verify that the USB cable is properly connected to the computer. And that the length of the USB cable does not exceed 5 meter without USB amplifier / hub. |
Verify that the computer hardware and operating system supports touch screen operation. (Windows 7 or earlier does not support HID touch screens). (Some MacBooks do not support HID touch screens). (Older Linux kernels do not support HID touch screens). | |
Video signal problems | |
No picture and no sound | Check whether the machine has started. |
Check whether signal wire is well plugged, whether INPUT is corresponding to it. | |
If in internal computer mode, check whether internal computer is started. | |
With horizontal or vertical stripes or image dithering | Check whether signal wire is well connected. |
Check whether other electronic equipment or power tools are placed around the machine. | |
No color, color is weak, or image is weak | Adjust chromatic and brightness or contrast in menu. |
Check whether signal wire is well connected. | |
Audio problems | |
Image but no sound | Check whether mute button is pressed for mute. |
Press VOL + / - to adjust volume. | |
Check whether audio line is connected correctly. | |
Only one speaker has sound | Adjust sound balance in menu. |
Check whether computer sound control panel only sets up one sound channel. | |
Check whether audio line is connected correctly. | |
HDMI output without sound | Check whether the external device is connected correctly. |
Maintenance
Proper maintenance can avoid many early faults and regular careful cleaning can make machine brand new. Please unplug power plug before cleaning and maintenance, to prevent electric shock.
Clean screen
Please mix and stir even a little fabric softener or tableware detergent with alcohol.
Please use a soft cloth to be completely soaked in the mixture.
Please take out cloth and twist to half dry state to wipe machine screen.
Repeat for several times, pay attention not to squeeze water flow into machine when wiping machine.
Clean face frame
Please use dry, soft, lint-free cloth to wipe front frame.
No use of machine for a long time
In case of no use of machine for a long time, such as holiday, please make sure to unplug the plug to prevent any possible dangers caused by power supply ripple from lightning.
NOTE: The terms HDMI and HDMI High-Definition Multimedia Interface, and the HDMI Logo are trademarks or registered trademarks of HDMI Licensing LLC in the United States and other countries.